Assignment Board
The Assignment Board is the planning board function of Ostendo. It has principally been designed to be used in conjunction with Freeway, however can still be used without Freeway as a simple way of assigning work to Employees or Assets.
You can use this screen to create and schedule assignments for Jobs, Assemblies, Sale Deliveries, Sales Orders, Ticket Actions, and Activities.
For example, Job or Assembly tasks can be assigned to resources like employees, contractors, plant equipment, vehicles, etc. These assignments can be scheduled or re-scheduled when required.
The Ostendo Assignment Board has the additional dimension of evaluating requirements of a task against thecapabilitiesof the resource to ensure the correct resources are assigned to the task.
For example, if a job requires the use of a 10 ton truck which in turn requires a driver with a Class 2 licence, then these capability requirements are evaluated against the resources assigned. If the requirements are not met, the assignment is flagged as Planned (the assignment bar is highlighted red) and is deemed not available for dispatch until these issues are resolved.
Ostendo also allows you to set up "Blocked Times" for any resource (e.g. vacation time, system maintenance etc...). The Assignment Board will not allow tasks to be assigned to a resource during their blocked times.
When you click on Assignment Board, you will first be prompted to select a Profile Name. An Assignment Profile can be optionally linked to each Ostendo User as a Default Profile.
Profile Names are set up under the Assignment Profiles screen. This allows you to define what jobs or tasks, resources, departments etc that the user can manage through the Assignment Board. There are also further options and defaults that determine the display and behaviour of the board, some of these are:
- The default date horizon for both the days back and forward
- The definition of the 3 time scale buttons that allow the board to be displayed in a minute by view, right through to monthly buckets
- An auto refresh interval in minutes (if zero the auto refresh facility is deactivated)
- Conditions tab allowing for specific inclusions or exclusions to be defined (i.e. Employees, Departments, Job Types, Service Zones, etc.)
When the Assignment Board screen is displayed, the title of the screen isAssignment Boardwith theProfile namein brackets.
The Assignment Board screen is split into five main sections
- The Toolbars at the top of the screen
- The left panel shows the Resources (employees and assets)
- The main panel in the middle shows the assignments scheduled for each resource
- The upper-right panel shows a calendar for you to select the displayed time periods
- The lower-right panel (Un-Assigned Bookings) shows all Jobs/Tasks/Tickets/etc. yet to be assigned
You can resize the panels by clicking on the panel boundaries and dragging them to the required position
Toolbars
Days Back– Assignments will be displayed up to the specified number of days back.
Days Forward– Assignments will be displayed up to the specified number of days forward.
Refresh– Click this button to refresh the assignment board contents.
Auto Refresh– This toggles the activation of the auto refresh feature
Switch Profile– Allows the user to switch to another assignment profile
Resources
Group By– None / Resource / Date
Resources Layout Editor– This allows you to select or de-select any resource and place them in the desired order.
Resources per Page– Select how many resources to be displayed per page.
Employee- Tick to display Employees
Asset– Tick to display Assets
View
TimeLine Scale
Major Unit – can be Day / Week / Month / Quarter / Year
Minor Unit – can be Hour / Day / Month / Quarter
Time Step (in Minutes): (applies only when minor scale is in Hours ) can be 1 / 5 / 6 / 10 / 15 / 30 / 60 minutes (affects the number of segments in an hour)
Hour Width– Width of the Hour scale (in pixels)
Day Width– Width of the Day scale (in pixels)
Month Width– Width of the Month scale (in pixels)
Quarter Width– Width of the Quarter scale (in pixels)
Assignment Bar Detail: if Assignment notes available, this will expand the height of the bar to display the notes.
View Position– This gives the option to place the main panel either to theleftor to therightof the Calendar and To-Be-Assigned panels.
Display Mode
Resource– Displays the board with the employees or assets order based on the department sequence and then the resource calendar order
Order: Displays the board grouped by order number
Project: Displays the board grouped by project
Zone: Displays the board grouped by service zone
Publish
Print: the Assignment Board graphical screen
Email: the Assignment Board screen in various formats
Export– the Assignment Board screen in various formats
Reports– View and print related reports. Additional reports can be defined in the Report and View developer and linked to the Assignment Board via the specific screen drop down
Scale Buttons Shortcuts– These three buttons are shortcuts for what is set in the Assignment profile (Time scales, Steps, and widths). You can also specify a caption for each of these shortcuts.
Update Orders– Click this button to update any changes made to orders (dates and times). Unless this button is clicked changes to dates and times will not be reflected in the Job and Assemblies order screens.
Work Times– Clicking on Work Times will display only work times for each day. This is a toggle switch. Clicking it again will revert back to the previous setting. The work times are defined in the General-Settings-Work Times screen.
Work Days– Clicking on Work Days button will display only working days on the main panel. This is a toggle switch. Clicking it again will revert back to the previous setting. The work days are defined in the General-Settings-Work Times screen.
Highlight By–
Tracking Code: this will show the current Tracking Code colour for each assignment
Assignment Status: Blue = In-progress, Green = Completed, Red = capability not met, White = active assignment
Overdue: this will highlight the assignment bars in a yellow highlight colour that are overdue
Out of Sequence: this will highlight the assignment bars in a yellow highlight colour where the tasks/steps are out of sequence as defined in either the Job Tasks or Assembly Steps
Double Booked: this will highlight the assignment bars in a yellow highlight colour where the resource has been double booked
Shortages: this will highlight the assignment bars in a yellow highlight colour where there are material shortages for the orders they are linked to. A time picker will be popped up for the user to select a start date and time to be used as the starting point for the accumulative shortage check for assignments.
Display Actuals– This function allows you to display the actual times as read in from the Timesheet lines. There are a few options for actuals as determined via the Assignment Rules screen. The options are as follows:
Create New Actual Assignments: if this is set, then completely new assignment bars are created and displayed on the board, they are identified by a unique bar icon and are always green in colour. These actual bars are either displayed in the same row as all other current assignments for that resource, or are displayed in their own row as determined by the Assignment Rule – ‘How Timesheet Entries are shown on the board if displayed’.
Update Existing Assignments: if this is set then the specific assignment bar is updated in duration and status (completed) by the timesheet posting. There is another rule that can be set if this option is used, and that is the shift assignments logic. There is the ability to have all subsequent assignments for the same resource to shift by the same offset that the updated assignment was either late or early.
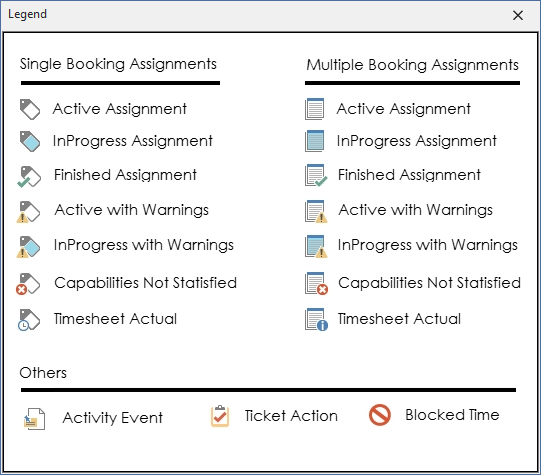
Legend –This displays a legend of the possible icons shown on the assignment bars and what they indicate.
Changes –This button will only appear if the mobility module is being used (by defining employees in Employees Mobility Settings screen – making sure the Service Sheet is activated), the employee has synchronised at least once with Ostendo Freeway, and there have been changes to his or her schedule since they last synchronised. On clicking the button a drop down of the employees where changes have occurred since they last synchronised – with ability to display those changes.
Filter By– Use this function to filter assignments byCustomer/Job Order/Sales Order/Assembly Order/Resources without Assignments/Resources with Assignments. For example – filtering by Customer allows you to focus on all assignments related to a particular Customer. Filtering will prompt you to enter the specific customer name or order number for the above. There is also the ability to filter the board by Resources with or without assignments (a date range is prompted if this option is selected); this is useful where there are a large number or employees or assets and filtering out who or has not got work assigned could be very time consuming otherwise.
Toolbar Shortcut Buttons: These shortcut buttons allow you to open the following screens:
- Customers
- Employees
- Job Orders
- New Job
- Call Centre
- Activity Calendar
Main Panel
The Main Panel shows all Assignments scheduled for the period displayed and the profile definition.
Navigation of the Main Screen
Creating Assignments and Resource Allocation
Assignment bookings can be created 3 ways:
Dragging and Dropping: from the Un-Assigned Bookings list you are able to either singularly select or multi-select and then drag and drop onto the appropriate employee or asset and the booking (or bookings) will be displayed immediately. The duration of the booking is determined by the assignment rules (Job Duration style, Assembly Duration style or the default minutes for each booking type).
Using the Job or Assembly Schedule Buttons: These buttons will appear at the top of either the Job or Assembly Un-Assigned lists based on the Assignment Rules – Assembly Schedule Button Logic or Job Schedule Button Logic. They allow the bookings to be created either by selecting a single or multiple list items, and then clicking on the button: this will in turn create the bookings based on predetermined resources in the Job or Assembly order.
Automatically from the Job Task Resources: Assignment bookings will be automatically created from the Job Resource tasks if the Assignment Rule – Auto Create Assignments from Job Tasks is selected.
Displaying the Booking Details
The assignment booking details can be displayed by double clicking the on the assignment, where upon anAssignment screenwill be displayed with the following:
Header tab– this provides a summary of the booking and the ability to override the subject displayed in the assignment bar. Although there are default subject and location captions for all the assignment types there is the ability to define custom labels from field values (i.e. Phone number, Contact Name, Required Date etc ) via the Requirement-Settings-Assignment Captions screen.
ID:Assignment ID
Type: Assignment Type (eg: Job, Assembly, Delivery etc..)
Start Time: Assignment Start Date and Time
Finish Time: Assignment Finish Date and Time
Status: Assignment Status: These statuses are automatically maintained by Freeway and Ostendo, however you can right mouse click on the Assignment Booking and Manually change this if necessary.
Active(White Tag) Default setting when booking is created. This indicates the booking is awaiting the Freeway user toaccept the Order booking from within Freeway
InProgress: (Blue Tag) Indicates the Freeway user has selected this Order in Freeway and created a Datasheet
Finished(Green Tick) Indicates the Freeway user has sent back the Datasheet to Ostendo
Description
Assignment Subject: This is the Subject data that will be shown in Freeway against this booking. The information displayed here can be controlled by the use of Assignment Captions.
Assignment Location: Job = Customer Name, Assembly = Parent Item Code, Delivery = Customer Name, Ticket =Customer Name
Override Subject: Tick the box and key in a new Subject. This will override the Subject generated above
Settings
Can't be Split: Assignment cannot be split to other resources.
Fixed Time Slot: This is only used if Employee Mobility Settings - Assignment Move Rules are in use. If a preceding Assignment is started at a different time to when it was originally booked for, any Assignment booking times after that point are adjusted accordingly, however those Assignments marked as 'Fixed Time Slot' will not be changed.
Schedule Following Assignments (Button): Use this button to schedule the follow-on assignments when the current assignment is delayed.
Undobutton.:Use this button to undo the above scheduling.and return to original.
Information
Bookings: Summary of all the bookings linked to this assignment.
Resources: Summary of all the resources linked to this assignment.
Warnings: Summary of all warnings applicable to this assignment.
Shortages: Summary of all shortages in this assignment.
Capability Satisfied: Ticked indicates that all required capabilities for this assignment are satisfied.
Required Hours: Summary of required hours.
Booked Hours: Summary of booked hours.
%: Percentage of Required / Booked hours.
Bookings tab– this displays the order(s) or activity(s) that this assignment booking is linked to. There is the ability to add or subtract others (as long as they are the same assignment type) from there.
Booking Type: Job, Assembly etc..
Booking: Assignment Subject Information eg: Job Number and Task, or Assembly and Step
Description: Job = Customer Name, Assembly = Parent Item Code, Delivery = Customer Name, Ticket = Customer Name
Required Date: Order or Action Required Date
Resources tab– this displays the resources (either employees or assets) and provides the ability to add or subtract others. There is also the ability to De-Couple the resource from the others, by this we mean if that resource is moved or there duration is altered it doesn’t affect the other resources (by default all resources are moved and their duration are synchronised when any one of them is altered).
Resource Type: Employee or Asset of the Booking
Resource Name: Employee or Asset Name of the Booking
Start: Start Date and Time for the Booking
Finish: End Date and Time for this Booking
De: Coupled: Ticked or Unticked. A De-Coupled Assignment Booking allows you to independently move assignments for multiple resources on this one assignment. NB: Even though the Assignment is split over different resources, there is still only one assignment, which means if you move one assignment the other will also be moved. De-coupling allows you to move them so they have differing start and finished time, whilst still having the same Assignment.
Capability Required tab – this displays the capabilities required for the assignment booking and then dynamically compares these to the capabilities held against the resources (defined against the Employees or Assets screens) and if the capabilities required are not satisfied by the linked resources then the booking is deemed to be planned (not Active) and there for not available to be dispatched to the mobile or factory workforce (if using Ostendo Freeway planned assignments are not deployed). The assignment bar is a red colour and displays a specific icon to highlight the issue. Required Capabilities can be added, modified and subtracted at the specific assignment booking, if required.
Capability Name: This is the specific Capability required for this Order, Task or Step
Capability Type: This is the Capability Type linked the the Capability that is required
Capability Qty: This is the Qty required for this Capability
Source: eg: Job, Dependant, Manual
Warnings tab: This displays any warnings generated for this assignment booking. The types of warnings indicated are defined against the assignment profile.
Message:
Overdue= indicting this booking is beyond the order Required Date.
Double Booking= indicating this same Job Task / Assembly Step is already booked against the same Resource
Out of Sequence= indicating this booking is booked for a time out of sequence to that Task or Step. eg: Sequence 20 has been booked before Sequence 10
From Type: Job, Assembly etc..
From Name: Order Number, Task or Step etc..
Shortages tab– this displays any specific shortages for the assignment booking. The Highlight by-Shortages needs to be run for these to be current.
Item Code: The Item Code on the Order where there is insufficient available inventory
Description: Item Description
Required Qty: Required Qty on the Order
Available Qty: Total Available Inventory for that item (ie: On hand Qty - Demand + Supply)
Shortage Qty: Required Qty minus Available Qty
Unassigned Bookings (Lower Right hand Panel)
Assignments can be created by dragging the selected orders/items from these lists and dropping them into the Main Panel.
Search field: to help find Jobs, Assemblies, etc... from the Unassigned list.
Jobs tab: list of unassigned Job Orders
Assemblies tab: list of unassigned Assembly Orders
Deliveries tab: list of unassigned Deliveries
Sales tab: list of unassigned Sales Orders
Tickets tab: list of unassigned Tickets
Blocked Times: list of standard, pre-defined Blocked Times that can be assigned to any resource at any time.