|
|
|

Workflows
Workflows are user-defined graphical representations of Operational Activities, Training Guides, Installations Guides, KPIs, etc. The Workflow itself can include interaction with Ostendo such that clicking on a Graphical object takes the User directly to a Screen, Report, or View in Ostendo. Additionally, the object can be linked to Custom Menu Scripts that can perform Customised Activities. These activities can be refreshed automatically or each time the object is selected
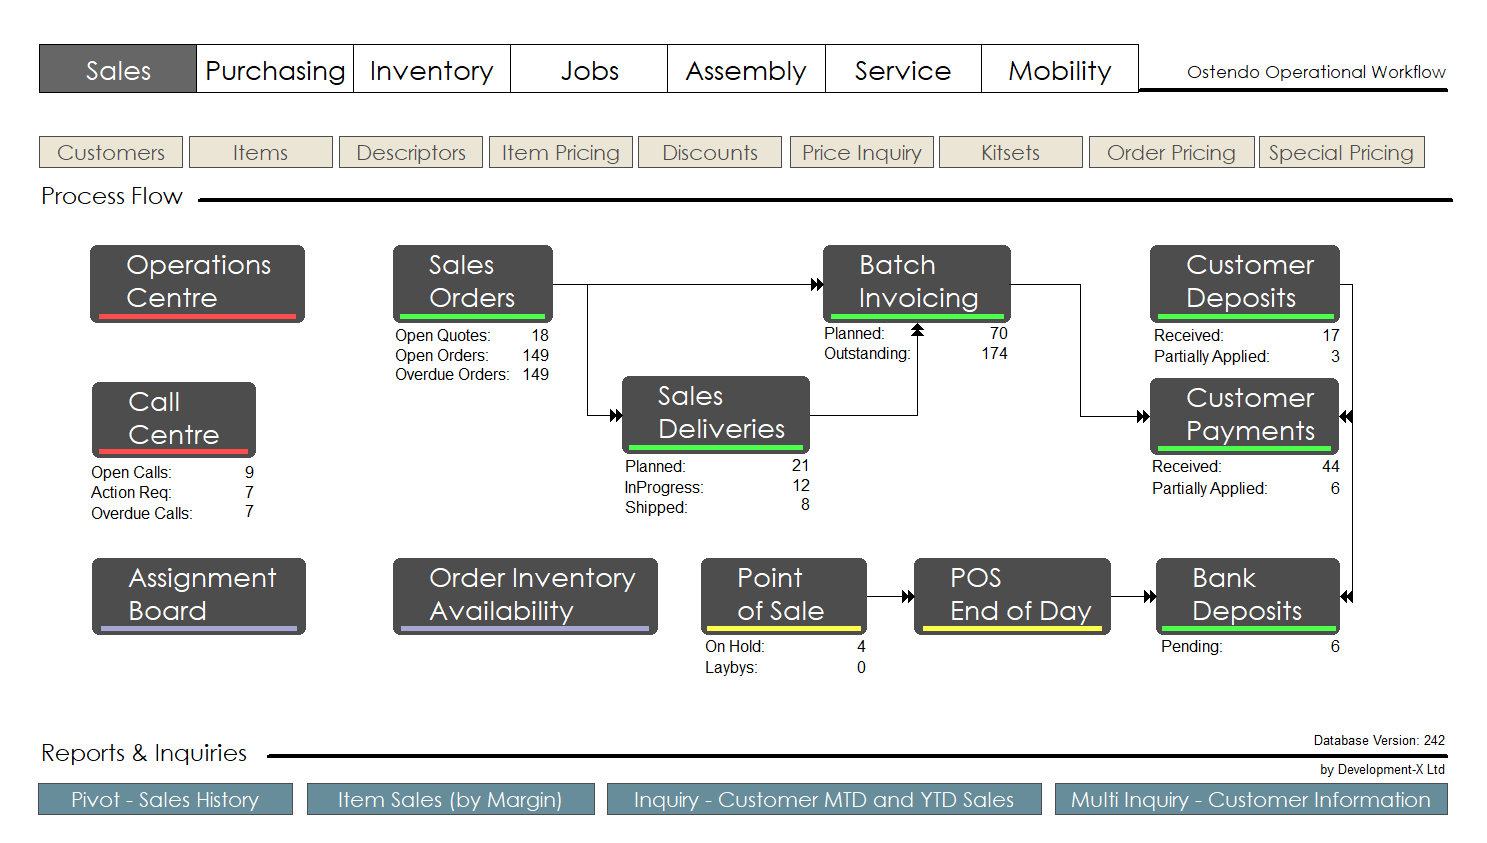
Below is an example of what a Workflow lookup like. Each button is assigned to a respective option or module and therefore behaves simply as a shortcut.
Sales Workflow Example:
A separate Graphical Designer is available for the User to create the Workflows. The option for a User to see Workflows is defined against the User’s Security and Options record. (See File> System Configuration> User Security and Options).
Once linked to a User the Workflow will be available for viewing on the User’s Desktop where the following facilities are available:
Right Mouse on an Object
Assign Function: If this is selected then you can select any Menu Item (For example: Selecting Sales>Settings Customer Types) and that selection will be linked to this Object. If you now click on the Object the linked screen will be presented.
You may link any Screen, Report, View or Custom Menu Script (available to the User via User Security settings) to an Object
Object ID: This is available for the Advanced User who may wish to use scripting to activate functions within it. For example: The object could simply be a KPI Text in which the KPI variable is calculated and amended within the script by referencing the Object ID.
Link to Another Workflow: A panel will appear where you can point this button to another Workflow. Subsequently, whenever this object is selected the linked workflow will replace the currently viewed Workflow
Right Mouse away from an Object
Refresh: The current Workflow is loaded ‘into memory’. If you make any changes to the Workflow via the Graphical Editor then you should not only save the changes in the Graphical Editor but also select this ‘refresh’ option to reload the saved Workflow.
Move/Resize: With this selected you have the facility to move and resize any object on the Workflow to suit your requirements.
|
• |
To move a group of Objects simply place the cursor to (say) the top-left of the Group and drag the cursor to form a rectangle around the Group. You can then move the Group as required. |
|
• |
To move selected objects ‘in unison’ Shift/click on each object and they will move as one. |
Select Move/Resize again to exit this function
You should note that this action only adjusts the Workflow ‘in memory’ and does not affect the originating Graphical Design.
Edit Workflow: If this is selected then the Graphical Editor will be resented showing the current Workflow. You can make changes to the Workflow as described in the Graphical Designer Tutorial. You must ‘Save’ the changes for them to be effective. Having saved the Workflow source you now need to ‘Refresh’ the Desktop to bring the changes into ‘memory’
Load From File: With this feature you can locate and use other Workflows. You should note that the current selected Workflow will become the default Workflow to be used the next time you sign onto Ostendo