|
|
|

Ostendo Setup
The following areas need to be set up in preparation for the integration with Sage Evolution Live:
|
• |
Systems Settings - Accounting Link tab |
|
• |
User Security and Settings - User Options tab |
|
• |
General Ledger Settings |
|
• |
Tax Codes |
|
• |
Cost Centre - Xero GL Codes mapping |
|
• |
ExternalLedgerTypes table |
SYSTEM SETTINGS
For integration with Sage Evolution Live, the following items must be specified in File --> Systems Configuration --> Systems Settings - Accounting Link tab:
|
• |
Accounting Link Style: Sage Evolution Live |
|
• |
Posting Frequency: Minimum 5 minutes. |
|
• |
Cutover Date: The date from which transactions will be posted to Evolution. Please set this date correctly. |
|
• |
Timeout (min): This should be set to 120 minutes. |
|
• |
Retry Count: Recommended 1 or 2 retries when there are connection failures. |
|
• |
External Accounts Receivables: Ticked. |
|
• |
No External Payments Returned: Tick this box if you want payments to go in one direction only - i.e. from Ostendo to Evolution. |
USER SECURITY & SETTINGS
In File --> System Configuration --> User Security and Settings - User Options tab, there is this option:
|
• |
No External GL Posting |
At least one Ostendo user must have this option UNTICKED (if you are not using Queue Services to initiate posting). When there is one or more users (with this option unticked) logged in, then the automated posting process will be active.
If this option is TICKED for every Ostendo user, then the automated posting process will not be active. This is one way to temporary stop posting to Evolution (if required).
Alternatively, you can use Queue Services to initiate posting of batches as per your set Posting Frequency. All you need to do is to create a user (say QS) and have this No External GL Posting option unticked for QS (but ticked for all other users). Then when the Queue Service is started, the financial transactions will be posted across to the Accounting system as per the Posting Frequency.
When using Queue Services in this manner, you would need to go to File --> AccountingLink to check if there are any failed batches .
Activate posting only when all the other integration setup tasks are completed.
GENERAL LEDGER SETTINGS
In File --> Financial Configuration, go to GeneralLedgerSettings and add a record. Fill in the following:
|
• |
Accounting Link : Sage Evolution Live |
|
• |
Common Connection : This should be in the following format: |
DBCommonConnection=server=servername\SQLname;initial catalog=EvolutionCommon;integrated security=false;MultipleActiveResultSets=True;User id=sa;Password=your_sa_password;
|
• |
Username : Not used. |
|
• |
Password : Not used. |
|
• |
API Token : Not used. |
|
• |
Database Connection : This should be in the following format: |
DBConnection=server=servername\SQLname;initial catalog=databasefilename;integrated security=false;MultipleActiveResultSets=True;User id=sa;Password=your_sa_password; Provider=ODBCdrivername;
|
• |
Version : This is a display only field to show what version of the posting script you are currently using. |
|
• |
DebugMode : Ticking this will produce a debuglog file in Ostendo folder each time a batch of transactions is posted. This is useful during initial stages of integration to resolve any teething problems. Can be turned off after the integration is running smoothly. |
|
• |
Database path : This is a display only field to show which database you are actually connected to. |
After filling in the required fields, click on the Update button. This will download the required integration scripts from Development-X Limited. You will see that the version field will be updated when this completes.
Next, click on Connect button to test that you can actually connect to your Evolution file.
Next, click on the Import button, and select GL Codes. This will import the General Ledger Accounts Codes from Evolution. These will be used to map to the Ostendo Cost Centres later.
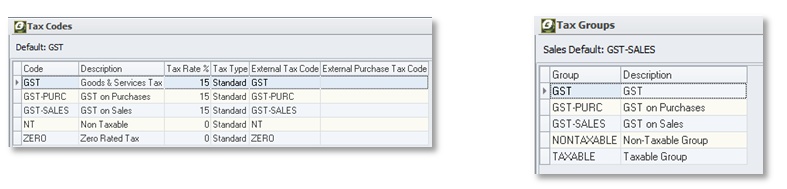
TAXCODES
Go to File --> Financial Configuration and select Tax Codes. Setup the appropriate Ostendo Tax Codes with the Tax Rate %. Enter the appropriate Xero External Tax Code (Income) along with the External Purchase Tax Code (NB: These are case sensitive)
This means that one Tax Code in Ostendo can be set for Sales and Purchases, and Ostendo will post it to the Xero External Tax Codes specified here.
Now setup up Ostendo Tax Groups and Matrix.
Ensure Ostendo Tax Codes are defined in Evolution.
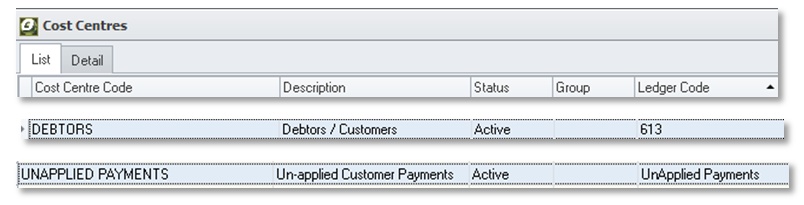
COST CENTRES
Go to General --> Cost Centres. From the detail screen of each Cost Centre, select the appropriate Evolution GL Account from the lookup
If you are using Project Codes in Evolution, you can also map the default Project Codes (Financial Category) to the corresponding Ostendo Cost Centre codes.
EXTERNALLEDGERTYPES table
This Ostendo table is required to be populated with all Payment Types defined in Evolution’s Accounts Receivable module. This includes payments and refunds.
The AccountingLink will only process payment/refund types defined in this table.
Relationship between JournalType Invoice Payment in Ostendo and Evolution’s AR Transaction Types:
Each Transaction Type in Evolution AR has a Credit Ledger Account and Debit Ledger Account.
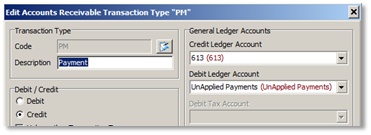
The Payment Type is then defined in the EXTERNALLEDGERTYPES table like this:
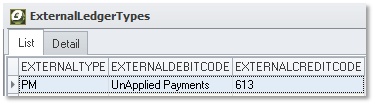
For this example, when an Invoice Payment journal is created in Ostendo, it will debit UNAPPLIED PAYMENTS and credit DEBTORS. The UNAPPLIED PAYMENTS cost centre should be mapped to UnApplied Payments and the DEBTORS should be mapped to 613 (Debtors)
Ostendo setup is now complete.
At this point you may want to import Customers and Suppliers from Evolution into Ostendo (or export them from Ostendo to Evolution).
You can do so by going to File --> Financial Configuration and selecting General Ledger Settings. Click on the Import button to import or the Export button to export.