Inventory Count
The Inventory Count process in Ostendo creates a 'Snapshot' of the Stock on Hand at the point the Count is initially generated. This enables you to continue recording transactions that are timed after the physical count. Preparation is important before you generate a Count. Your paperwork ('Stock records') must be up to date to the point of the Count DateBEFOREyou generate the count. The reason for this is when the Count is generated, Ostendo records the Qty On Hand at that moment in time. After the Count Qty's have been entered against the lines in the Count, Ostendo will generate Variances between the recorded Qty on Hand (from the snap shot) and the Physical Count results entered.
Below is a Flowchart showing a suggested process for Inventory Counts
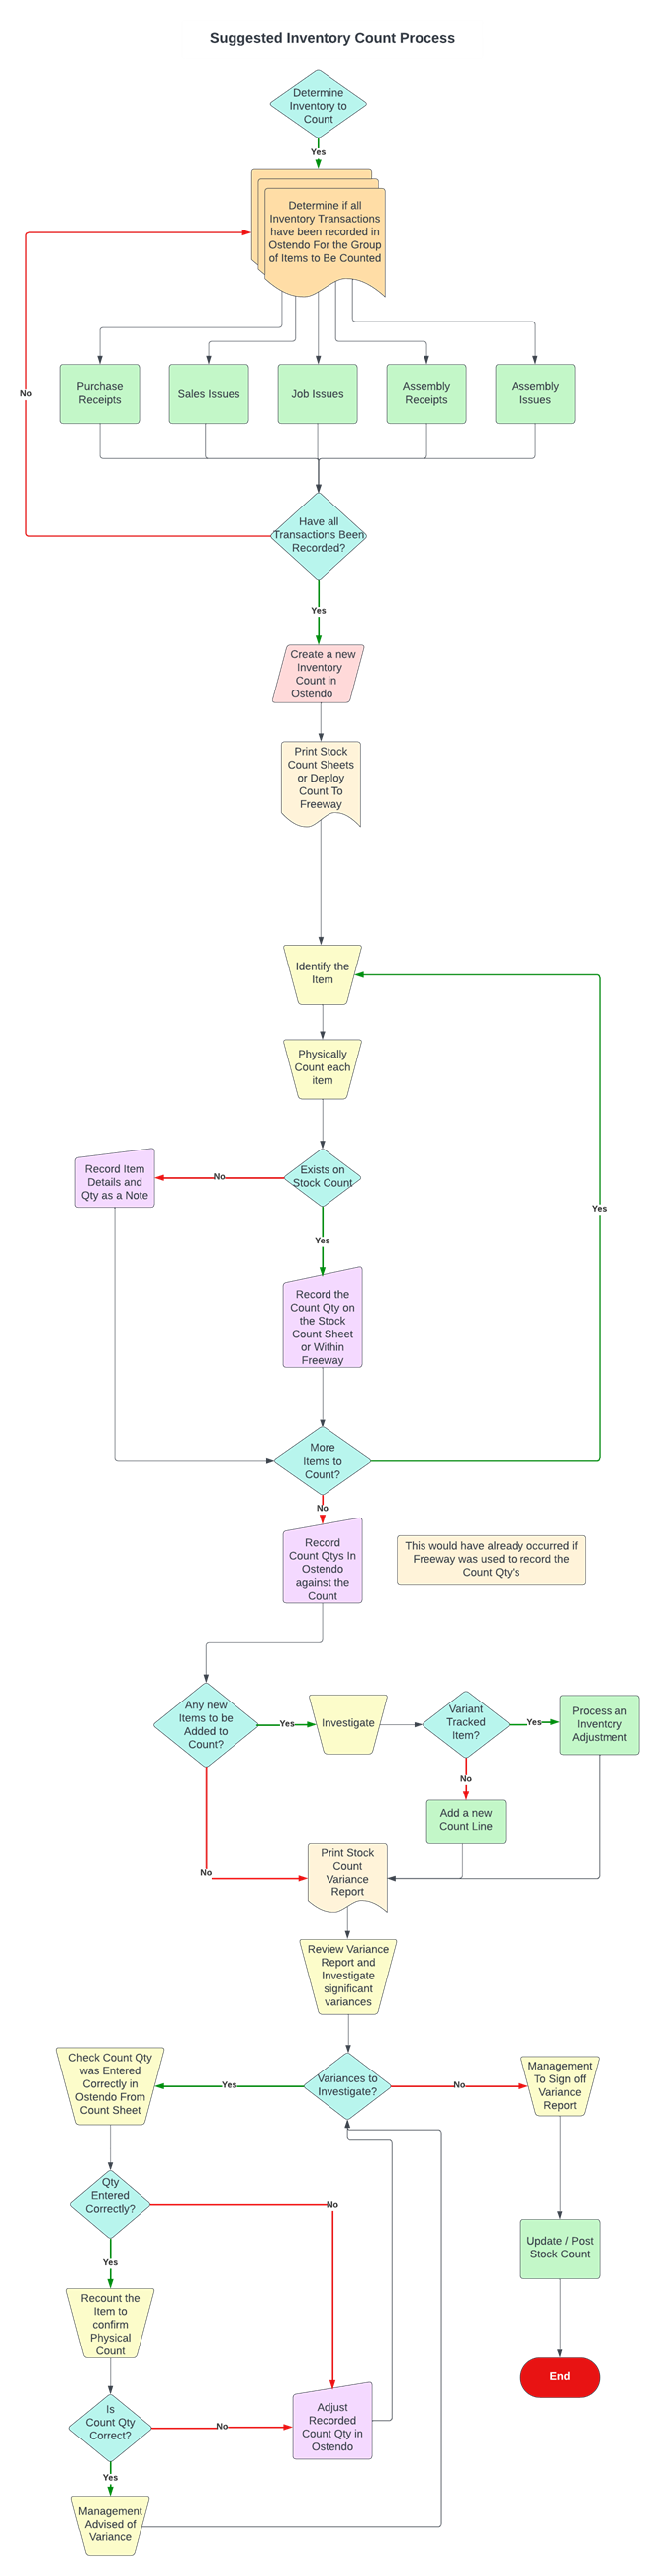
This screen enables you to carry out stock counts on all, or selective areas, of your Inventory. The Inventory Count process comprises the following Steps
- Create an Inventory Count Batch and identify the selection criteria
- Generate the Lines from the selection criteria
- Print the Check Sheet
- Update the Batch Lines with the counted stock
- Add lines where Item found that was not expected
- Go back to the Batch Header
- Update the quantities against lines that have been flagged as ‘Counted’
List Tab
Display fields
Count No: This is the Inventory Count Reference Number as generated by Ostendo and provides a unique reference to the Count Batch.
Reference: The Reference attached to this Count Batch as entered into the Details screen,
Status: The status of this Count Batch. There are two statuses (In Progress and Updated), which are maintained by the program.
Count Date: The date when the Count Batch was created.
Data Display Options
Field Position: On the List screen you can move the field position by dragging the column heading left or right to the position where you want it to appear.
Filtering and Sorting: If you ‘check’ the checkbox then the displayed data is available for filtering and sorting:
- To sort the data in a selected column simply click on the column heading. Clicking against will sort in descending order.
- Click on the black ‘down arrow’ to the right of your selected column heading and you can either select a specific entry to display all records containing that entry, or you can select (Custom ) to enter detailed selection criteria.
Include Updated Status: By default the display will only show Batches that have not been updated. If you wish to see all batches including those that have been updated then ‘check’ this checkbox.
Searching: If you enter some text into the ‘Search’ field and click on the ‘binoculars’ Icon then all records will be interrogated and those records that contain the entered text will be displayed. To revert back to displaying all records click on the ‘Eraser’ Icon
Buttons
Close: This will close the Count screen. If you have any unsaved data then you will be asked if you wish to save it before the screen is closed.
Add: This will bring up the ‘Detail’ tab for entry of a new Count Batch.
Save: Not applicable to the List panel
Cancel: Not applicable to the List panel
Delete: This only becomes ‘active’ when linked to a Count Batch with status ‘In Progress’. In this instance it enables you to delete the selected Batch.
Related: This will bring up a list of functions that are related to Inventory Count. You may open and maintain information in those screens whilst still remaining in the Inventory Count screen.
Reports: This will bring up a list of Reports that are related to Inventory Count. You can immediately run the report whilst still remaining in the Inventory Count screen.
Detail Tab
This tab enables you to create and maintain a Count Batch Header.
When the Count is initially created, Ostendo will record the Qty on HandAT THAT MOMENT IN TIMEagainst the Count. This is irrespective of the Count Date manually entered against the Count
Entry and Display fields
Count No: This is a unique number automatically allocated by the program. It cannot be amended.
Status: This is the status of the Count Batch and is maintained by the program. The displayed variants are:
In Progress: The Count Batch is still being worked on
Updated: The Count Batch has been ‘Posted’ and Stock variances have been created for the included Items
Reference: Enter a brief description of the Count Batch. No validation checks will be carried out on this field.
Count Dates:
Count Date: This is prefilled with the system date. It can be amended at any time up to Posting the Batch by entering the date or by clicking on the drop-down menu and selecting the date.
This dateONLYcontrols the date of the resulting inventory transactions and financial postings of any variance adjustments (ie: Qty On Hand when Count was first created Vs Counted Qty)
Updated Date: (Display Only) This displays the date the Count was updated and is only updated when the Count is Posted.
Mobility Restriction:
Mobility Team: (Optional) Select the Mobility Team name if you wish to restrict this count to be carried out only by a certain Team.
Prevent Mobility Editing: Tick this box when you are in the process of reviewing the Count before posting it to update the Inventory records. (You don't want anyone to change the data when you are about to post it.)
Inventory Quantity Restriction:
Count Style: From the drop-down list select the Items to be included in the list. The Options are:
Count Update:
Update Counted Inventory Lines: This button should only be selected when you have entered and are happy with your count results and wish to update the count itself. Selecting this Button will first ask you to confirm the update and then post the ‘checked’ variances to Inventory with a Transaction Type of ‘COUNT’. The Count Updated Date field will be updated with the system Date and the Count Batch status will be changed to ‘Updated’.
Count Selection: The following selection criteria can be entered to restrict the Items that will appear in the Count Batch.
- For Site:From the drop-down list select the Site if you wish to restrict the Count to a certain site. (Ensure an Item Site Settings default Warehouse / Location record is set up for each item.)
- Warehouse:From the drop-down list select the ‘From’ and ‘To’ Warehouse Range. If nothing is selected then all warehouses are assumed.
- Location:From the drop-down list select the ‘From’ and ‘To’ Location Range. If nothing is selected then all Locations within the Warehouse Range is assumed.
- Location Group:From the drop-down list select the Location Group if you wish to restrict the Count to a certain Location Group.
- Location Sequence Range:Enter the ‘From’ and ‘To’ Location Sequence Range if desired.
- Category:From the drop-down list select the ‘From’ and ‘To’ Item Category Range. If nothing is selected then all Categories will be assumed.
- Sub Category:From the drop-down list select the ‘From’ and ‘To’ Item Sub Category Range. If nothing is selected then all Sub Categories will be assumed.
- Item:From the drop-down list select the ‘From’ and ‘To’ Item Range. If nothing is selected then all Items will be assumed.
- Primary Supplier:Select the Primary Supplier if you wish to count items from this Supplier only.
- Cycle Count Code:Enter the Cycle Count Code to restrict the batch to those Items that are linked to this Code. If nothing is selected then all Codes will be assumed.
- ABC Classification:From the drop-down list select the ABC Code to restrict this batch to those Items that are linked to this Classification. If nothing is selected then all Classifications will be assumed.
Generate Inventory Count Lines: When this button is selected you will be asked to confirm the above selection criteria. If you accept the setting then the program will generate count lines. The routine will create Lines within the above parameters but will exclude any Items within the selected Warehouse(s) that currently exist in other Inventory Counts whose status is ‘In Progress’. The generated lines can then be viewed on the ‘Lines’ tab
Notes: Extended Notes for your own information can be attached to this Count Batch. Whenever you click on this field an icon will appear in the top-right. By clicking on this Icon you can bring up the Frequently Used Text table. Select the text to be copied and either press the OK Button in that screen or double-click the selected record.
Recorded Notes: This blob field is used to store notes recorded when the Count is performed using the the Freeway Mobility app.
Buttons
Close: This will close the Inventory Count screen. If you have any unsaved data then you will be asked if you wish to save it before the screen is closed.
Add: Not applicable to the Detail panel
Save: This will save the current data without exiting the screen
Cancel: Any changes made to the current Count Batch Header record or the last time the ‘Save’ Button was pressed will be lost.
Delete: Not applicable to the Detail panel
Related: This will bring up a list of functions that are related to Inventory Count. You may open and maintain information in those screens whilst still remaining in the Inventory Count screen.
Reports: This will bring up a list of Reports that are related to Inventory Count. You can immediately run the report whilst still remaining in the Inventory Count screen.
Lines Tab
This tab enables you to add and maintain Count lines. The Count Batch Number and status will be displayed at the top of the panel.
Entry and Display fields
Warehouse: The Warehouse where the Item is currently stocked. It can be amended if the stock was found to be in another Warehouse.
Location: The Location in the Warehouse where the Item is currently stocked. It can be amended if the stock was found to be in another Location.
Item Code: Display only field showing the Item Number at this location
Unit: Display only field showing the Unit of Measure of the Item at this location
On: Hand Quantity: Display only field showing the current On-Hand quantity at this location
Count Qty: Enter the quantity that you counted at this location.Note:- If the Item has variants (Serial Number, Batch Number, etc) then each variant will have its own line in this check list. Ensure that you are updating the correct line
Variance: Display only field showing the variance between the current Oh-Hand quantity and the Counted Quantity.
Counted: Display only field showing this Item at this location has been counted. This function enables filtering of all uncounted lines.
(Variants): Where an Item has Variants then each occurrence will be displayed along with the content of that variation. Variations can cover
- Serial Number
- Batch Number
- Expiry Date
- Revision Number
- Grade
- Colour
- Size
Category: Display only field showing this Item's category.
Sub Category: Display only field showing this Item's Sub-category.
Buttons
Close: This will close the Inventory Count screen. If you have any unsaved data then you will be asked if you wish to save it before the screen is closed.
Add: This will allow you to enter Items that were not originally included when the Count was generated. Typically this would be used in situations where an item was physically counted but was not included in the generated Count. A thorough investigation of the item should be undertaken before simply adding a new Item to a count.NB: Any variant tracked items (eg: Serial Numbered, Batch Tracked etc.). that do not exist in the count must be added to stock via an Inventory Adjustment Transaction
Save: This will save the current data without exiting the screen
Cancel: Any changes made to the current Count Batch Lines record or the last time the ‘Save’ Button was pressed will be lost.
Delete: This will delete the current highlighted line from this list
Related: This will bring up a list of functions that are related to Inventory Count. You may open and maintain information in those screens whilst still remaining in the Inventory Count screen.
Reports: This will bring up a list of Reports that are related to Inventory Count. You can immediately run the report whilst still remaining in the Inventory Count screen.