Panel Viewing Options
All of the main ‘List’ and 'Lookup' panels throughout Ostendo have some - or all - of the following to provide a best possible viewing option to suit the end user
Displayed fields. The displayed fields are taken from the master record to which the List or Lookup applies. The selection of which fields to display is at the user’s discretion. To select the fields to display simply ‘right mouse’ in the main panel and select ‘Customise Fields’.
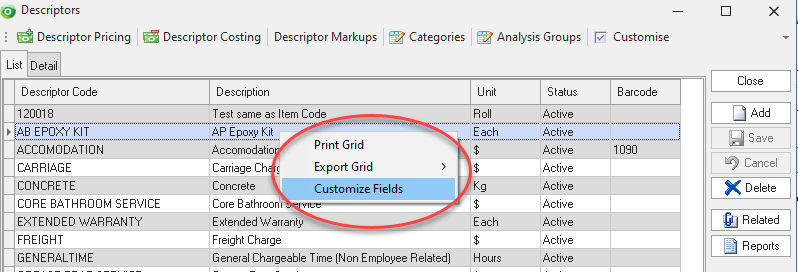
If this option is not displayed then you don't have the rights (on your User Security and Options screen found underFile> System Configuration) to make these changes. On the displayed panel you can:
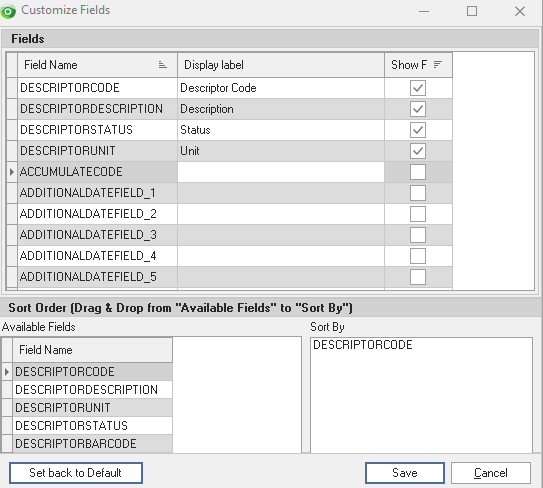
- Click on the ‘Show field’ checkbox to display the field
- Amend the column heading by changing the content of ‘Display Label’
- Define the sort sequence of the records by going to the lower panel and dragging the field from ‘Available Fields’ to ‘Sort By’.
- Click the ‘Save’ Button when done.
Field Position: Field positions can be adjusted as follows:
- On List screens you can move the field position by dragging the column heading left or right to the position where you want it to appear.
- On 'Lookup' screens you can adjust the field position as described but the positions will not be retained when you exit the screen. To retain a permanent adjustment in 'Lookup' screens you should 'right-mouse' and select 'Customise Fields'. In the upper area of the displayed panel simply drag and drop the field to the display sequence required.
Filtering and Sorting: If you ‘check’ the checkbox then the displayed data is available for filtering and sorting:
- To sort the data in a selected column simply click on the column heading. Clicking against will sort in descending order.
- Click on the black ‘down arrow’ to the right of your selected column heading and you can either select the specific entries to display records containing that entry, or you can select (Custom ) to enter detailed selection criteria.
Searching: If you enter some text into the ‘Search’ field and click on the ‘binoculars’ Icon then all records will be interrogated and those records that contain the entered text will be displayed.
If you enter multiple words into the ‘Search’ field then the interrogation will look for all records containing either word. If you enter multiple words enclosed in ‘double quotes’ then the search will look for the combined words as they appear within the quotation marks.
If the ‘Advanced Searching’ option is ‘checked’ in System Settings (File> System Configuration> System Settings) then, in the following screens, an additional facility is provided to search the content of all Properties linked to the master record in addition to searching the fields currently displayed in the list.
- Assembly Order
- Customer Assets
- Customers
- Descriptors
- Items **
- Job Orders
- Labour Codes
- Purchase Orders
- Sales Orders
- Supplier Codes
- Warehouses
- Inventory Availability
Additionally the Advanced Search for Items will also address the linked Supplier records and search a Supplier’s Part Number
Other Options: If you right-click on any column ‘Heading’ a panel will appear that offers the following options. Note: Some options may be ‘greyed out’ because the above ‘Filtering and Sorting’ checkbox has not been ‘checked’.
Sort Ascending: The current column will be sorted into ascending sequence
Sort Descending: The current column will be sorted into descending sequence
Clear Sort: This will clear the sort sequence in the current column
Group By This Field: A ‘band’ will appear above the list into which the current field now resides as a ‘box’. The data in the main panel is grouped by this selection. If you click on the ‘+’ sign in the main panel then the group will expand to show all records in the group. Note that:
- You are not restricted to a single grouping in the top Group Box. I.e. You can have Groups within a Group.
- You can also ‘change’ the grouping sequence by simply ‘dragging’ one of the Group Boxes left or right as required
- If you ‘right mouse’ on a Group Box you will note that the option ‘Group by this field’ now reads ‘Remove from Grouping’. Select this to remove this Group Box and restore the details to the main panel
Group By Box: A ‘band’ will appear above the list. You can select and drag any column heading into this area where it will now reside as a ‘box’.
- If you ‘right mouse’ on a Group Box you will note that the option ‘Group by this field’ now reads ‘Remove from Grouping’. Select this to remove this Group Box and restore the details to the main panel.
- If you select the ‘Group Box’ again then it will not appear in the panel; however any Groupings will still be retained
Footer: A band will appear at the bottom of the display. Under each column - if you click the ‘right mouse’ - you have the option to display:
- Sum - The total of the values in the column (only if it is numeric)
- Max - The maximum value that exists in the column (only if it is numeric)
- Min - The minimum value that exists in the column (only if it is numeric)
- Ave - The Average of all the values in the column (only if it is numeric)
- Count - The Number of records in the column
- None - No value displayed
Group Footers: Similar to the above ‘Footer’ but the values appear at each ‘Group’ level
Remove this column: This will ‘hide’ the column from the current display. To restore the column select ‘Field Chooser’
Field Chooser: The fields displayed in the main panel are defined in the above ‘Displayed Fields’ option. Using this feature you can ‘Hide’ selected fields from those on display. When ‘Field Chooser’ is selected a small panel will appear. You can hide fields by clicking on the column header and dragging it to this panel. Restoring the field to the display is simply the reverse of this action
Best Fit: Selecting this will adjust the width of the selected column to that defined by the maximum width of the data entered into it, or the Column Title, whichever is the greater
Best Fit (All Columns): Performs the same function as ‘Best Fit’ on all the columns in the display