Freeway Installation and Setup Publication (Revision 1.0.1)
Step 3 - Mobility Employee Setup


All Mobility Employees must first be setup as Employees within Ostendo
Employee Setup:
Labour -> Employees
- Type the Employee Name
- Calendar Order controls the sequence this Employee will appear on the Assignment Board (if being used) (Ignore for this tutorial)
- No Scheduling indicates this employee will not be shown on the Assignment Board (Ignore for this tutorial)
- Assignment Image is displayed optional alongside this employee. (Assignment Board only). Different icons can represent different types of employees eg: Service Vs Installation etc.. (Ignore for this tutorial)

Employee Mobility Settings:
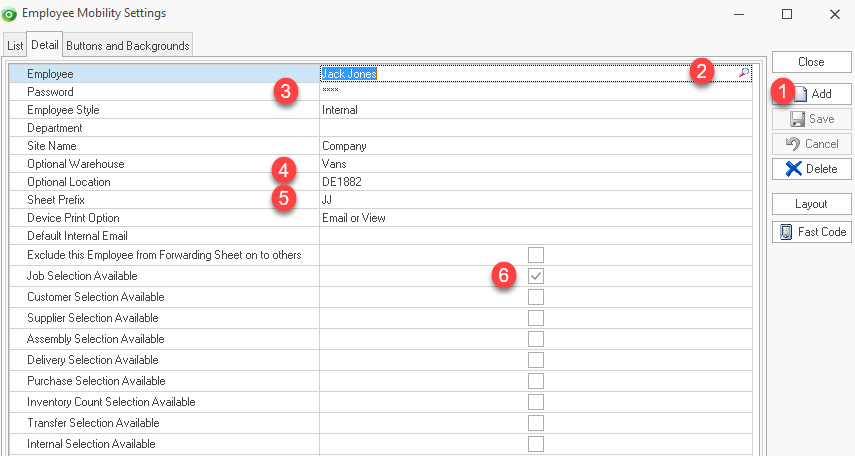
Mobility-> Employee Mobility Settings
Top Section of this screen..
- Click the Add button to add a new Employee
- Browse and select the Employee Name
- Type in an initial password of "pass" for the user (It is recommended the password is changed later by the Freeway user on the device)
- Browse and select a Warehouse and Location (This will be the default location that inventory is issued from when issuing Materials from Freeway.
- Type in a Sheet Prefix to be used. This must be a unique value. This is used by Freeway to prefix all Datasheets created by this employee.
- Tick the 'Job' Selection. This will allow the Freeway user to display all jobs deployed to them.

Lower Section of this screen - Device Tab..
- Click on the 'Device' tab and tick the Auto Synchronise Completed Data Sheets rule. This will instruct Freeway to automatically send back a completed Datasheet to Ostendo once the Freeway user has Completed the Datasheet. If this is Not ticked, any Completed Datasheets will only be returned to Ostendo when the Freeway user Synchronises Freeway (Standard or Re-Initialise Sync).

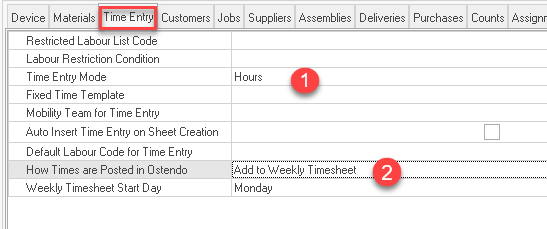
Lower Section of this screen - Times Tab...
- Click on the 'Time Entry' tab and select the Time Entry Mode of 'Hours' (This means the hours duration will be manually entered by the Freeway user when Times are recorded)
- Select Add to Weekly Timesheet to How Times are Posted in Ostendo. This means all timesheet hours recorded for this employee in the same week will be added to an existing weekly timesheet batch for that week. If one does not already exist, Ostendo will automatically create a new timesheet batch.

Lower Section of this screen - Jobs Tab..
- Click on the 'Jobs' tab and select the appropriate method for deploying Jobs to this Freeway user. We will use "Mobility Team" in this tutorial
- Tick Auto Sync the Job List when selected rule. This will instruct Freeway to perform a Live refresh of all deployed Jobs to this Freeway user when they press select the Job Lookup option within Freeway. If no internet connection is available, this will only show a list of the jobs based on the last time the list was refreshed. If this rule is Not ticked, the Job list will only be refreshed when a synchronisation is perform from Freeway. (It is recommended you turn this rule on for most situations)
