Step 5 - Define The Style Template & Matrix


- Style Template Setup
- Add Times Type to the Template
- Add Materials Type to the Template
- Add a Checklist Type to the Template
- Add a Images Type to the Template
- Add a Signature Type to the Template
- Add a Note Type to the Template
- Add a Job Workflow Tracking Code Type to the Template
- Add a Job Task Status Type to the Template
- Define the Style Template Matrix
The Style Template is the basis of the Datasheet created from within Freeway. You can have as many Style Templates as you wish. These Templates are linked to Datasheet Styles in the Style Template Matrix eg: Jobs, Assemblies etc..
For example when the Freeway user selects a Job from their Job List, Freeway will display a list of all available 'Job' Templates they can select from. The Freeway user would then select the appropriate Template for the work they wish to perform. Therefore you may have an Installation Template as opposed to a Servicing Template. This way the Template contains specific options eg: checklists etc.. for the type of work being carried out.
For the purposes of this Tutorial we will setup a Job Template containing a range of Template Types
- Times (Recording Time)
- Materials (Issuing of Items and Descriptors)
- Checklist
- Photo
- Signatures
- Notes
- Update Job Workflow Tracking Code
- Update Job Task Status
Style Template Setup
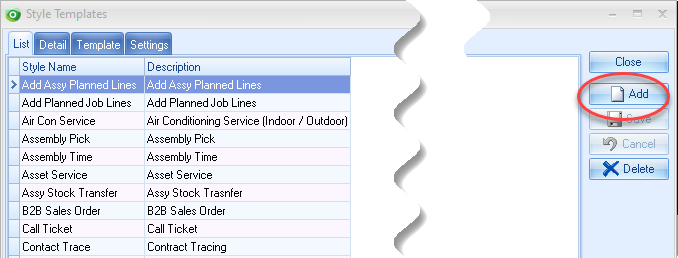
Mobility -> Style Templates
- Click the Add Button

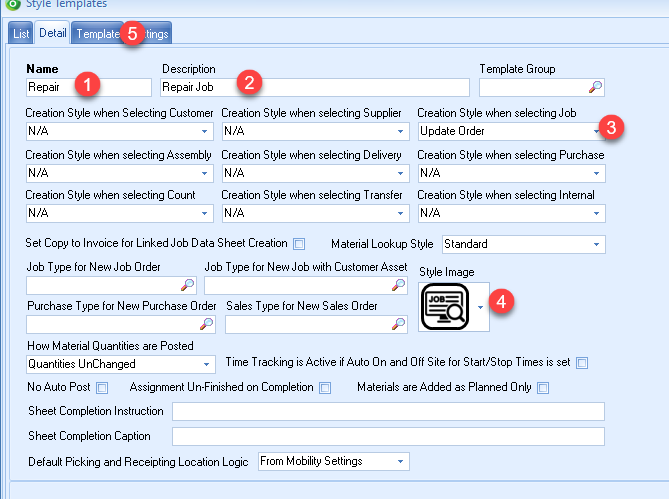
- Type a Template Name eg: 'Repair'
- Type a Template Description eg 'Repair Job'
- Select "Update Order" from Creation Style when selecting Job. (This will allow the data captured from Freeway to be linked back to the Job)
- Optionally select a Style Image from the drop down list provided. (This will appear in Freeway alongside the Template Name. Useful if you have multiple Style Templates)
- Click on the Template Tab

The Template Tab allows us to define the intended structure of the Datasheet.
Add Times Type to the Template
Press the Add button to add a new entry
This option provides the Freeway user the ability to record their times against the Job based on their Employee Mobility settings.
- Dropdown and select the Type of TIMES
- Tick the Include Print box. This will entry will then be available on the Service Sheet Printout if the completed Datasheet is printed from Ostendo.
- A Description (Employee Times) will be automatically added to this entry once the Save button or Add button is pressed. (This can be overridden)

Add Materials Type to the Template
This option provides the Freeway user the ability to issue Materials directly from the Warehouse / Location setup against their Employee Mobility settings.
Press the Add button to add a new entry
- Dropdown and select the Type of MATERIALS
- Tick the Include Print box. This will entry will then be available on the Service Sheet Printout if the completed Datasheet is printed from Ostendo.
- A Description (Materials and Charges) will be automatically added to this entry once the Save button or Add button is pressed. (This can be overridden)

Add a Checklist Type to the Template
This option allows the Freeway user to complete a predefined checklist prior to completing the Datasheet
Press the Add button to add a new entry
- Dropdown and select the Type of CHECKLIST
- Browse and select the 'Air Con Checklist' you setup previously
- Tick the Include Print box. This will entry will then be available on the Service Sheet Printout if the completed Datasheet is printed from Ostendo.
- A Description (Air Conditioning Checklist) will be automatically added to this entry once the Save button or Add button is pressed. (This can be overridden)

Add a Images Type to the Template
Press the Add button to add a new entry
- Dropdown and select the Type of IMAGES
- Tick the Include Print box. This will entry will then be available on the Service Sheet Printout if the completed Datasheet is printed from Ostendo.
- A Description (Photos) will be automatically added to this entry once the Save button or Add button is pressed. (This can be overridden)

Add a Signature Type to the Template
This option allows the Freeway user to capture a Signature using a predefined Signature Name prior to completing the Datasheet
Press the Add button to add a new entry
- Dropdown and select the Type of SIGNATURE
- Browse and select the Signature Name 'Customer' you setup previously
- Tick the Include Print box. This will entry will then be available on the Service Sheet Printout if the completed Datasheet is printed from Ostendo.
- A Description (Customer) will be automatically added to this entry once the Save button or Add button is pressed. As the word Customer is not Specific enough we will override this description to 'Customers Signature' to make it more readable

Add a Note Type to the Template
This option allows the Freeway user to capture Notes prior to completing the Datasheet using a predefined Note Name. (These notes can be made a Mandatory entry if required)
Press the Add button to add a new entry
- Dropdown and select the Type of NOTE
- Browse and select the 'Tech Notes' you previously setup
- Tick the Include Print box. This will entry will then be available on the Service Sheet Printout if the completed Datasheet is printed from Ostendo.
- Tick the Mandatory Entry box if you wish to force the Freeway user to always enter notes
- A Description (Tech Notes) will be automatically added to this entry once the Save button or Add button is pressed. (This can be overridden)

Add a Job Workflow Tracking Code Type to the Template
This option allows the Freeway user to update the Job Workflow Tracking Code so that back office uses can easily determine the current workflow status of a job. (This option can be made a Mandatory entry if required)
Press the Add button to add a new entry
- Dropdown and select the Type of TRACKINGCODE
- Tick the Include Print box. This will entry will then be available on the Service Sheet Printout if the completed Datasheet is printed from Ostendo.
- Tick the Mandatory Entry box if you wish to force the Freeway user to always update the Job Workflow Tracking Code
- A Description (Job Tracking Code) will be automatically added to this entry once the Save button or Add button is pressed. (This can be overridden)

Add a Job Task Status Type to the Template
This option allows the Freeway user to update the Job Task Status to 'Finished' in Ostendo. This is only relevant if you are deploying Job tasks 'without' using the Assignment Board. Essentially, if you are deploying all Open and InProgress Job Tasks to the Freeway User, there has to be a point that the Technician needs to indicate "this Job Task is now finished". Without this, the Job Task would continue to be available to the device until someone in the back office flags the Job or Task as 'Finished". There could well be a situation where the Tech carries out work over a number of visits. This would mean the Tech would create a Datasheet for each visit. In this case he would only flag the Job Task as Finished upon the final visit. Up until that point he would not amend the Task Status.
Assignment Board deployment on the other hand, works differently. Effectively once the Tech has completed the booking, that booking is marked as Finished and is therefore no longer available to the device. If further visits are required, then addition assignment bookings would be made for another day by back office staff. In this case the Tech would also create a Datasheet for each visit.
Press the Add button to add a new entry
- Dropdown and select the Type of TASKSTATUS
- Tick the Include Print box. This will entry will then be available on the Service Sheet Printout if the completed Datasheet is printed from Ostendo.
- A Description (Task Status) will be automatically added to this entry once the Save button or Add button is pressed. (This can be overridden)

Define the Style Template Matrix
Finally we must specify which Freeway Employees can use this Style Template. This is define by using the Style Template Matrix.
Mobility -> Style Template Matrix
Press the Add button to create a new Matrix entry
- Select Job from the Datasheet Style
- Browse and select the Employee eg: Jack Jones
- Browse and select the Style Template eg: Repair
