Ostendo API Setup
Ostendo to Freeway communication requires the Ostendo API to be installed and connected to the Ostendo database itself. Communications between these two platforms can be configured to use either HTTP or HTTPS protocol. HTTPS require SSL certificates to be generated. This process is not included in this documentation. Instead, please refer to your IT support Professional for assistance with the generation of these certificates.
|
|
Ensure the windows user setting up and controlling the starting of the API Service has full Windows Security rights for the machine the API service is installed on |

- Windows Firewall Exceptions
- Installing Ostendo API Software
- HTTP API Setup
- Test the API Service Connection (Local and Remote separately)
- HTTPS API Setup
- Test the API Service Connection (Local and Remote combined)
Windows Firewall Exceptions
It is suggested your IT Support Professional is involved in this process
- As Freeway does not require a Static IP address, a Port Forwarding rule must be setup on the Router to forward all Freeway traffic to a specific Port on the Server. Any port maybe allocated for this.
- Windows Firewall Exceptions (both Inbound and Outbound) must be created for the specified port.
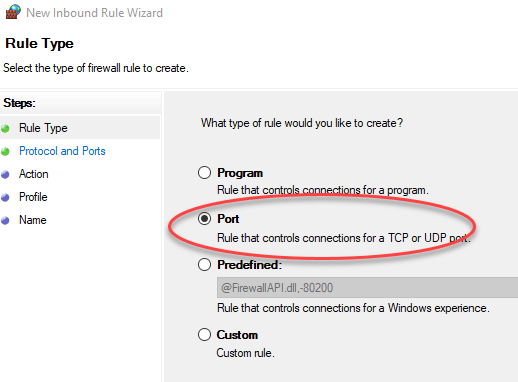
- Go to Windows Firewall ->Advanced Settings -> Inbound Rules and select New Rule
- Rule Type = 'Port' (click Next)
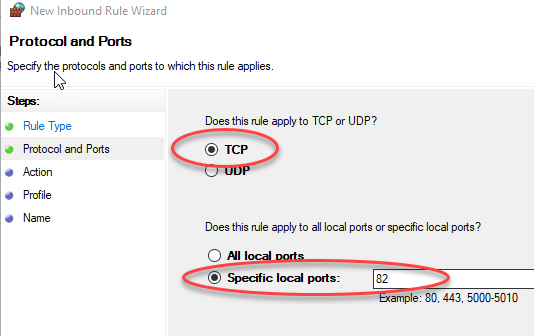
- Protocol & Ports = 'TCP', Specified local port = the designated Ostendo API port number (click Next)
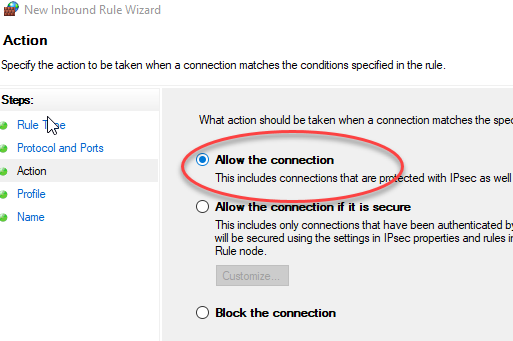
- Action = Allow the Connection (click Next)
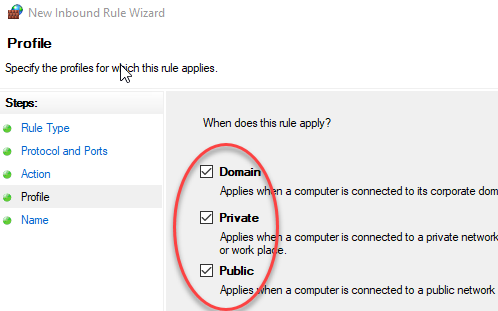
- Profile = Applies to Domain, Private, Public (click Next)
- Name = Give the Rule an appropriate Name eg: Ostendo API (click Finish)

- Now click Outbound Rules and repeat the same steps as above
|
|
For environments with very strict security that block access to websites, please ensure their rules allow the following sites to be accessed www.freewayapi.com http://api.ipify.org These are required to allow Freeway to send API keys to the cloud and determine IP addresses stored for Freeway to connect to Ostendo |

Installing Ostendo API Software
- Launch Ostendo ensuring you take the "Run as Administrator" option. (Right click on the Ostendo icon)
- Go to File -> API Service -> API Configuration
- Drop down the API Service box and select "Install"
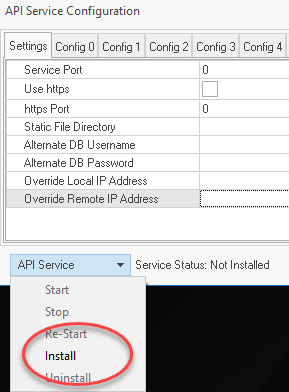
- Once the installation process has completed (should take a couple of seconds) you will be returned to this screen (Click OK)
- An information box will be displayed asking if you wish to re-start the API service now. It does not matter whether you answer "Yes" or "No" as we will be Starting the service the Service later
This completes the initial Ostendo API Software Installation. Follow the Instructions below for configuring for HTTP or HTTPS (Preferred Option)
HTTP API Setup
Access the API Configuration screen
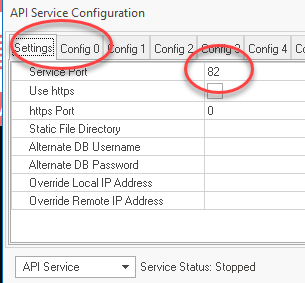
- Enter the designated Port number in "Service Port" in the "Settings" tab and click on the "Config 0" tab. (NB: Port forwarding must have already been setup on this port)
- From the Config 0 tab
- Tick "Active"
- Tick "Allow Freeway Access"
- Browse to the Ostendo Database you will be connecting to
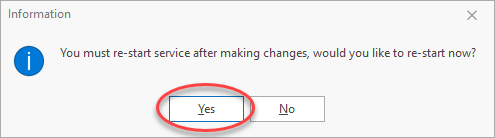
- An information box will be displayed asking if you wish to re-start the API service now. Answer "Yes"
- Now check to ensure the Service has started successfully by accessing the API Configuration screen again and checking the "Service Status" is now Started
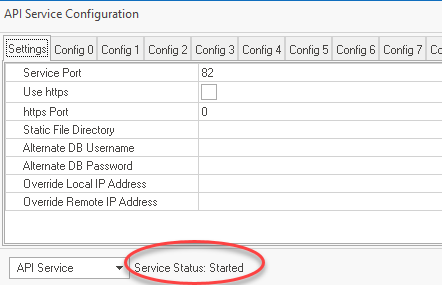
- If the Service has not started, refer to the Ostendo API and Freeway Connection Troubleshooting Topic
Test the API Service Connection (Local and Remote separately)
Local IP Address Test:
From the Windows Command DOS prompt type ipconfig
- Note the IPv4 Address. This is your local IP address
- Type the IP address into your browser along with the designated port number separated by a colon 199.999.9.99:82 (Notice the ‘:’ between the IP address and the designated Port No.)
- Your browser should return this screen proving that you have contacted the API successfully. (NB: The version number maybe different)
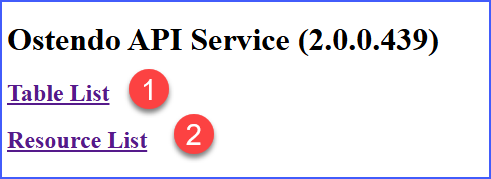
- Click on the Table List option to ensure a list of Tables are displayed
- Click on the Resource List option to ensure Resources are displayed. These two checks ensure the API has appropriate security privileges
External IP Address Test:
- From your browser google ‘whats my IP address’
- Google will return your current external IP address.
- Type the IP address into your browser along with the designated port number separated by a colon 199.999.9.99:82 (Notice the ‘:’ between the IP address and the designated Port No.)
- Your browser should return this screen proving that you have contacted the API successfully. (NB: The version number maybe different)
HTTPS API Setup
For enhanced security, it is strongly recommended that HTTPS be used in preference to HTTP. This is because HTTPS sessions are encrypted. Use HTTP only if the HTTP requests are not routed via the internet.
Steps to implement HTTPS:
It is strongly recommended that your IT Support Professional is involved in this process
- The company needs to obtain an SSL certificate (Signed by a Certificate Authority) for the domain name they wish to use for this (cannot be an IP address)
- Once obtained the certificate must be installed on the server
- Then the certificate must be bound to an IP/port and a URL reservation made in http.sys (Link below on configuration)
- In Ostendo (API Configuration) the flag must be set to use https and appropriate port set, then both override IP’s must be set to the new https domain name
To use HTTPS, you will require an SSL Certificate and SSL Key. Obtaining and setting these up are deliberately not covered off in this document as the methods vary from site to site. Your IT Support provider must set this up and prove it is working in advance of any Ostendo API setup. This link maybe of assistance to your support provider. NB: This process is not related to Ostendo therefore Development-x cannot assist with this.
Once the Certificate has been applied and proven to operate correctly by the IT Support Provider, you can amend the necessary Ostendo API Configuration settings as follows.
|
|
The Ostendo API Service Session must run either entirely HTTP or HTTPS, not a mixture of both |
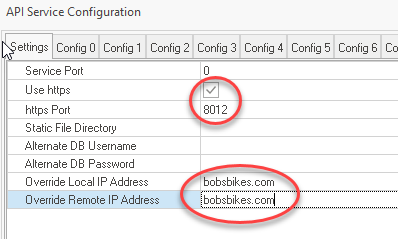
Access the API Service Configuration screen
- Tick ‘Use HTTPS’ (NB: Port forwarding must have already been setup on this port)
- Specify the HTTPS designated Port number that has been assigned with port forwarding
- Specify the Domain name in the ‘Override Local IP Address’
- Specify the Domain name in the ‘Override Remote IP Address’
- From the Config 0 tab
- Tick "Active"
- Tick "Allow Freeway Access"
- Browse to the Ostendo Database you will be connecting to
- An information box will be displayed asking if you wish to re-start the API service now. Answer "Yes"

- Now check to ensure the Service has started successfully by accessing the API Configuration screen again and checking the "Service Status" is now "Started"
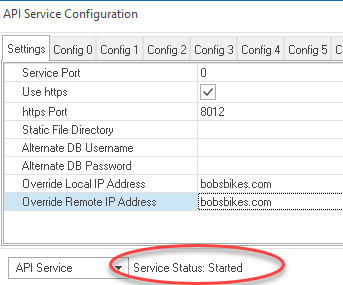
- If the Service has not started, refer to the Ostendo API and Freeway Connection Troubleshooting Topic
Test the API Service Connection (Local and Remote combined):
- Through your web browser, type your domain and designated port number separated by a colon. eg: https://bobsbikes.com:8012
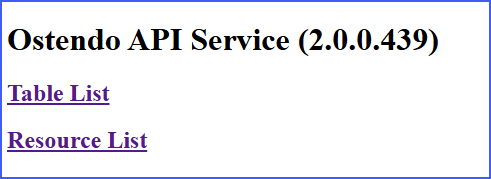
- Your browser should return this screen proving that you have contacted the API successfully. (NB: The version number maybe different)
- Click on the Table List option to ensure a list of Tables are displayed
- Click on the Resource List option to ensure Resources are displayed. These two checks ensure the API has appropriate security privileges
|
|
More Information: Certificate Authorities, or Certificate Authorities / CAs, issue Digital Certificates. Digital Certificates are verifiable small data files that contain identity credentials to help websites, people, and devices represent their authentic online identity (authentic because the CA has verified the identity). CAs play a critical role in how the Internet operates and how transparent, trusted transactions can take place online. CAs issue millions of Digital Certificates each year, and these certificates are used to protect information, encrypt billions of transactions, and enable secure communication. An SSL Certificate is a popular type of Digital Certificate that binds the ownership details of a web server (and website) to cryptographic keys. These keys are used in the SSL/TLS protocol to activate a secure session between a browser and the web server hosting the SSL Certificate. In order for a browser to trust an SSL Certificate, and establish an SSL/TLS session without security warnings, the SSL Certificate must contain the domain name of website using it, be issued by a trusted CA, and not have expired. |