Freeway Installation and Setup Publication (Revision 1.0.1)
Assignment Captions


Requirements -> Settings -> Assignment Captions
Overview:
Assignment Captions allow you to influence the information presented to the Freeway user on their Freeway Job Order / Assembly Order / Delivery / Sales Order / Ticket Action Activity and Customer Asset Lookups lists.
These Custom Captions are defined according to their Assignment Type. The system will display the default caption layout if none have been defined for an Assignment Type.
Captions consists of two portions - a 200 character "SUBJECT" string followed immediately by a 200 character "LOCATION" string which is enclosed in brackets.
SUBJECT:
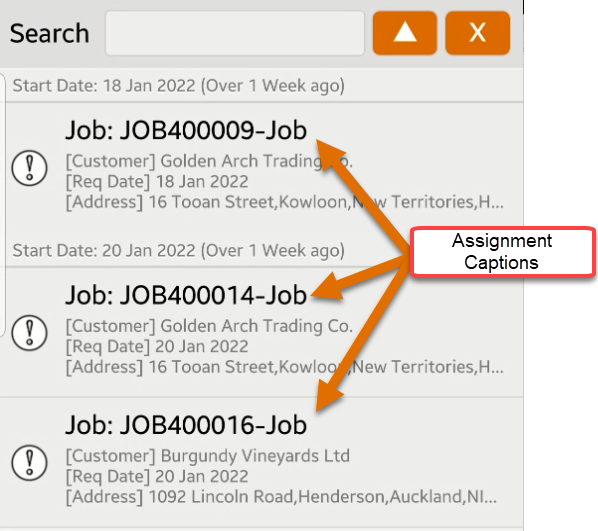
- This type of Caption is what is seen in the Freeway on the Top Line in bold. (refer below screenshot)
LOCATION:
- This type of Caption is only seen against the Assignment Header (Assignment Location) on the Assignment Board (only if jobs are being deployed via the Assignment Board). The contents of this Type are NOT sent to Freeway.
Both SUBJECT and LOCATION strings can consist of one or more selected fields.
Below is an example of the standard Lookup information for 'Jobs'. Assignment Subject Captions refer to the Top line in bold as indicated below

The Standard Lookup Caption for Jobs is Job: Job Number-Job Task Name
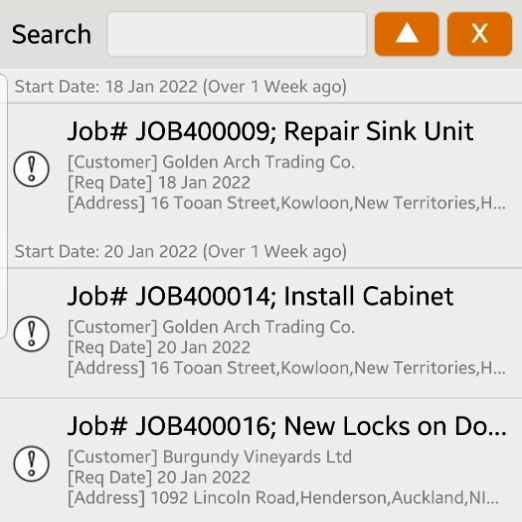
Let's say we wish to modify this so the Caption reads as follows 'Job#' Job Number - Order Description (Job# is a heading in this example)
From the Assignment Captions screen, press the Add button to add a new record
- Select the Assignment Type of 'Job' from the drop down
- Select SUBJECT Caption Type
- Enter a sequence number to control where this field is sequences in relation to others you may define for this Assignment Type
- Enter an optional Field Prefix (NB: Ostendo will automatically insert a ';' between these captions
- Browse and Select the Field to display in the Caption

This is how the Job Lookup will now display in Freeway.


|
Remember that more detail can be displayed if the Freeway user switches the device to Landscape mode
|
Buttons
Close: This will close the screen. If you have any unsaved data then you will be asked if you wish to save it before the screen is closed.
Add: This will send the cursor to a new line for entry of a new record.
Save: This will save the current data without exiting the screen
Cancel: Any changes made since the last time the ‘Save’ Button was pressed will be lost.
Delete: This removes the current highlighted line.