Employee Mobility Settings


- Overview
- Upper Screen - Detail Tab:
- Lower Screen - Device (Sub-Tab)
- Materials (Sub-Tab)
- Time Entry (Sub-Tab)
- Customers (Sub-Tab)
- Jobs (Sub-Tab)
- Suppliers (Sub-Tab)
- Assemblies (Sub-Tab)
- Deliveries (Sub-Tab)
- Purchases (Sub-Tab)
- Counts (Sub-Tab)
- Assignment Move Rules (Sub-Tab)
- Restricted Warehouses (Sub-Tab)
- Picking Classes sub-Tab
- Transfers (Sub-Tab)
- Layout Button
- Buttons and Backgrounds Tab
- Fast Code Button (On Detail Screen)
Mobility -> Employee Mobility Settings
Overview
This screen allows you to setup the actual Freeway Mobility user. This record defines what information is directed to the Freeway user whilst also allowing you to define the look and feel of Freeway for that user if required.
This screen is split into an Upper and Lower Section. The upper section defines global attributes associated to that user, whereas the Lower section allows you to define specific module behaviour for this employee.
It should be noted, that you are able to setup an Employee Mobility record with all the appropriate settings, then use this employee as a 'template' to be used for inheriting settings for other similar types of employees. eg: Setup a Service employee and inherit those settings for other Service employees. This saves time defining multiple employees requiring the same settings.
You should also note that apart from B2B Employees, their should only be one Employee Mobility Settings record used for one actual employee. (ie: do not use the same Freeway Employee on multiple devices, however you may use multiple employee records on one device)
Upper Screen - Detail Tab:
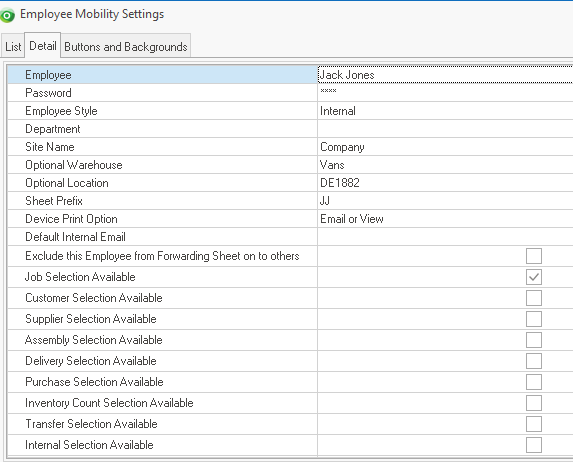
Employee: The name of the employee authorised to use Freeway. (This must be a valid Employee Labour->Employees)
Password: If this Employee has a Style of 'Internal' enter a an initial password for the Freeway user to use. (NB: The Freeway user is able to change this password within Freeway later if desired)
Employee Style: Ostendo will determine this. The Internal (Default) refers to an actual Internal Employee within Ostendo. The Style will be changed to 'Mobility B2B' if a Customer has been linked to this Employee Mobility Settings record. The Style will be changed to 'Mobility Sub Contractor' if the Employee linked to this record is also linked as a Sub Contractor Supplier.
Department: The Department linked to this Employee will be displayed here for reference only
Sitename: This is the Company Site Name this employee is linked to
Optional Warehouse: The warehouse specified here will be the default issuing Warehouse for Materials. An Example of this is for Van Stock where this warehouse will be used for each Material Issue
Optional Location: The location specified here will be the default issuing location associated with the Optional Warehouse (above) for Materials. An Example of this is for Van Stock where this location will be used for each Material Issue
Sheet Prefix: This must be a unique Prefix that will be used when Datasheets are created within Freeway
Device Print Option: Email or View (Default), View or Email. This the default output option when a Datasheet Printout is selected within a Style Template for this Freeway user
Default Internal Email: This is the default email address for Internal employees when a Datasheet Printout is selected to be emailed within a Style Template for this Freeway user
Exclude this Employee from Forwarding Sheet on to others: When forwarding a Datasheet onto other Freeway Users (ie: before sending it back to Ostendo) this option will exclude this employee from the list of available forwarding employees specified on the Style Template -> Detail Tab -> Forwarding Employees Tab
Customer Selection Available: This check box indicates whether the employee can work with Customers. eg: Creating a new Job Order / Sales Order etc..
Job Selection Available: This check box indicates whether the employee can work with Jobs. eg: Retrieve assigned Jobs
Supplier Selection Available: This check box indicates whether the employee can work with Suppliers. eg: Creating a New Purchase Order, Creating a Purchase Receipt without a PO already existing
Assembly Selection Available: This check box indicates whether the employee can work with Assembly Orders. eg: Retrieve assigned Assembly Orders
Delivery Selection Available: This check box indicates whether the employee can work with Delivery Orders. eg: Retrieve Assigned Sales Deliveries
Purchase Selection Available: This check box indicates whether the employee can work with Purchase Receipting. eg: Creating a Purchase Receipt of goods from an existing PO
Inventory Count Selection Available: This check box indicates whether the employee can work with Inventory Counts. eg: Retrieve assigned Inventory Counts if this employee exists in the Count assigned Mobility Team
Transfer Selection Available: This check box indicates whether the employee can perform stock transfers within their defined Site specified above
Internal Selection Available: This check box indicates whether the employee can work with Internal processes. eg: Style Templates where no standard Ostendo function is performed. eg: recording data from Checklists etc..
Inherit Mobility Settings from another Employee: As described earlier, this option allows you to select an existing Mobility Employee to copy all Lower screen options through to this Employee.
Level of Information Displayed: Standard (Default) or Minimum This option control how much information the Freeway user sees in the Datasheet Info option within Freeway. (This is typically set to Minimum for B2B or Sub Contractor type Freeway Mobility Employees.
Only include Style Templates for this Employee in Matrix: Only Style Templates specified in the Style Matrix specifically for this employee will be available to this user if this setting is ticked.
Lower Screen - Device (Sub-Tab)
This Tab allows you to define certain global device settings irrespective of the function(s) the Freeway user is performing.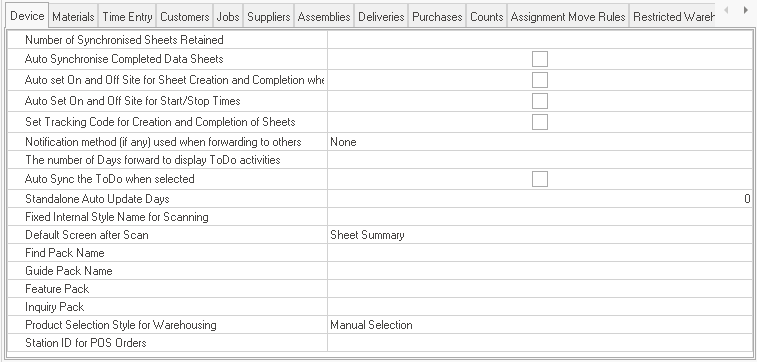
Number of Synchronised Sheets Retained: Specify the number of synchronised sheets to be kept on the device at any one time. This is for the convenience of the Freeway user who may wish to review some of the recent jobs/tasks recently completed on the device. Retained sheets are for review only - no further updates of data are allowed.
Auto Synchronise Completed Data Sheets: Ticking this box will enable sheets to be synchronised with the Ostendo immediately upon completion (live update). If this box is NOT ticked, then synchronisation is done only when the Freeway user chooses to synchronise.
Auto set On and Off Site for Sheet Creation and Completion when Tracked: If the Style Template has Tracking (GPS) specified, ticking this option will automatically capture the GPS coordinates and the status will be set to On Site when the datasheet is first created. When the sheet is completed, it will set the status to OffSite. On and Offsite tracking influences Employee Locations within Ostendo
Auto set On and Off Site for Start/Stop Times: If Times data is captured on the datasheet template, then ticking this option will automatically capture the GPS coordinates and the status will be set to On Site when Start Time is entered on the datasheet. When the Stop Time is entered, it will set the status to OffSite, Note that "Time Tracking is Active if Auto on and Off Site for Start/Stop Times is Set" on the Style Template Detail tab must also be ticked. This setting is mutually exclusive to the previous setting above. On and Offsite tracking influences Employee Locations within Ostendo
Set Tracking Codes for Creation and Completion of Sheets: Ticking this box means Tracking Codes will be automatically updated when the datasheet is first created and when the sheet is completed. Default Tracking Codes can be set for Jobs, Assembly Steps, and Deliveries in the Freeway app under the Defaults option. These Tracking Codes must first be defined in Jobs Settings, Assembly Settings, and Sales Settings.
Notification Method (if any) used when forwarding to others: Text Message or Email or None. When datasheets are designed to be forwarded from one Freeway user to another, it may be desirable to send a notification message to the one who is receiving the data sheet next - so that he/she can start reviewing it soonest possible.
The number of Days forward to display To Do activities: Enter number of days here. To Do tasks are generated by Call Ticket Actions, Job/Sales Quotes Follow-Up Actions, Activity Calendar Events (appointments), and History Notes Follow-Up Actions.
Auto Sync the To Do when selected: Ticking this box will automatically refresh the To Do activities when the To Do button is pressed. Otherwise it will only be refreshed whenever synchronisation is carried out.
Standalone Auto Update Days: (Only applies to Standalone Solutions) Set the number of days to automatically refresh the Standalone Solution on the mobile device.
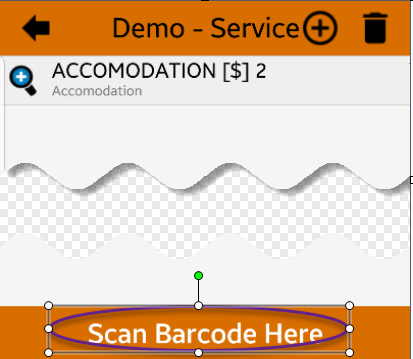
Fixed Internal Style Name for Scanning: Select the Style Template to initiate when an Employee barcode is scanned using the Scan On button on the Front Screen.
Default Screen after Scan: Sheet Summary (default) or Front Screen
- Sheet Summary: if you want to display the initiated Datasheet after using the Scan On button to scan a barcode.
- Front Screen: if you want to return to the front screen after initiating the datasheet using the Scan On button.
Find Pack Name: Select the Find Pack Name for this employee. A Find Pack is a collection of Groups and Names and Styles that allow the Freeway user to access generic or product specific information relating to a range of items that are held within a Hierarchical Name.
Guide Pack Name: Select the Guide Pack Name for this employee. A Guide Pack contains documentation for the Freeway User. eg: Standard Operating Procedures, Product Manuals, Health and Safety Policies. These Packs are linked to Mobility users. A Mobility user can only be linked to one Pack.
Feature Pack: Select the Feature Pack Name for this employee. A Feature Pack is a collection of features that are globally available to specific Code Types eg: Item Code, Descriptor Codes, Catalogue Codes. Features defined in a Feature pack are shown in addition to the specific item / descriptor features at a Code level which are maintained in the Item Mobility and Web and Descriptor Mobility and Web screens in Ostendo. All Features are shown in Freeway Product Inquiry screens.
Inquiry Pack: Select the Inquiry Pack Name for this employee. An inquiry pack is a collection of Custom Freeway Inquiries available to one or more Mobility users
Product Selection Style for Warehousing: Manual (default) or Scan Barcode.
- Manual Selection means items are selected manually from delivery list when picking the items.
- Scan Barcode means items are picked by scanning barcodes.
StationID for POS Orders: Select the POS Station ID to be associated with this user (mobile device). With the appropriate Style Template, an On-Hold POS Order will be created using this Station ID. At the checkout cashier's station, the POS Order can be reviewed and converted into an invoice to receive payment. You could create an Employee Mobility Settings record for each tablet you intend to use for POS.
Materials (Sub-Tab)
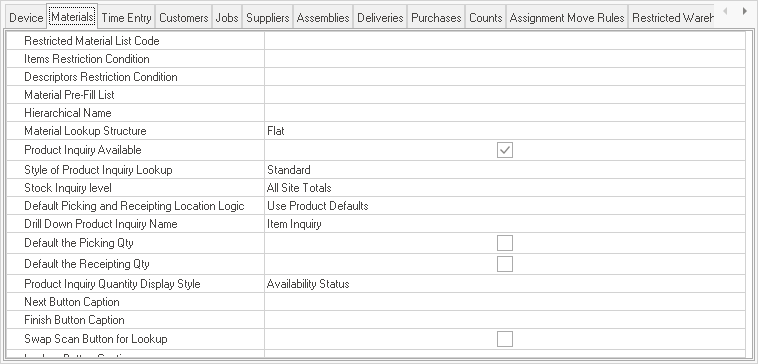
Restricted Material List Code: This is an optional List you can link to this employee (Inventory -> Lists). The contents of this list will be displayed in the Materials Lookup from the Datasheet within Freeway. If this entry is left blank, then the following two conditions can be used to restrict what Items / Descriptors the employee can select via Freeway.
Items Restriction Condition: (Applicable only if Restricted Material List Code is blank.) Specify the condition that will restrict the employee to using certain Items. (Maximum 1000 char) For example: itemcategory in ('Fasteners','Hinges','Nails','Screws')
Descriptors Restriction Condition: (Applicable only if Restricted Material List Code is blank.) Specify the condition that will restrict the employee to using certain Descriptors. (Maximum 1000 char) For example: descriptorcategory <> '111'
Material Pre-Fill List: Select the List that this employee can use. This list must be a subset of the Material List selected above. The idea of this Prefill list to to automatically prefill Materials issued to the Datasheet. This is useful if you always which to charge for a Travel Fee. The Freeway user then only needs to enter in the qty and that descriptor will be issued to the order.
Hierarchical Name: Optional - Enter the Name of the Hierarchical Structure that is used by this employee to view materials. Hierarchical Structures are defined from General -> Hierarchical Structures. In the Related Menu of Items, there is a function called Item Mobility and Web which enables you to specify additional information about the item (Short Description, Long Description, Specifications, Hierarchical Names, and Features). Same goes for Descriptors..
Material Lookup Structure: Select either Flat or Hierarchical. Flat means materials are presented as a list. Hierarchical means materials are presented according to predefined Hierarchical Structures. If you select Hierarchical, you must have also specified a Hierarchical Name in the previous setting.
Product Inquiry Available: Tick this box if this employee is allowed to run Product Inquiries. If this is not ticked, then the employee will not be able to do product inquiries even if his/her assigned Inquiry Pack contains product inquiries.
Style of Product Inquiry Lookup: Select an option from the drop-down list - Standard or Graphical . Standard shows Items in a simple List form, whereas Graphical display a small image alongside the item where a mobility image has been load against the Item.
Stock Inquiry Level: Select an option to display the stock levels this employee is allowed to view. Options are:
- All Site Totals: Inventory Totals for all sites.
- Mobility Site Totals: Inventory Totals for the Site assigned to this mobility employee.
- All Site|Warehouse Totals: Inventory Totals for all Sites and broken down by Warehouse.
- Mobility Site|Warehouse Totals: Inventory Totals for this employee's site and the totals for warehouses within that site.
- All Site Details: Inventory Details for all sites. (This will show variants eg: Batch Nos / Serial Nos etc..)
- Mobility Site|Details: Inventory Details for Site assigned to this mobility employee. (This will show variants eg: Batch Nos / Serial Nos etc..)

|
Note that this selection together with the Restricted Warehouses (specified in Restricted Warehouses tab) determines what stock levels this employee can view. For example if this selection is Mobility Site Totals, and only two warehouses listed in Restricted Warehouses for this employee falls within the Mobility Site assigned to this employee, then this employee will only be able to view the Inventory Totals for those two warehouses combined. |
Default Picking and Receipting Location Logic: These options determine the logic used to pick and receipt stock to and from locations. This setting is used if the Style Template has been defined with a Default Picking & Receipting Logic setting of "From Mobility Settings", otherwise the Style Template setting is used in preference to the employees setting:
- Use Product Defaults (Default): Use Product's default Issue/Receipting Warehouse and Location. (In a single site environment this will be specified on the item Detail screen. In a multi site environment, the Item Site Settings record applicable to that items site will be used.) If Restricted Warehouses are specified for the employee, then only products from those locations will be shown.
- Fixed From Employee: use the default warehouse and location specified in Employee mobility Settings. (Upper screen)
- User Specified: The user will be required to specify the Location (ie: Scan or enter the Location Value) before the item is picked. The Location Barcode Style needs to be specified in Mobility Barcode Rules to configure the Location Barcode Field value to be used when scanning.
Drill Down Product Inquiry Name: When picking items in a Delivery Order with Freeway, you can drill-down on the item to see product details like Product Image and quantities available. You can also specify your own inquiry to display other information pertaining to the item. This Inquiry name must be defined in the Inquiry Pack specified on the Device Sub-Tab.
Default the Picking Qty: Tick this box if you wish to default the Pick Qty within Freeway. This will save the user from having to enter a pick quantity for every item picked. The user can overwrite if required. (NB: This is not applicable if an item batch number is scanned in Freeway. In this case despite this setting you will be required to enter a qty to pick. This is to ensure the user enters the correct pick qty applicable to the scanned batch number)
Default the Receipting Qty: Tick this box if you wish to default the Receipt Qty within Freeway. This will save the user from having to enter a receipt quantity for every item received. The user can overwrite if required.
Product Inquiry Quantity Display Style: Possible options are : Actual Quantities (Default), Only Positive Quantities , Availability Status.
- Actual Quantities: Displays the actual Qty in Stock
- Only Positive Quantities: All negative quantities will be displayed as zero (0)
- Availability Status: The quantity displayed is either "In Stock" or "Out of Stock". no quantities are displayed. This is to cater for situations where you do not wish to show the actual stock quantities to the Freeway Mobility user eg: B2B.
The next three options control the Freeway Buttons when Materials are selected in Freeway
Next Button Caption: Specify a caption for the "Next" Button here (if desired). (Refer Example below - 'Return')
Finish Button Caption: Specify a caption for the "Finish" button here (if desired). (Refer Example below - 'End')
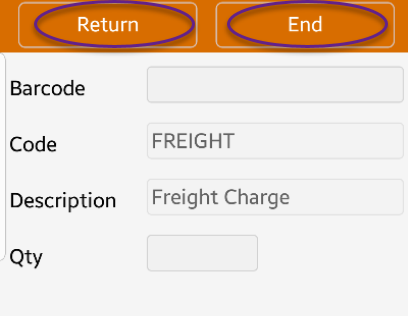
Swap Scan button for Lookup: Tick this box to change the 'Scan' button to a materials Lookup button.
Lookup Button caption: If Scan button is changed to a Lookup button, you can specify a caption for the "Lookup" button (if desired).
Time Entry (Sub-Tab)
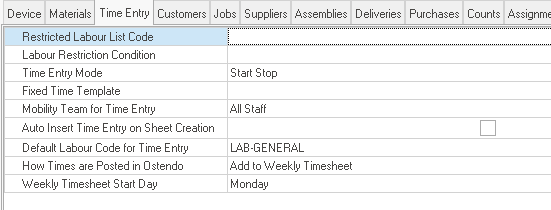
Restricted Labour List Code: Optional - Select the Code for the Labour Code List (Inventory -> Lists) that this employee can use. (Maximum 50 char). If this is left blank, then the following condition can be used to restrict what Labour Codes the employee can select via Freeway App.
Labour Restriction Condition: (Applicable only if Restricted Labour List Code is blank.) Specify the condition that will restrict the employee to using certain Labour Codes (Maximum 1000 char) For example LabourCategory in ('Misc', 'Computer') and (DepartmentCode = 'Quality')
Time Entry Mode: Select either Time of Day / Start Stop / Fixed Times / Hours
Fixed Time Template: Select the Fixed Time Template that this employee can use. (Maximum 20 char)
Mobility Team for Time Entry: Select the Mobility Team that this employee can enter times for (The employee must be a member of the Mobility Team - typically used where the employee is the Supervisor or Team Leader) . (Maximum 20 char)
Auto Insert Time Entry on Sheet Creation: Ticking this option inserts a time entry line automatically when the Datasheet is created. (Not applicable to Fixed Time Templates)
Default Labour Code for Time Entry: This specifies the Labour Code for the Time entry line that was inserted automatically (see Auto Insert Time Entry on Sheet Creation above).(Maximum 50 char) (Not applicable to Fixed Time Templates)
How Times are Posted in Ostendo: Options are:
- Job Direct: Time duration (hours) will be posted directly to the job
- Create New Timesheet: A new Timesheet Batch will be created each time a Datasheet is returned to Ostendo
- Add To Existing Timesheet: All timesheet hours recorded for this employee will be added to an existing timesheet. If one does not already exist, Ostendo will automatically create a new timesheet batch.
- Add To Daily Timesheet: All timesheet hours recorded for this employee for the same day will be added to an existing daily timesheet batch for that day. If one does not already exist, Ostendo will automatically create a new timesheet batch.
- Add To Weekly Timesheet: All timesheet hours recorded for this employee in the same week will be added to an existing weekly timesheet batch for that week. If one does not already exist, Ostendo will automatically create a new timesheet batch.
Weekly Timesheet Start Day: If "Add to Weekly Timesheet" is selected above then enter the start day of the week for this employee.
Customers (Sub-Tab)
Customer Restriction Condition: Specify the condition that will restrict the employee to working with certain Customers only (Maximum 1000 char) For example customertype = 'Standard'
Customer Asset Selection: Ticking this will allow the employee to access Customer Assets via the Freeway App in a Style Template defined with a Template Type of 'Asset'
Customer Asset Restriction Condition: Specify the condition that will restrict the employee to working with certain Customer Assets only. (Maximum 1000 char) For example assettype = 'Copier'
Number of Latest Customer History Notes: This specifies the number of history notes to be displayed in the Datasheet Info section within Freeway when a Datasheet has been created
Number of Latest Customer Asset History Notes: This specifies the number of history notes to be displayed in the Datasheet Info section within Freeway when a Datasheet has been created
Sales Type for New Sale: Select the default Sales Type when a new sale is generated. (Maximum 20 characters) NB: This will be used if no Override Sales Type has been defined on the Template
Hide Pricing for Materials: Tick this box if pricing is to be hidden from the Mobility user.
Include Purchase Reference in Sales Fields: Tick this box if user can enter PurchaseReference into Sales Order when SALESFIELDS is included in the Style Template.
Include Purchase Reference in Invoice Fields: Tick this box if user can enter PurchaseReference into Invoice when INVOICEFIELDS is included in the Style Template.
Include Project in Invoice Fields: Tick this box if user can enter Project into Invoice when INVOICEFIELDS is included in the Style Template.
Include Purchase Reference in Job Fields: Tick this box if user can enter PurchaseReference into Job Order when JOBFIELDS is included in the Style Template.
Include Job Category in Job Fields: Tick this box if user can enter JobCategory into Job Order when JOBFIELDS is included in the Style Template.
Include Mobility Team in Job Fields: Tick this box if user can assign a MobilityTeam to Job Order when JOBFIELDS is included in the Style Template. This option would be used if the Assignment Board was not in use and you were therefore deploying Jobs to Freeway based upon the Job Header Team.
Include Job Required Date Info in Job Fields: Tick this box if user can enter Job Required Date Info into Job Order when JOBFIELDS is included in the Style Template.
Allow Payment Entry: Tick this box if Mobility user is allowed to collect payment from Customer. This will enable the user to key in some basic Payment Data.
PlaceHolder Customer for Creating New Customers: Select the customer name used when creating new customers via the Freeway app. Typically the existing Customers field values (Customer Type, Price Level etc..) are used as the default values for any new Customers created via Freeway.
The following information can be pre-set in the Placeholder Customer so that when the new Customer is created, it will automatically copy these same properties.
CUSTOMERTYPE, CUSTOMERSTYLE, PRINTSTATEMENT, PRICELEVEL, CREDITTERM, CREDITLIMITAPPLIES , CREDITLIMIT , TAXGROUP, SALESPERSON , SHIPPINGMETHOD
The PlaceHolder customer must not be a actual Customer.
Customer Details Style: Select one of the following Options:
- Information Only - This means mobility user cannot create or update customer records. Someone else in the office will need to do that with the information collected.
- Create or Update - This enables the mobility user to create a new customer record or update existing customer record
- Create Only - This enables the mobility user to only create a new customer record
- Update Only - This enables the mobility user to only update an existing customer record
Allow Assignment Booking for New Jobs: Tick this box to indicate that mobility user can also assign any new jobs they create when JOBFIELDS is included in the Style Template. Combined with the next option of Include Service Employee in Job Fields, this will allow the Mobility user to define a Job Booking from within the Job Fields option in Freeway. Once a Booked Date / Start & End Time has been entered, the Completed Datasheet will automatically create and Assignment Booking on the Assignment Board against this Employee or the Employee selected if the option below has been ticked
Include Service Employee in Job Fields: Tick this box if user can select an Employee into Job Order when JOBFIELDS is included in the Style Template. This option could be used independently of the Allow Assignment Booking for New Jobs above if the Assignment Board is not being used to deploy jobs to the Mobility User. Or alternatively if used with the assignment board, this will allow the Mobility Job Creator to select a different employee to assign this job to.
Style of Customer when creating from Internal Sheet: Select either PROSPECT or CUSTOMER.
Style of Customer when creating for a Quote: Select either PROSPECT or CUSTOMER.
Direct Invoice Numbering Style: Select one of the following Options:
- Automatic - the number will be generated by Ostendo
- SheetID - the Datasheet ID will become the Invoice Number
- Entered - the Invoice Number is manually entered by the Freeway user.
Style of Payment created in Ostendo from the Payment created in Freeway: Select one of the following Options:
- Create Real Payment or Deposit - An actual payment will be created in Ostendo together with financial records.
- Record as External Payment or Deposit - External Payment with no financial records created in Ostendo.
- Information Only - No payment created.
Fixed Customer Style Name for Scanning : Select the Style Template to initiate when a Customer barcode is scanned using the Scan On button on the Front Screen.
Fixed Asset Style Name for Scanning : Select the Style Template to initiate when a Customer Asset barcode is scanned using the Scan On button on the Front Screen.
Jobs (Sub-Tab)
Job Selection Range: Select one of the following
|
|
An important point to note in Freeway. When deploying Job Orders to Freeway, you are NOT deploy the whole Job. You are actually deploying each Job Task. Therefore if a Job has 3 tasks on it and you nominate to deploy all Open Jobs or to a Team or an Employee, this will show each of those 3 tasks on that Job as an individual entries to the Mobility User within Freeway. When deploying orders using the Assignment Board, you are actually booking each Job Task individually. Job Tasks can only be deployed to each Mobility user by one of three methods shown below. |
- All Open Jobs - Without any restriction defined, Freeway will deploy all Job Tasks (All Open jobs are those where the Job Task Status is either Open or InProgress and the Required Date is up to the number of Job Horizon Days specified)
- Only Assigned Jobs - All Job Tasks assigned to that Freeway user up to the number of Job Horizon Days specified.
- Mobility Team (Includes Specific Employees as well) - As defined on the Job Details screen and where the Required Date is up to the number of Job Horizon Days specified. Freeway will deploy all Job Tasks (Only Job Tasks with a Job Task Status is either Open or InProgress).
Job Restriction Condition: Specify the condition that will restrict the employee to working with certain Jobs only. This limits the jobs to be displayed to the employee for selection and only applies if Job Range is “All Open Jobs”. (Maximum 1000 char) Fields from both the JobHeader and JobTask are available here therefore the appropriate table name must be specified within the condition. For example jobheader.jobcategory = 'Plumbing' and jobheader.jobtype = 'Service'
Number of Latest Job History Notes: This specifies the number of history notes to be displayed in the Datasheet Info section within Freeway when a Datasheet has been created
Job Type for New Job Order: Select the default Job Type when a new Job is generated. (Maximum 20 char) NB: This will be used if no Override Job Type has been defined on the Template
Job Type for New Job with Customer Asset: Select the default Job Type when a new Job with Customer Asset is generated. (Maximum 20 char) NB: This will be used if no Override Asset Job Type has been defined on the Template
Include Non-Finished Assignments A Number of Days Back: The number entered here will allow the employee to view un-finished Assignments up to that number of days back. (Used with the Assignment Board).
How Actual Lines are inserted: Select Create New Line or Add to Existing Line
Hide Pricing for Materials: Tick this box if pricing is to be hidden from user.
Auto Sync the Job List when selected: Tick this box if the Job List is refreshed each time the Job Lookup is selected, otherwise Job Tasks deployed to the User will only be refreshed when the user performs a synchronisation within Freeway. (NB: This requires a live internet connection)
Activate Mobility Pooling: Tick this box if employee can participate in Team Pooling. If this box is un-ticked, then any job assigned to a Pooling Team will be hidden from the user even if he is a member of the same Mobility Team.
Job Horizon Days: Enter the number of days. This will display jobs or assignments whose required date or Assignment date falls within this horizon. For example, if Job Horizon is set at 2 days, then the Mobility user will only see jobs/assignments which start in the next two days. This is to avoid displaying unnecessarily large number of jobs/assignments for selection.
Set Job/Assignment to InProgress from OnSite Tracking: Tick this box if you want to automatically change the Job Status (and Assignment Status if Assignment Board is being used) to "In Progress" when OnSite Tracking is triggered.
Shift Assignment to reflect actual Start from OnSite Tracking: Tick this box if you want to automatically shift the Assignment to reflect Actual Start time when OnSite Tracking is triggered if the Assignment Board is being used.
Allow Payment Entry: Tick this box if Mobility user is allowed to collect payment from Customer. This will enable the user to key in some basic Payment Data.
Disable Job Decline: Tick this box if the Mobility User is not allowed to decline jobs/assignments.
To decline a Job within Freeway the user would select the 'hamburger' button (top right corner) of the Job Lookup screen. Depending upon the method of job deployment one of two things will occur.
- Deployed Via The Assignment Board: The Job Booking will be removed from the Resource on the Assignment Board and be returned to the Job List ready for re-booking
- Deployed Via The Job Header (Employee): The Employee Name will be removed from the Job Header "Name" field.
Once a job is declined, it will no longer be displayed in the Freeway Job Lookup for that Employee unless it is re-assigned later.
Planned Job Line PreFill Style: Select one of the following Options:
- No Planned Line PreFill - this means Planned Lines are not added to the materials list.
- Prefill Planned Line with Zero Quantity - Planned Lines are automatically added to the Materials List - but with Quantity = 0
- Prefill Planned Line with Remaining Quantity - Planned Lines are automatically added to the Materials List with Quantity = Remaining Qty.
Fixed Job Style Name for Scanning : Select the Style Template to initiate when a Job barcode is scanned using the Scan On button on the Front Screen.
Include Planned Lines with Zero Remaining Qty : Tick this box if you wish to also show planned lines where the remaining quantity is zero.
Job Picking Tolerance % : Enter the percentage the user is allowed to pick above the required amount. eg: 10 would allow the user to pick up to 10% more than what is required. No entry here equates to Zero tolerance.
Suppliers (Sub-Tab)
Supplier Restriction Condition: Specify the condition that will restrict the employee to working with certain Suppliers only. (Maximum 1000 char) For example suppliertype = 'Standard'
Number of Latest Supplier History Notes: This specifies the number of history notes to be displayed in the Data Sheet Info section within Freeway when a Data Sheet has been created.
Purchase Type for New Purchase: Select the default Purchase Type when a new Purchase is generated. (Maximum 20 char) NB: This will be used if no Override Purchase Type has been defined on the Template
Hide Pricing for Materials: Tick this box if pricing is to be hidden from user.
Include Packing Slip in Receipt Fields: Tick this box if user can enter Packing Slip No. into Purchase Receipt when RECEIPTFIELDS is included in the Style Template. The Style Template must be set to either:
- "Creation Style when selecting Supplier" of New Receipt Purchase or
- "Creation Style when selecting Purchase" of Update Receipt
Allow Payment Entry: Tick this box if Mobility user is allowed to make payment to Supplier. This will enable the user to key in some basic Payment Data.
PlaceHolder Supplier for Creating New Suppliers: Select the supplier name used when creating new suppliers via the Freeway app. Typically the existing Supplier field values (Supplier Type, Buyer etc..) are used as the default values for any new Suppliers created via Freeway.
The following information can be pre-set in the Placeholder Supplier so that when the new Supplier is created, it will automatically copy these same properties:
SUPPLIERTYPE, CREDITTERM, TAXGROUP, BUYER , SHIPPINGMETHOD
Supplier Details Style: Select one of the following Options:
- Information Only - This means mobility user cannot create or update supplier records. Someone else in the office will need to do that with the information collected.
- Create or Update - This enables the mobility user to create a new supplier record or update existing supplier record.
- Create - This enables the mobility user to create a new supplier record.
- Update - This enables the mobility user to update an existing supplier record.
Fixed Supplier Style Name for Scanning : Select the Style Template to initiate when a Supplier barcode is scanned using the Scan On button on the Front Screen.
Include Job Order selection in Purchase Fields : If this box is ticked, then JobOrder number selection will be available in style templates which utilizes the PURCHASEFIELDS type. The Job Order Numbers will only be those available on the device. This is only applicable when creating new Purchase Orders within Freeway. Once the PO is created within Ostendo, that PO will have a Default Allocation Type of 'Job Order' and the Default Allocation Reference will be the Job Number selected here. All new lines will be linked to this Job.
Assemblies (Sub-Tab)
Assembly Selection Range: Select one of the following
|
|
An important point to note in Freeway. When deploying Assembly Orders to Freeway, you are NOT deploy the whole Assembly Order. You are actually deploying each Assembly Order Step. Therefore if an Assembly Order has 3 Steps on it and you nominate to deploy all Open Assemblies this will show each of those 3 Steps on that Assembly Order as an individual entries to the Mobility User within Freeway. When deploying orders using the Assignment Board, you are actually booking each Assembly Step individually. Assembly Order Steps can only be deployed to each Mobility user by one of three methods shown below. |
- All Open Assemblies - Without any restriction defined, Freeway will deploy all Assembly Steps (All Open Assemblies are those where the Assembly Step Task Status is either Planned, Open or InProgress and the Required Date is up to the number of Assembly Horizon Days specified)
- Only Assigned Assemblies - All Assembly Steps assigned to that Freeway user up to the number of Assembly Horizon Days specified.
Assembly Restriction Condition: If Assembly Selection Range is "All Open Assemblies" then you can specify the condition that will restrict the employee to working with certain Assemblies only. (Maximum 1000 char) Fields from both the AssemblyHeader and AssemblySteps are available here however the table name must be specified within the condition. For example AssemblyHeader.workflowstatus = 'Cutting'
Number of Latest Assembly History Notes: This specifies the number of history notes to be displayed in the Datasheet Info section within Freeway when a Data Sheet has been created
Include Non-Finished Assignments A Number of Days Back: The number entered here will allow the employee to view un-finished Assignments up to that number of days back. (Used with the Assignment Board).
How Actual Lines are inserted: Select Create New Line or Add to Existing Line
Auto Sync the Assembly List when selected: Tick this box if the Assembly List is refreshed each time the Assembly Lookup is selected, otherwise Assembly Steps deployed to the User will only be refreshed when the user performs a synchronisation within Freeway. (Requires live internet connection)
Assembly Horizon Days: Enter the number of days. This will display assemblies or assignments whose required start date falls within this horizon. For example, if Assembly Horizon is set at 2 days, then the Mobility user will only see assemblies/assignments which start in the next two days. This is to avoid displaying unnecessarily large number of assemblies/assignments for selection..
Set Assembly/Assignment to InProgress from OnSite Tracking: Tick this box if you want to automatically change the Assembly Status to "In Progress" when OnSite Tracking is triggered.
Shift Assignment to reflect actual Start from OnSite Tracking: Tick this box if you want to automatically shift the Assignment to reflect Actual Start time when OnSite Tracking is triggered.
Fixed Assembly Style Name for Scanning : Select the Style Template to initiate when an Assembly Order barcode is scanned using the Scan On button on the Front Screen.
Assembly Picking Tolerance % : Enter the percentage the user is allowed to pick above the required amount. eg: 10 would allow the user to pick up to 10% more than what is required. No entry here equates to Zero tolerance.
Deliveries (Sub-Tab)
Delivery Selection Range: Select one of the following
- All Open Deliveries - Without any restriction defined, Freeway will deploy all Job and Sales Deliveries. (All Open Deliveries are those where the Sales Delivery Status is either Planned or InPicking and the Delivery Required Date is up to the number of Delivery Horizon Days specified)
- Only Assigned Deliveries - All Deliveries assigned to that Freeway user via the Assignment Board up to the number of Delivery Horizon Days specified.
|
|
Only Deliveries with a Shipping Method flagged as "Display Sales Deliveries in Assignment Board for this method" are available to the Assignment Board |
Delivery Restriction Condition: If Delivery Selection Range is "All Open Deliveries", then you can specify the condition that will restrict the employee to working with certain Deliveries only. (Maximum 1000 char) eg: shippingmethod = 'Courier'
Include Non-Finished Assignments A Number of Days Back: The number entered here will allow the employee to view un-finished Assignments up to that number of days back. (Used with the Assignment Board).
Hide Pricing for Materials: Tick this box if pricing is to be hidden from user.
Include Invoiced Deliveries: Tick this box if Invoiced Deliveries are to be included.
Auto Sync the Delivery List when selected: Tick this box if the Delivery List is refreshed each time the Delivery Lookup is selected, otherwise Deliveries deployed to the user will only be refreshed when the user performs a synchronisation within Freeway. (Requires live internet connection)
Delivery Horizon Days: Enter the number of days. This will display deliveries or assignments whose required start date falls within this horizon. For example, if Delivery Horizon is set at 2 days, then the Mobility user will only see deliveries/assignments which start in the next two days. This is to avoid displaying unnecessarily large number of deliveries/assignments for selection.
Shift Assignment to reflect actual Start from OnSite Tracking: Tick this box if you want to automatically shift the Assignment to reflect Actual Start time when OnSite Tracking is triggered.
Set Assignment to InProgress from OnSite Tracking: Tick this box to enable user to update the tracking code to InProgress when arriving OnSite for delivery. Used with the Assignment Board)
Fixed Delivery Style Name for Scanning : Select the Style Template to initiate when a Delivery barcode is scanned using the Scan On button on the Front Screen.
Delivery Mode : choose either "Proof of Delivery" or "Delivery Pick"
- Proof of Delivery: The mobility employee can only select deliveries which are ready to be delivered (e.g. truck driver). Proof of Delivery mode would include Deliveries where the status is "Shipped" (or "Invoiced" or "Invoiced not Shipped" if "Include Invoiced Deliveries" is ticked) AND Dropped Off flag is not ticked.
- Delivery Pick: The mobility employee can only select deliveries which are ready to be picked. Delivery Pick mode would include Deliveries where the status is "Planned" or "InPicking" AND ( Picked Status <> 'Complete' or Packed Status <> 'Complete' ) .
Restrict Picking and Receipting to Restriction Warehouses : Tick this box if picking and receipting are to be restricted to certain warehouses as listed in the Restricted Warehouses tab.
Purchases (Sub-Tab)
Purchase Restriction Condition: Specify the condition that will restrict the employee to working with certain Purchase Orders only. (Maximum 1000 char) For example Buyer = 'Sam'
Auto Sync the Purchase List when selected: Tick this box if the Purchase Orders List is refreshed each time the Purchase Lookup is selected, otherwise Purchase Orders will only be refreshed when the user performs a synchronisation within Freeway. (Requires live internet connection)
Purchase Horizon Days: Enter the number of days: This will display Purchase Orders whose required date falls within this horizon. For example, if Purchase Horizon is set at 2 days, then the Mobility user will only see Purchase Orders which are required in the next two days. This is to avoid displaying unnecessarily large number of Purchase Orders for selection.
Counts (Sub-Tab)
Inventory Count Restriction Condition: Specify the condition that will restrict the employee to working with certain Inventory Counts only. (Maximum 1000 char) For Example countdate >= Current_Date NB: If the count has been assigned to a Team, then only Team Members will see this Count
Auto Sync the Inventory Count List when selected: Tick this box if the Inventory Counts List is refreshed each time the Inventory Count Lookup is selected, otherwise Counts deployed to the Team (the user is a member of) will only be refreshed when the user performs a synchronisation within Freeway. (Requires live internet connection)
Display Stock On hand for Count Lines: Tick this box if you wish to display the expected On Hand quantity in the Count lines within Freeway.
Assignment Move Rules (Sub-Tab)
These rules apply to how assignments (on the Assignment Board) are affected when an assignment status changes from "Active" to "InProgress" controlled via Freeway.
For example if the original scheduled start of an assignment was 9.00 am. But the mobile user only starts working on this assignment at 10.30 am.
This means this current assignment was shifted by 1.5 hours. The following rules define which assignments are affected. Note that any assignment which already overlaps the current assignment will not be affected since they are already overlapping.
Only those assignments which are not overlapping could be affected. If the shift in the current assignment does not lead to overlapping with the next assignment, then the next assignment will not be moved. This merely closes the gap between the current assignment and the next assignment.
How other Assignments are affected by a Job or Assembly Shift: Select one of the following Options:
- No Assignment Move - No assignments on the Assignment Board are moved - not even the current assignment.
- Move Current Assignment - Move only the current assignment to its actual start time. All follow-on assignments are not moved.
- Move Assignments to End of Working Week - If the new end time of the current assignment overlaps the start time of the next assignment, then the next assignment will be shifted to accommodate the shift in the current assignment. Only assignments starting within the current week will be shifted. Assignments starting the following week will not be affected.
- Move Assignments for a No. of Days - Only assignments which start within the horizon days are affected. Horizon days are set in the "Assignment Move Horizon in Days" below.
End of Day Assignment Completion Tolerance (Mins): This specify the number of minutes an assignment is allowed to go past end of day before it is split into the next day (if Assignment Spitting is allowed).
Allow Assignment Splitting when moved: Tick if Assignment Splitting is allowed.
Assignment Move Horizon in Days: Enter the number of days for the "Move Assignments for a No. of Days" option.
Restricted Warehouses (Sub-Tab)
This lists warehouses this employee is restricted to work with. Add as many as required. This controls all Picking and Receipting functions for this Mobility user.
Click on Add button to add a warehouse.
- Site : Company site (display-only field)
- Warehouse : Select from drop-down list of available warehouses linked to the employee's Company Site..
Picking Classes sub-Tab
This screen allows you to restrict the employee to picking only items belonging to certain classes. Picking Classes are defined in Inventory Settings against each Item.
Picking Classes (Inventory -> Settings -> Picking Classes) allow you to group together items with similar characteristics (e.g. Dangerous goods, Heavy goods, etc...)
- Include or Exclude : Select either Include or Exclude.
- Picking Class : Select the Picking Class to include or exclude.
Transfers (Sub-Tab)
This screen allows you to specify the Selection Style for processing inventory transfers.
Transfer Selection Style : Select either From Mobility Site ,or All Sites, or Restricted Warehouses.
Layout Button
Clicking on the Layout button allows you to re-arrange the Main Freeway Screen buttons. You can also tick or untick any of the buttons to either display or hide the button on the Main Freeway Screen. A maximum of 8 buttons can be displayed on the Main screen.
The following button icons are available for selection and re-arrangement. (Drag each button to move it around the layout)
1. Update This button re-synchronizes Freeway with Ostendo
2. Solutions This button allows you to select the available Freeway solutions.
3. New This button starts a new datasheet and displays a menu for selecting a Job / Customer / Supplier / Assembly / Delivery , etc.
4. Existing This button shows existing uncompleted datasheets.
5. To Do This displays a list of To Do tasks for selection. In Ostendo, such tasks are generated by Call Ticket Actions, Jobs / Quotes Follow-Up Actions / Activity Calendar Events (appointments) / History Notes Follow-Up Actions.
6. Notify This lists all the pre-defined Notification Messages that the user can send.
7. Inquiry This lists all the standard Inquiries available for selection.
8. Scan On This allows you to scan a barcode to immediately initiate a datasheet (short-cut way to launch datasheets).
9. Find This allows you to look up Catalogues or other information.
10. Guides This display all the help Guides available to the user.
Buttons and Backgrounds Tab
Background Style : select From Rules (as per Mobility Rules settings), Default (new style) or Classic (original Freeway background style)
Modifying the Look & Feel of the Main Screen
The next 4 pairs of items allow you to load the portrait and landscape background images for the Freeway app for the three basic device dimensions (for smartphones & tablets).
The background images should be saved as png or jpeg files.
Click on the following fields to display the box. Then right-click on the box to load/delete the image.
Portrait Home Image (4:3 - iPpad): The recommended pixel ratio for the portrait image is Height: 2998 by Width: 2267
Landscape Home Image (4:3 - iPad): The recommended pixel ratio for the Landscape image is Height: 2174 by Width: 3038
Portrait Home Image (16:9) : The recommended pixel ratio for the portrait image is Height: 1730 by Width: 1080
Landscape Home Image (16:9) : The recommended pixel ratio for the landscape image is Height: 920 by Width: 1920
Portrait Home Image (16:10) : The recommended pixel ratio for the portrait image is Height: 2553 by Width: 1650
Landscape Home Image (16:10) : The recommended pixel ratio for the landscape image is Height: 1499 by Width: 2652
Portrait Home Image (18.5/19.5:9) : The recommended pixel ratio for the portrait image is Height: by Width:
Landscape Home Image (18.5/19.5:9) : The recommended pixel ratio for the landscape image is Height: by Width:
Button Style : select From Rules (as per Mobility Rules settings), or Black (default) or White, or Classic (original Freeway button style)
Button Transparency : select From Rules (as per Mobility Rules settings), or No Transparency to 90 percent in steps of 10% . Default is 40%.
You can customise the Main Menu buttons by loading your preferred images here:
Update Button Image - Landscape
Solutions Button Image - Landscape
New Button Image - Landscape
Existing Button Image - Landscape
ToDo Button Image - Landscape
Notify Button Image - Landscape
Inquiry Button Image - Landscape
ScanOn Button Image - Landscape
Find Button Image - Landscape
Guides Button Image - Landscape
Update Button Image - Portrait
Solutions Button Image - Portrait
New Button Image - Portrait
Existing Button Image - Portrait
ToDo Button Image - Portrait
Notify Button Image - Portrait
Inquiry Button Image - Portrait
ScanOn Button Image - Portrait
Find Button Image - Portrait
Guides Button Image - Portrait
Fast Code Button (On Detail Screen)
Click on this to generate a Fast Code and create an email to send the Fast Code to the employee. (The employee must have an email address defined in the Employee screen).