Checklists


- Overview - Checklists
- Standard Checklist
- Detail Tab:
- Groups Tab
- Items Tab
- Conditional Checklist
- Example 1 - Generator Test
- Example 2 - Shed Estimator
- Example 3 - Car Overheating Diagnostic
- Example 4 - Heat Pump Selector
- Dynamic Checklist
- Setup
- Dynamic Checklist Syntax:
- Syntax Example:
- Things to Avoid
- Register Checklist
- Example - Repairs & Maintenance Register
- PreStart Checklist
- Optional Checklists:
- Examples:
- List & Form Checklist Styles
- Info Type
- Group CheckBox
- ImageList
- Help Text
Overview - Checklists
Checklists provide the Freeway user the ability to record numerous pieces of information. In essence they simulate the process of a user manually completing a paper-based form, however Ostendo Checklists offer far more capability than just ticking boxes etc.. Checklists can not only be used in conjunction with any type of Ostendo transaction eg: Jobs, Assemblies Sales Orders, Deliveries etc. but also can be used in isolation of an Ostendo transaction or order.
Examples of Checklists
- Quality Assurance
- Health & Safety (Job Safety Analysis - JSA)
- Recording Hazards
- Any type of Compliance that requires data to be captured and stored centrally
- Product selection (Determining suggested product based upon parameters entered)
- Diagnostics
- Temperature Recording of Product or Chillers
- Surveys
- and much more....
Ostendo allows for multiple types of checklists to be defined
- Standard Checklist: Simply allows the Freeway user to capture data in a pre-defined sequence
- Conditional Checklists: Expands on a Standard checklist however based on the responses to certain criteria, the checklist can automatically launch another checklist or simply display a result. This is useful for diagnostics, where depending upon the problem, the answer maybe down one of many paths.
- Dynamic Checklist: Is a checklist that is able to be optionally incorporated into an Assigned Job / Assembly or Delivery for the Freeway user to complete. This means you do not need to pre-define a specific checklist to a Style Template, instead you can define the checklist on the order.
- Register Checklist: This type of checklist allows the user to trap multiple checklist entries across the same checklist structure unlimited times in the same Data Sheet. Typically a Standard checklist can only be completed 'once' per Datasheet. However, if that checklist is defined as a 'Register', you can effectively make that checklist available any number of times within the same Datasheet. eg: You may have a Checklist defined for identifying Repairs & Maintenance. A Standard Checklist would only allow you to record the information once, whereas a Register will allow you to generate that same checklist on the Datasheet multiple times allowing you to record multiple R&M items separately within the same Datasheet.
- PreStart Checklist: These are Checklists that are presented to the user before any other items defined in the Style Template are displayed unless they are defined as 'Shown at PreStart'. These are commonly used for situations were a Service Tech is required to complete a JAC before any work can proceed. (Refer Style Template Display Option)
- Optional Checklist: These are Checklists that can be optionally launched by the user from the Datasheet(Refer Style Template Display Option)
Within the structure of the Checklist there are 'Checklist Groups'. These allow you to separate your checklist items into a logic sequence and also allow you to control whether all / some or no items in that group are mandatory (ie: require completing)
Standard Checklist
A simple example of setting up a Standard Checklist can be found by clicking on this link
Detail Tab:
Name: This name must be unique. The reason for this is that conditional checklist call Checklists by Name, therefore there must be a unique occurrence of the checklist name
Description: Provide a general long description of this Checklist.
List or Form: From the drop down select either (Click here for examples)
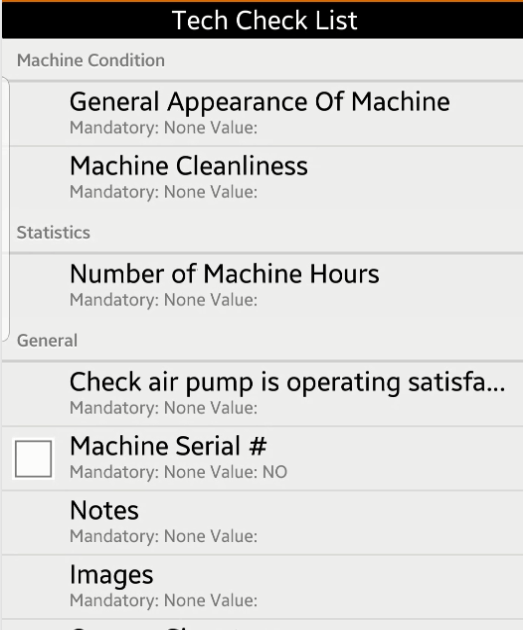
- List: This will display a conventional listing type layout of the checklist items on the Device from Freeway
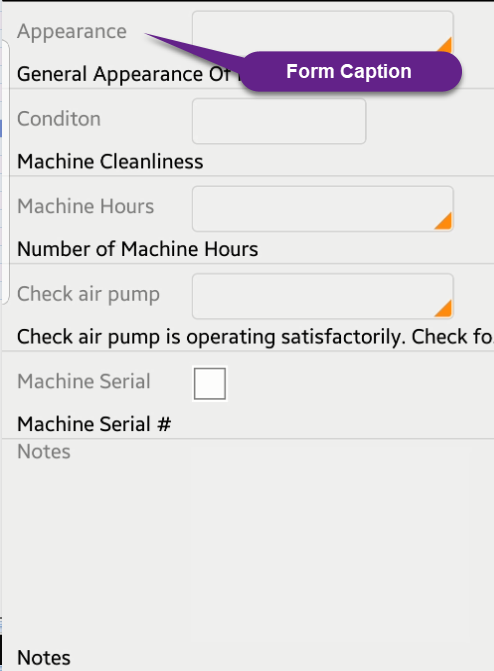
- Form: This will display the checklist items on page type layout on the Device in Freeway. With this layout you can define a Form Caption alongside each checklist item (NB: Do not use this for conditional Checklists)
Include Checklists in Notes: Ticking this box will add entries associated with any Checklist Item to the Notes field in the Order if the Mobility Note is also marked as "Include Checklists in Notes' (Refer Mobility Notes setup)
 |
All Checklist entries MUST be fully completed in Freeway for any checklist results to be added to notes, therefore it is suggested that all items are in Checklist Groups flagged as Mandatory 'All' |
Groups Tab
Press the Add button to Add Groups to allow you to logically group together items
Group Seq: This controls the sequence that all items linked to this group will appear in the Datasheet presented to the Freeway user
Group Name: This is a unique name give to this group. It must not exist in any other Checklist
Mandatory Style:
- Optional - There is no validation on this Group to ensure that Items linked to this have been answered, therefore the user can choose to ignore answering any Items linked to this Group.
- All - All Items linked to this Group must be answered before the Datasheet can be Completed.
- Any - Any one or more Items linked to this Group must be answered before the Datasheet can be Completed.
Items Tab
This Tab allows you to define you Questions etc.. and link them to a Checklist Group. Many Items can be linked to the same group. Press the Add button to add a new Item
Group Name: Browse and Select the Group this Item will be linked to
Group Seq: Ignore this as this value comes from the Group itself
Item Seq: Ostendo automatically inserts this value, however you are free to overtype this in order to control the Item sequence in your Checklist
Variable Name: Leave Blank (only used for Conditional Checklists)
Form Caption: Only used if you checklist is marked as a 'Form' type (Refer Detail Tab)
Description: Type in a Description that will be displayed to the Freeway User for this Item
Type: Select the appropriate entry from the list below:
- AssetList
- Displays the list of assets belonging to the customer. Ostendo Freeway can be used to facilitate the servicing of multiple customer assets at a site. For a full description of how to do that, please refer to : Freeway Multi Asset Servicing
- Batch Status (Only to be used List Style Checklists)
Allows the selection of a Item Batch Status (Approved / OnHold / QC Required / Rejected).
This option must be used in conjunction with a Style Template set to Internal (Data Only) or Assembly Order (Update Order) along with a Template Type of
ITEMBATCHENTER
ITEMBATCHSCAN
ITEMSCANBATCHENTER
- Check Box
- Displays a simple Check Box
- Date
- Allows a Date to be entered
- GPS
- Allows the Freeway user to initiate the capture GPS co-ordinates
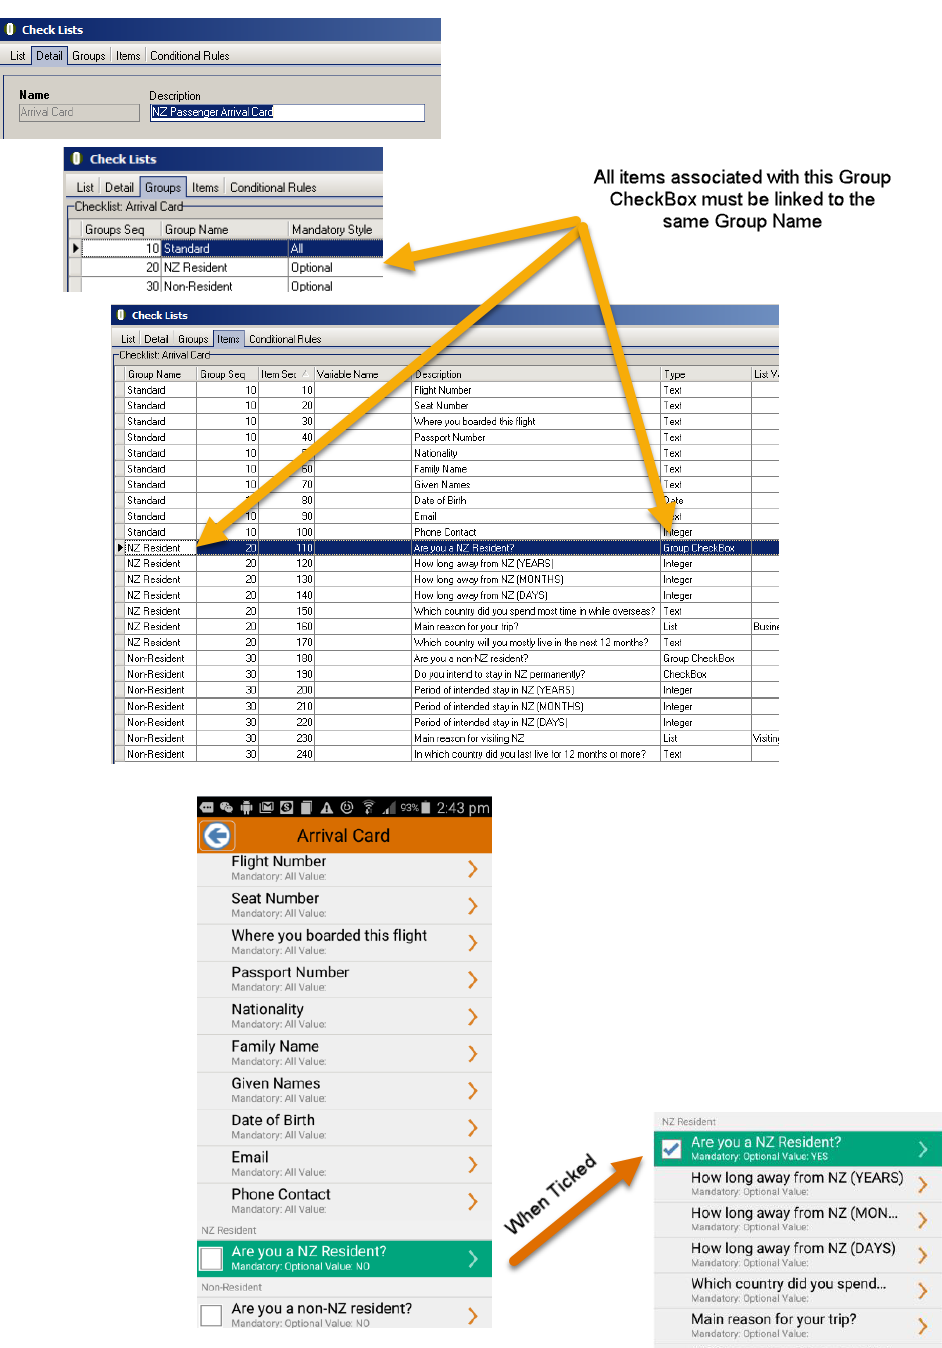
- Group CheckBox (Click here for example)
This provides a sub-checklist within a checklist. When this Group Checkbox is ticked (in Freeway), it opens up a sub-checklist. A Sub-Checklist can have any item type (except another Group Checkbox). You can have multiple (separate) Group Checkboxes within the same Checklist. Each Group CheckBox must have its own Group Name. All items belonging to a Group CheckBox will have the same Group Name. The first item in a Group CheckBox group must be a Group CheckBox type. All other items in this group can be of any item type except Group CheckBox
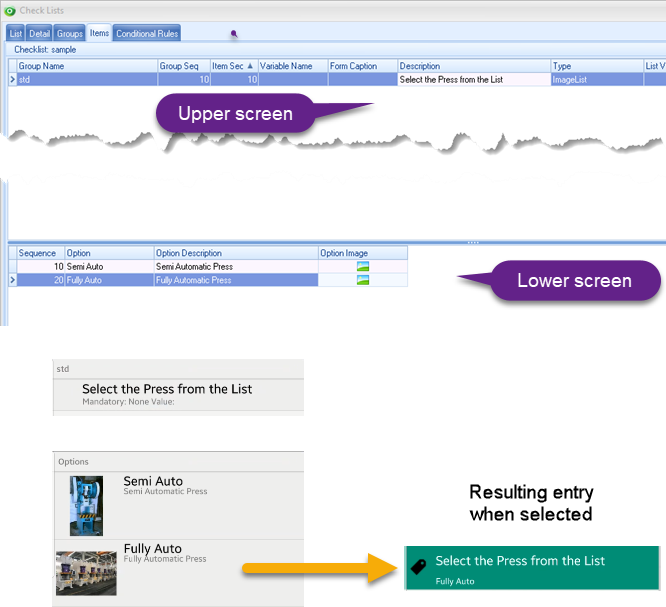
- ImageList (Click here for example)
Allows the Freeway user to select an image from a predefined list of images
Once you have “Saved” the ImageList type in Check List – (Upper screen), a sub screen (Lower screen) will appear to enable you to add the images that make up this ImageList. Click on the bottom section and click Add button to add an image to the list.
Sequence : Sequence number of the image. Increments in 10.
Option : Enter an Option Name for this Image.
Option Description : Enter an Option Description for this image.
Option Image : Click on the field; then right-click to load an image file (jpeg or png).
Add as many images as required to make up the ImageList.
When the Freeway user selects an image from a CheckList-ImageList, the Option Name associated with the selected image will be the value of the Checklist item
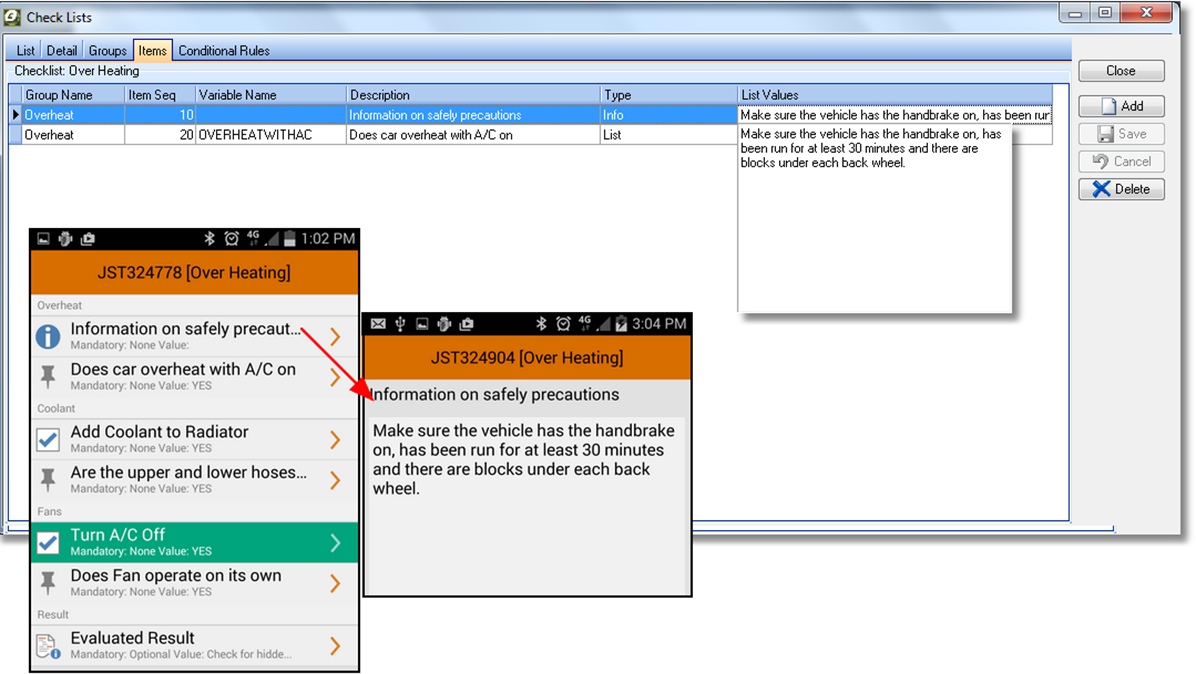
- Info (Click here for example)
Use this to provide brief information or instructions for the Freeway user.
When this Type is defined, type the Information text in the "List Value or Info Text" field.
- Integer
- Allows a whole number to be entered (negative values not allowed)
- JobOrder
- Allows the Freeway user to select a Job Number. NB: Only Jobs that are on the Device are displayed for selection
- List
- Allows you to predefine a list of values for the Freeway user to select from.
- The actual List values must be defined in the "List Value or Info Text" field on separate lines
- Memo
- Allows the Freeway user to type in multi-line text. eg: notes or comments from within the Checklist
- Number
- Allows a numeric value to be entered, either with or without decimals
- PhotoNote
Allows a photo to be captured whilst also allowing for annotation directly on the image (similar to a Sketch)
- PrintNames
Allows for the selection of a preferred PrintName from a list of all available Mobility PrintNames.
This is useful if the datasheet have several possible Print output styles.
The Freeway user can then be prompted with this checklist to select the appropriate PrintName.
- Reading
Allows for the entry of a Asset Reading value in the checklist. (This would be used in conjunction with the Asset Checklist Type) typically when the Checklist is set as a Register when used with Method 1 of Multi Asset Servicing.
- Scan
- Allows the Freeway user to scan a barcode from within the Checklist
- Signature
- Allows the Freeway user to capture a signature from within the Checklist
- SQLList
This allows the Freeway user to generate a list of values base on an predefined SQL Query entered in the "List Values or Info Text" field. The query must select and therefore return only one field, e.g. select itemcode from itemmaster where itemcategory = 'BOLTS'
The selected value will be the value of the Checklist item.
You can also include the #employeename# parameter in the SQL statement if necessary.
The #employeename# parameter will pass the Freeway employee name to the SQL statement.
e.g. select ORDERNUMBER from PURCHASEHEADER where BUYER = #employeename#

This Query is NOT a 'real-time' query. SQLList queries are only refreshed when the Freeway user performs a Synchronisation. Therefore if the Query is amended back in Ostendo, is it not reflected within Freeway until the user runs the Freeway synchronisation process.
- StopWatch
This adds a stopwatch function to the checklist to capture time/duration values
- Text
- Allows the entry of a single line of text up to 200 characters.
- Time
- Allows the entry of a Time value
List Values or Info Text: Enter the appropriate information into this field as below:
- If the item is a "List" type, then enter the list of values here on separate lines. This will force the user to select values from this list only.
- If the item is an "Info" type, then enter the information text here.
- If the item is an SQLList type, then enter the SQL select statement here.
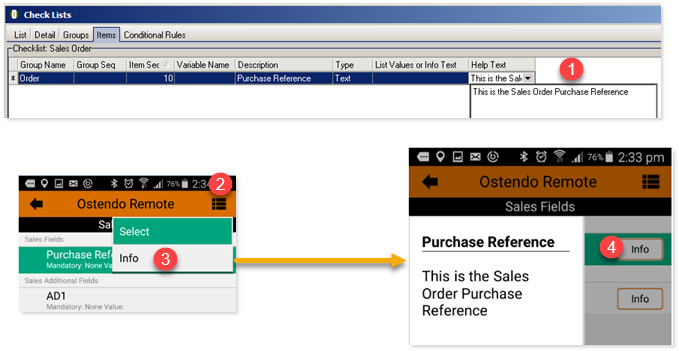
Help Text: (Click here for an example) Enter any applicable help text here for the item. This help text can be displayed within Freeway as required by the user.
Property : Select a standard property to be associated with the Property item.
 |
If you are updating a Property in Ostendo using this field, ensure the Checklist Item Type has been set to reflect the data to be captured, eg: If the Property relates to an Integer, then ensure the Checklist Item Type is set to Integer |
Conditional Checklist
Conditional Checklists can be used to help users follow a pre-defined process to carry out such tasks as problem diagnosis, compliance certifications, custom product configuration, quality assurance, and so on.
Where a Standard Checklist is a pre-defined list of questions or pointers to guide a user and ensure they follow a disciplined and consistent approach to the task at hand. Conditional Checklists makes the process dynamic. Depending on the answers to the preceding questions, the Conditional Checklist can take a variety of paths so that the relevant set of questions are asked and responded to, depending on the actual situation being addressed.
Conditional Checklists help ensure that:
- 1. Service/Sales personnel offer consistent quality service regardless of their experience.
- 2. Problems are diagnosed, quality assured, or products configured efficiently without having to go through each and every question in the Check List.
- 3. Companies can continuously improve their processes by fine-tuning their checklists based on past experience.
We have put together the following examples to illustrate how Conditional CheckLists can be put to practical use:
1. Generator Test – a simple quality assurance checklist.
2. Shed Estimator – illustrates how a Conditional Checklist can be used to configure and compute the price of a custom built product.
3. Car Overheating Diagnostic – shows how a set of checklists can be put together to do problem diagnostics and resolution.
4. Heat Pump Selector – shows how checklists can be organized to calculate requirements based on room dimensions and select the appropriate Heat Pump mo
Example 1 - Generator Test
XYZ Generators Ltd wishes to ensure that all their domestic generators meet the following technical specifications before they are sold:
- Output Voltage must be >= than 235 volts and <= 242 volts.
- Output Current must exceed 10 amps.
- Noise level of Generator when run at load must be less than 60 decibels.
A Quality Assurance template and checklist can easily be created in Ostendo Freeway to handle such requirements.
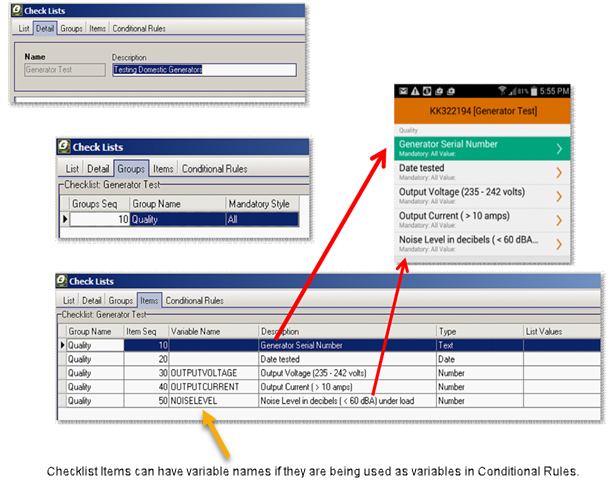
1) Go to Mobility -> Check Lists to create a new checklist called Generator Test. As it is a straight forward set of tests, we can put all the check items into one mandatory group called "Quality"
Items tab:
Group Name must be defined in Groups tab. Every item must have a valid Group Name.
Item Seq determines the sequence in which the Checklist items are displayed in the mobile app.
Variable Name is optional.
A variable name is required only if the variable will be utilised in a conditional rule.
Variable names must not be the same as the Item Seq.
Variable Names must be unique across all checklists.
Description – This is what will be displayed in the mobile app’s checklist.
Type – Checklist item types could be :
- Checkbox / Group CheckBox
- Text / Memo / List / Info
- Number / Integer
- Date / Time
- Signature / PhotoNote
List Values - If the Type is List, then all the list values are entered here.
Conditional Rules Tab
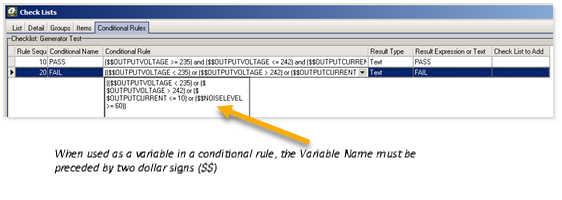
As checklist items are being responded to in the Freeway mobile app, the app will continuously check if any of the conditional rules are satisfied. If satisfied, the app will either display a result or branch off to another checklist.
 | You should not leave any Conditional Rule blank as this will always be true before any data is entered |
Rule Sequence: determines the sequence the rules are applied. Once a rule is satisfied, the remaining rules will be ignored.
Conditional Name: a user-defined name for the rule.
Conditional Rule: In this example, all three requirements (OutputVoltage, OutputCurrent, NoiseLevel) must be met before the generator is deemed to have passed the quality check.
This is expressed in the Conditional Rule called PASS:
($$OUTPUTVOLTAGE >= 235) and ($$OUTPUTVOLTAGE <= 242) and ($$OUTPUTCURRENT > 10) and ($$NOISELEVEL < 60))
The second condition in this example is FAIL when any of the requirements are not met:
(($$OUTPUTVOLTAGE < 235) or ($$OUTPUTVOLTAGE > 242) or ($$OUTPUTCURRENT <= 10) or ($$NOISELEVEL >= 60))
Result Type: If this rule is not branching off to another CheckList, then the type could be either an Expression or Text. Text is simply some words that will be displayed, while Expression is a formula to be computed.
Result Expression: If this rule is not branching off to another CheckList, then either the text or expression is entered here. In this example, the word ‘PASS” or “FAIL” is the text entered here. If Result Type is an Expression, then an expression (formula) would be entered in this column. This column is left blank if the rule is branching off to another CheckList.
CheckList to Add: If the Result Type is neither an Expression nor a Text, then this column is used to enter the name of the CheckList to branch to.
2) Go to Mobility -> Style Templates to create a new template called "GENCHECK"
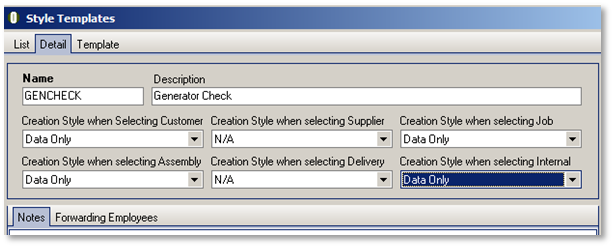
We will not create any job or invoice with this template. So select ‘Data Only’ for Creation Style when Selecting Customer / Job / Assembly / Internal
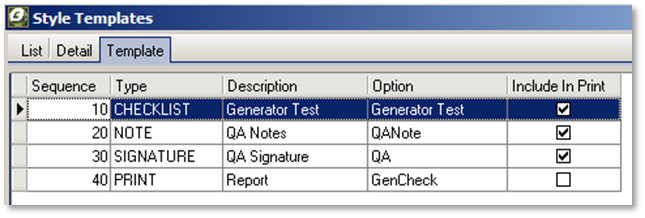
For this template, we will start with the Generator Test CheckList, followed by QA Notes and Signature. We also want to print a report for documentation purposes.

|
You need to have the Note name, Signature name, and Print name defined in Mobility Settings first. |
3) We now go to Mobility -> Style Template Matrix to add a record so that we can select this GENCHECK template as well.


|
Note that even though the Datasheet Style is “All”, we have actually limited it to Customer, Job, Assembly, and Internal in step 2 above. |
4) Now we should be able to synchronise Freeway on our device to get this template from Ostendo.
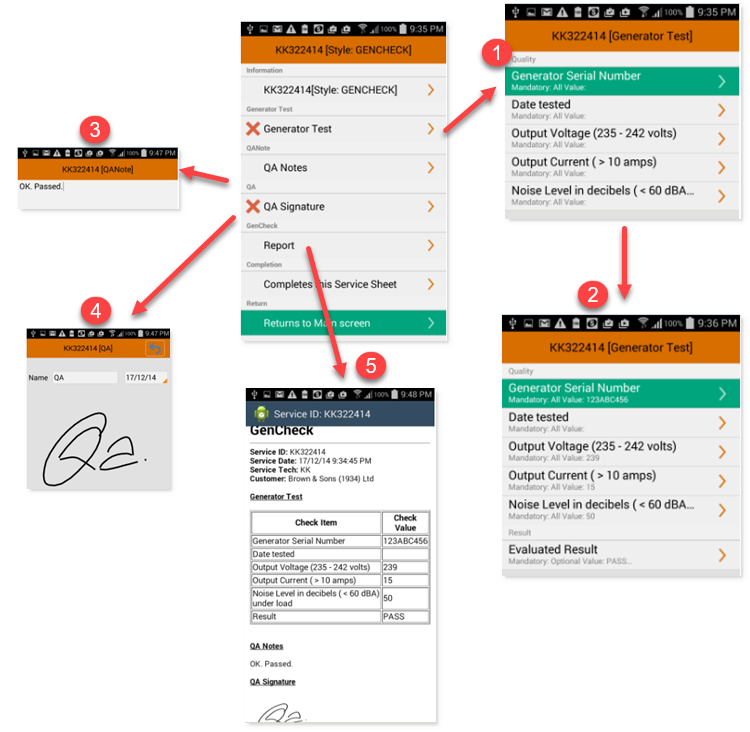
5) Below are screen shots showing the results after the Freeway user has created and completed the Data Sheet on the device.
- Shows the initial Checklist allowing the user to specify details including the variable values for "Output Voltage", "Output Current" and "Noise Level".
- The answers to these variables then produce the "Evaluated Result" of "PASS" in this example
- QA Notes allows the user to record notes
- QA Signature allows the user to record their signature directly onto the device
- An optional report can be produced directly from within Freeway. This report can then be either Printed form the device / Saved or emailed
Example 2 - Shed Estimator
In this example, the Price of a shed is based on its dimensions and type of finish.
It can be any length and any width, with two standard choices for Height (2100 mm or 2300 mm) and type of Finish (Zinc or ColourSteel).
The price is computed based on the following formula:
If Finish = ColourSteel and Height = 2300, then Price = Width in Metres X Length in Metres X 200 X 1.2
If Finish = ColourSteel and Height = 2100, then Price = Width in Metres X Length in Metres X 200 X 1.0
If Finish = Zinc and Height = 2300, then Price = Width in Metres X Length in Metres X 165 X 1.2
If Finish = Zinc and Height = 2100, then Price = Width in Metres X Length in Metres X 165 X 1.0
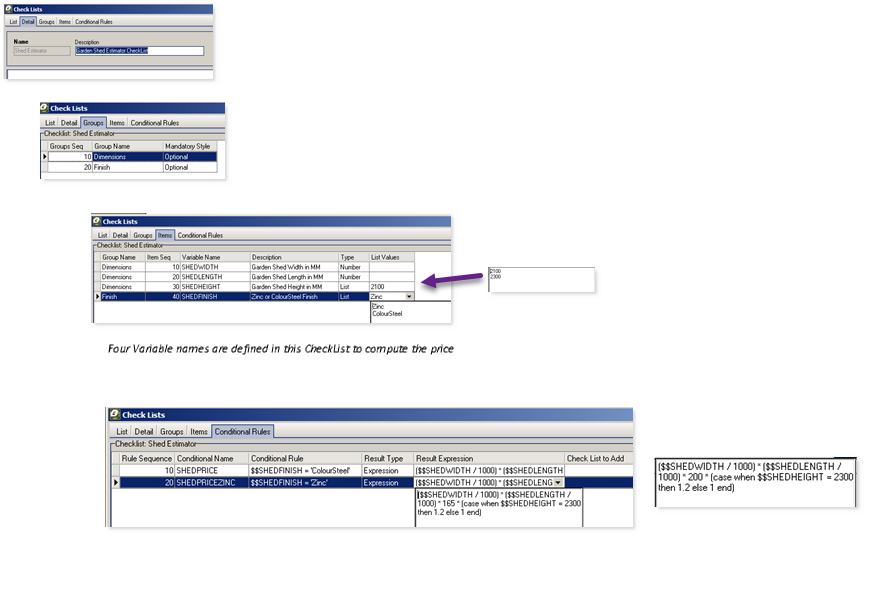
This is translated into two Conditional Rules (Finish = ColourSteel or Finish = Zinc).
The Result Expression uses a case statement to determine the factor to use based on Height selected.
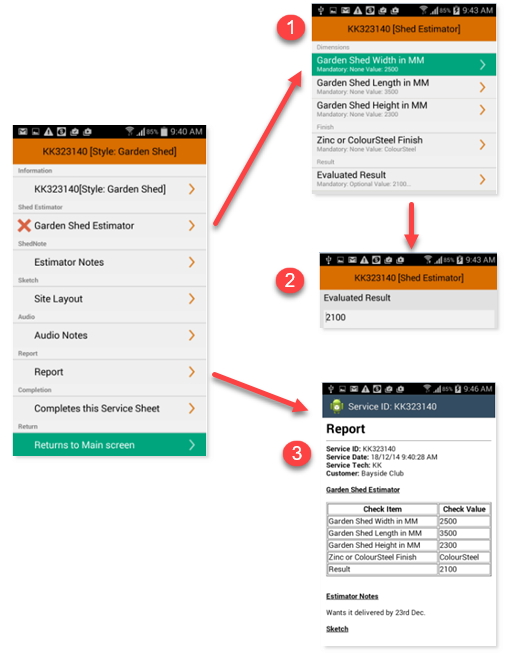
Below are screen shots showing the results after the Freeway user has created and completed the Data Sheet on the device.
- Shows the initial Checklist allowing the user to specify details including the variable values for the required Shed Dimensions
- The answers to these variables then produce the "Evaluated Result" of "2100" in this example
- An optional report can be produced directly from within Freeway. This report can then be either Printed form the device / Saved or emailed
The Expression
($$SHEDWIDTH / 1000) * ($$SHEDLENGTH / 1000) * 200 * (case when $$SHEDHEIGHT = 2300 then 1.2 else 1 end)
Will produce this result
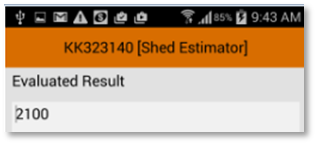
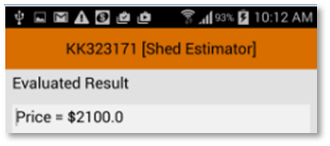
However if you cast the expression as TEXT and concatenate it to the string ‘Price = $’ like this:
‘Price = $' || cast(($$SHEDWIDTH / 1000) * ($$SHEDLENGTH / 1000) * 200 * (case when $$SHEDHEIGHT = 2300 then 1.2 else 1 end) as TEXT)
Will present this result showing the word "Price" and correct currency formatting
Example 3 - Car Overheating Diagnostic
This example shows how a CheckList can branch off to another checklist.
Suppose you have the following documented flowchart for diagnosing Car Overheating problems.
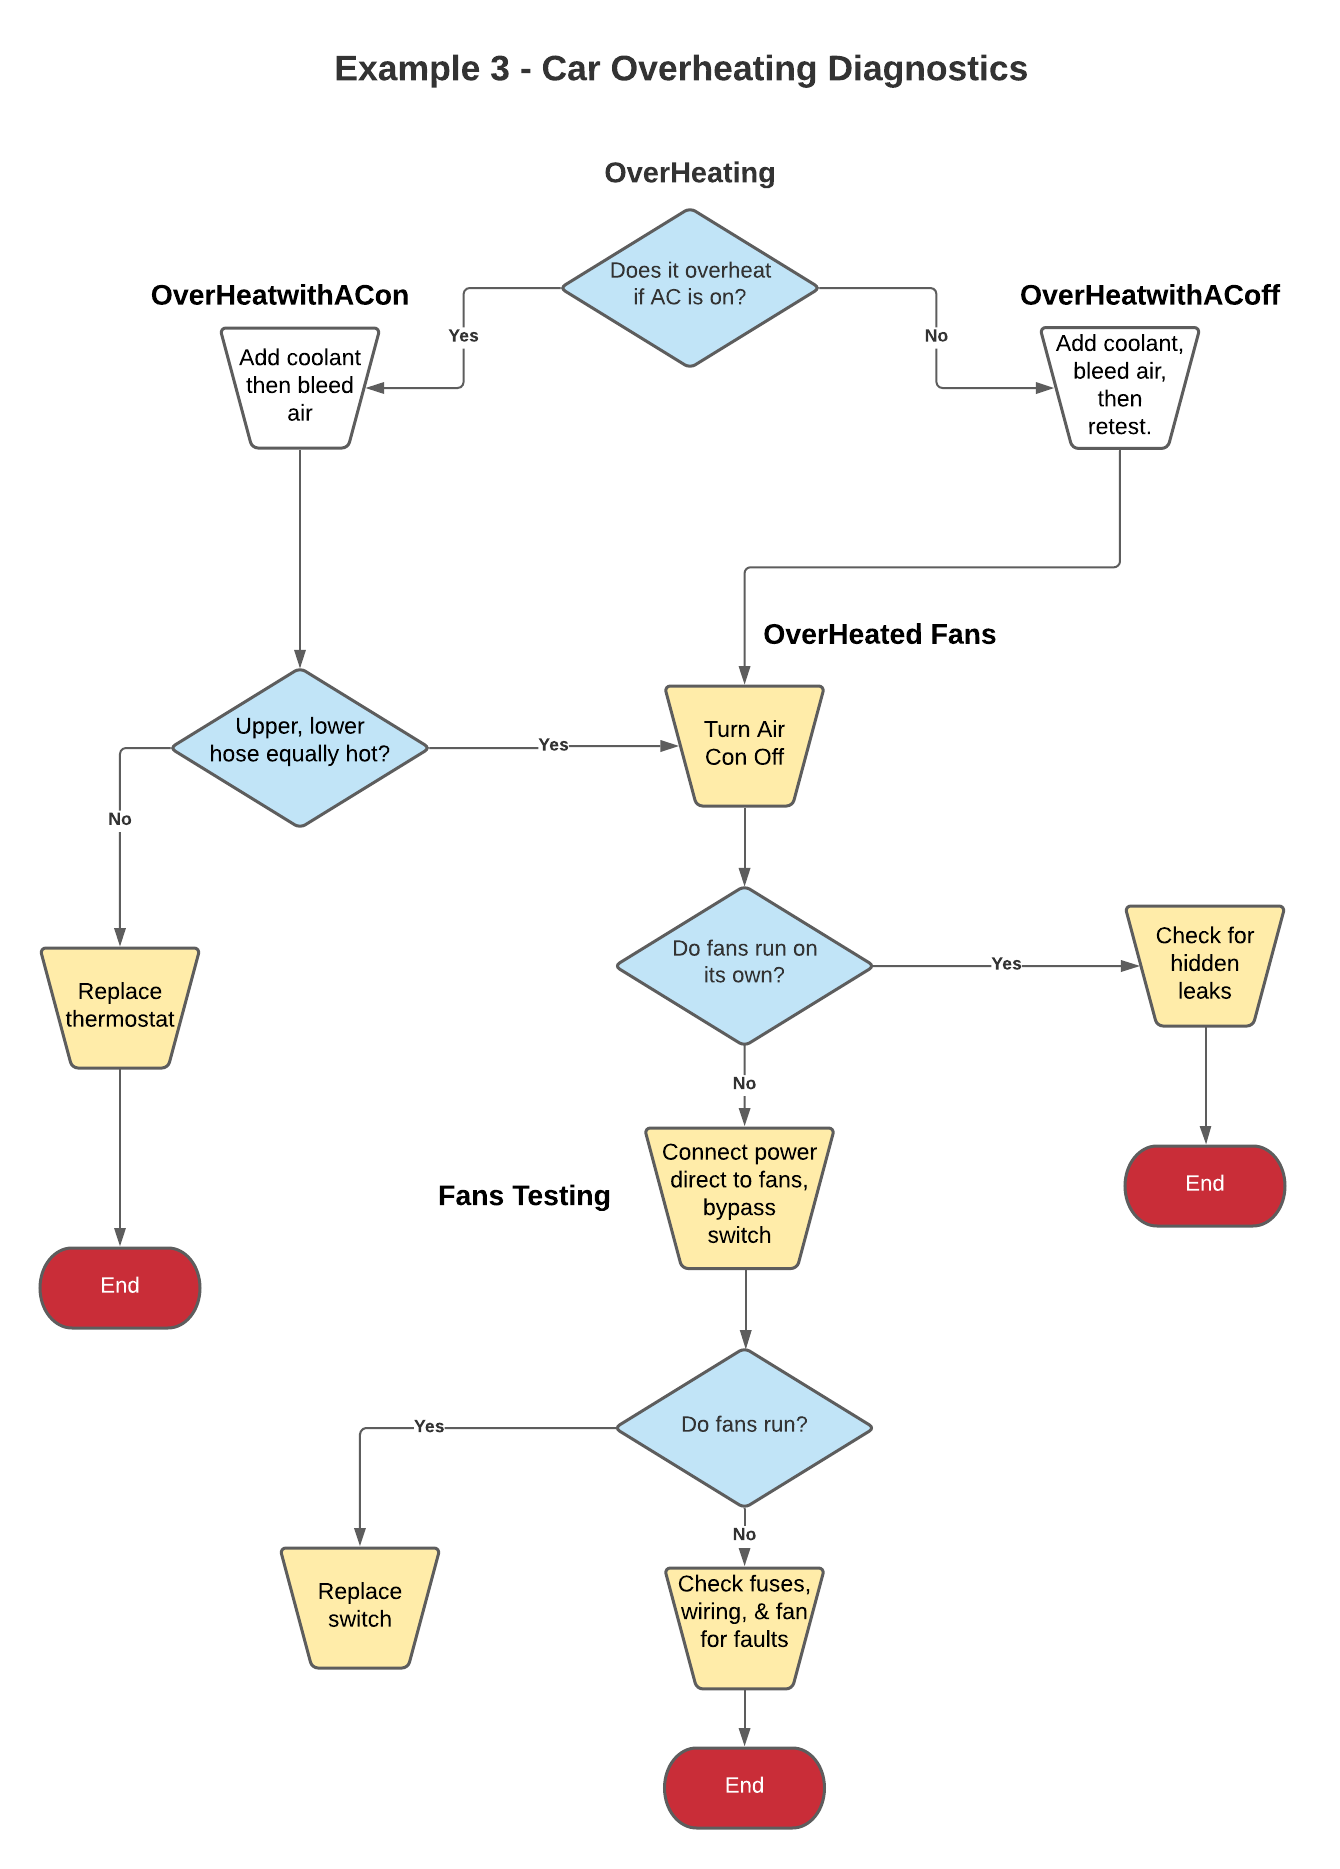
We can create 5 CheckLists to implement this flowchart:
The initial CheckList - Overheating
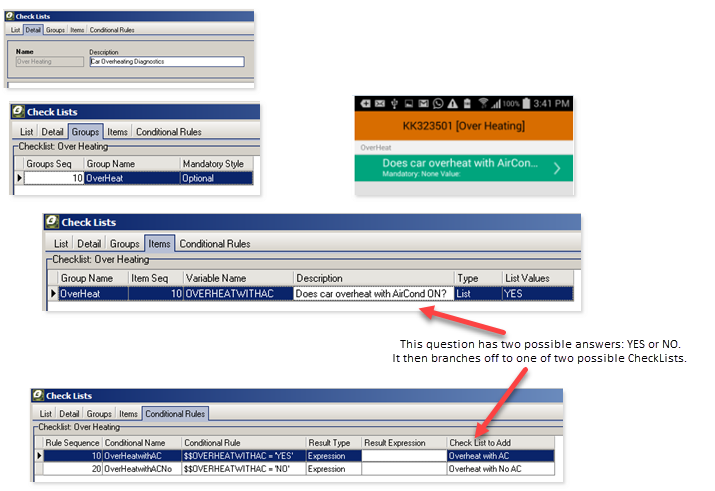
Next CheckList: Overheating with Aircon ON – Overheat with AC
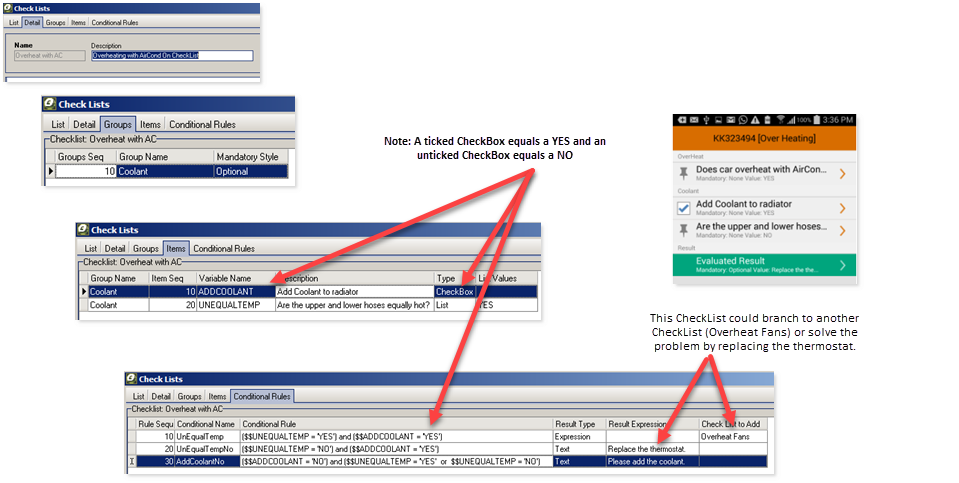
The last Rule (Line 30) is added just to prompt the user to perform the Add Coolant task and tick the CheckBox
Next CheckList: Overheating even when Aircon is OFF – Overheat with No AC
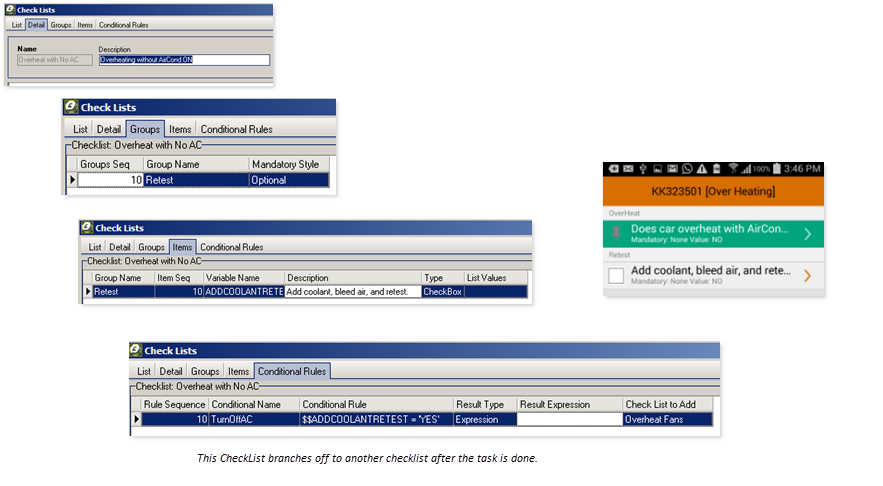
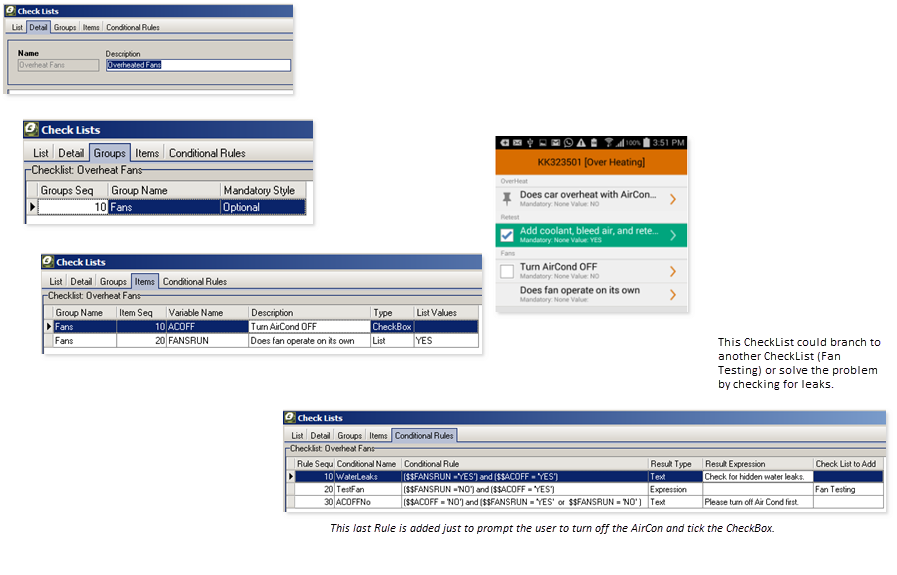
Next CheckList: Checking Overheated Fans – Overheat Fans
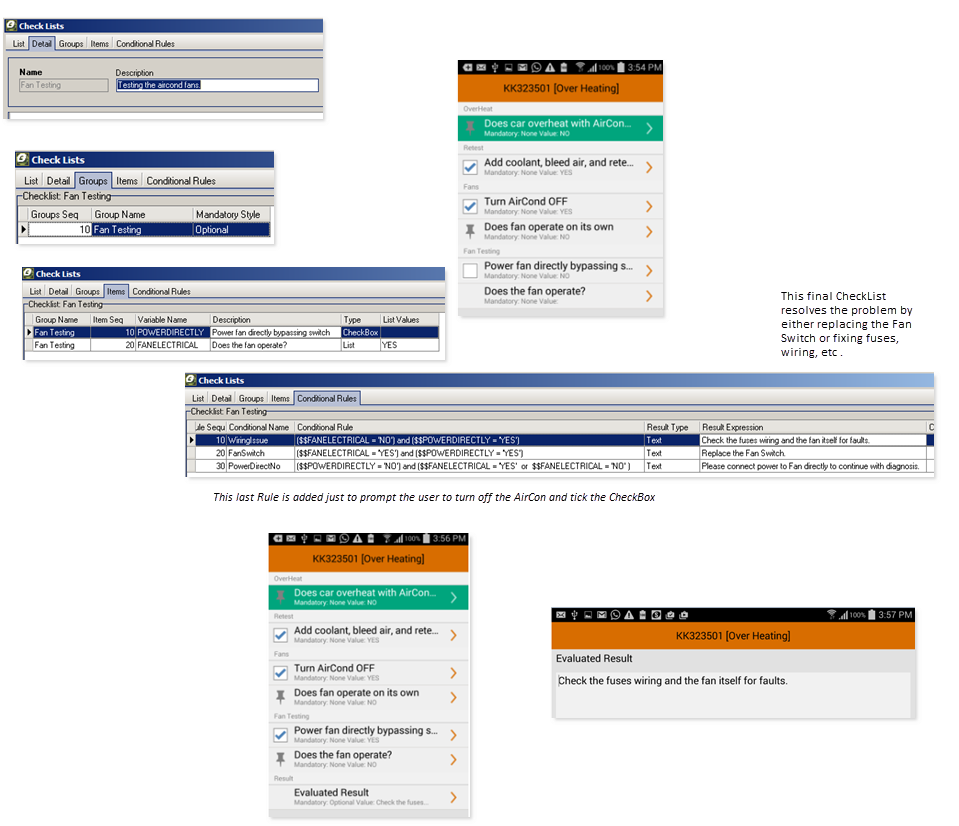
Final CheckList: Testing the AirCon fans – Fan Testing
Example 4 - Heat Pump Selector
The Heat Pump Selector starts with calculating the requirements for one room. It then checks if there is another room to be added. If there are no more rooms, then it will calculate the total requirements of all the rooms and recommend the appropriate model.
In this example, we assume the following:
- You need 45 watts per cubic metre
- Windows NONE/STANDARD/LARGE will use the following factors respectively : -5% / 0% / +5%
- Insulation LOW/MEDIUM/HIGH will use the following factors respectively : +10% / 0 / -5%
Ostendo Freeway HeatPump Selection Guide:
- Less than or equal to 2.5 Kilowatts à Model OF2500
- 2.5 – 5 Kilowatts à Model OF5000
- 5 – 7 Kilowatts à Model OF7000
- 7 – 9 Kilowatts à Model OF9000
- 9 – 12 Kilowatts à Model OF12000
First CheckList: HPSelect
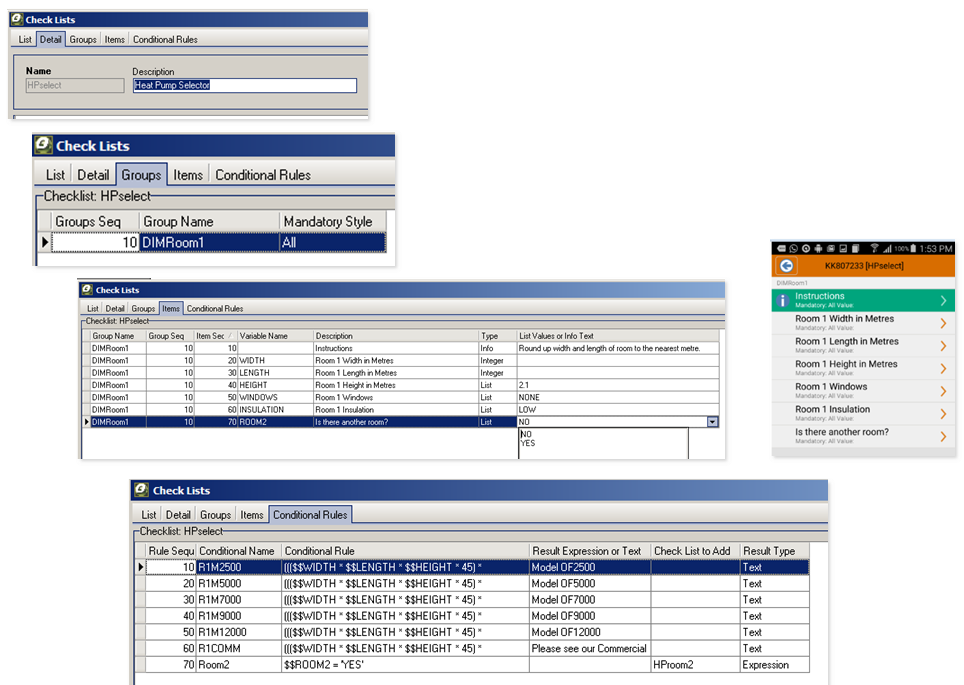
The Conditional Rule for selecting model OF2500 is as follows:
((($$WIDTH * $$LENGTH * $$HEIGHT * 45) * (case $$WINDOWS when 'NONE' then 0.95 when 'LARGE' then 1.05 else 1 end) *
(case $$INSULATION when 'LOW' then 1.1 when 'HIGH' then 0.95 else 1 end) ) <= 2500 ) and $$ROOM2 = 'NO'
The rest of the model selection rules are similar.
The last rule checks if there is a second room. If so, it will pull in the checklist for Room 2.
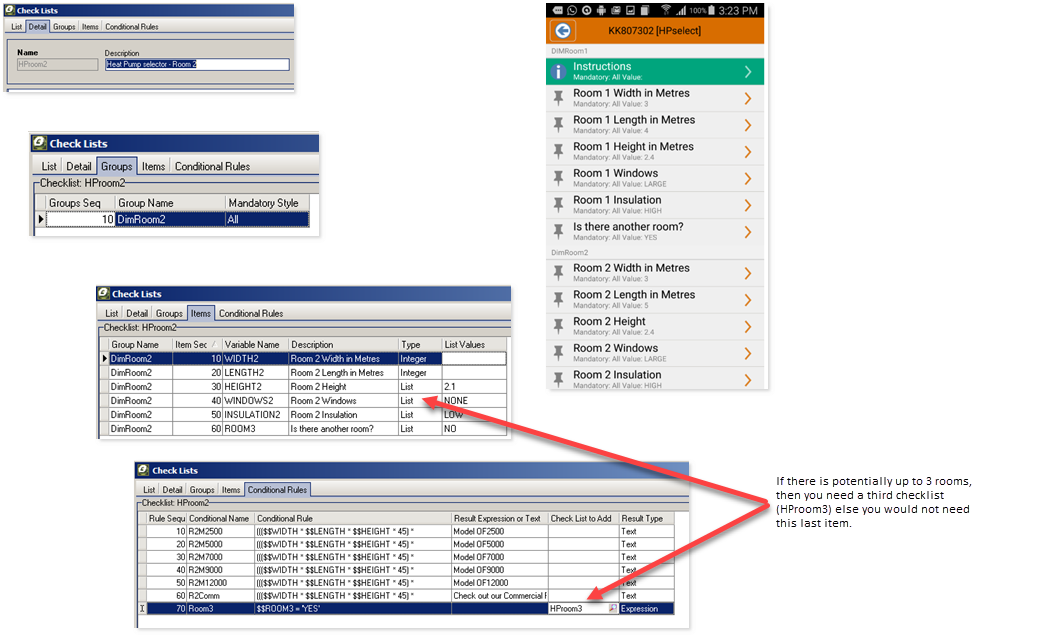
You will need a separate checklist with unique variable names for each additional room.
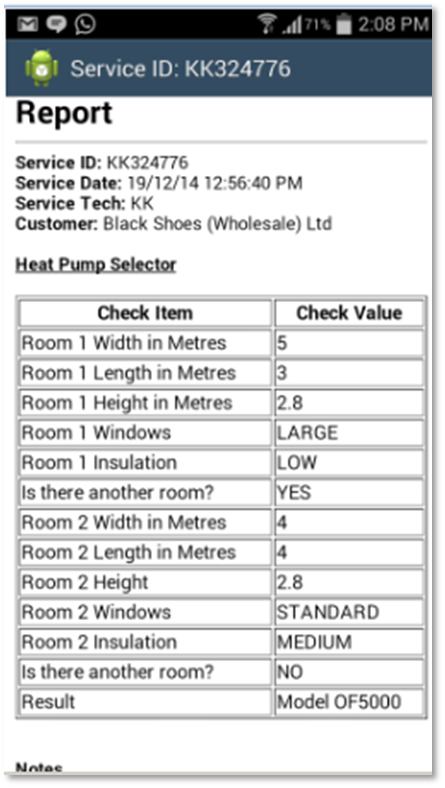
If there are two rooms, then the model selection is done after the second checklist is processed. The Conditional rule for model selection in this checklist is like this:
((($$WIDTH * $$LENGTH * $$HEIGHT * 45) *
(case $$WINDOWS when 'NONE' then 0.95 when 'LARGE' then 1.05 else 1 end) *
(case $$INSULATION when 'LOW' then 1.1 when 'HIGH' then 0.95 else 1 end)) +
(($$WIDTH2 * $$LENGTH2 * $$HEIGHT2 * 45) *
(case $$WINDOWS2 when 'NONE' then 0.95 when 'LARGE' then 1.05 else 1 end) *
(case $$INSULATION2 when 'LOW' then 1.1 when 'HIGH' then 0.95 else 1 end)) ) <= 2500
and $$ROOM3 = 'NO'
Notice that we are adding the requirements of both rooms. That is why we need unique variable names in all the checklists
Dynamic Checklist
The idea behind this is that you may want to include some specific Checklist items in your Style Template to the mobility user when they create the Datasheet for this specific Job, Sales Delivery or Assembly Order.
An example of this is where you may have defined a standard checklist in the Style Template, however for this specific job you require the mobility user to capture some specific data relating to this order.
Setup
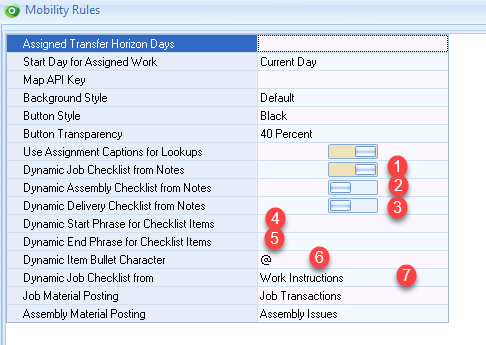
Mobility -> Settings -> Mobility Rules
- Dynamic Job Checklist from Notes: Select to turn this feature on
- Dynamic Assembly Checklist from Notes: Select to turn this feature on
- Dynamic Delivery Checklist from Notes: Select to turn this feature on
- Dynamic Start Phrase for Checklist Items (blank = {Checklist}
- Dynamic End Phrase for Checklist Items (blank = {End}
- Dynamic Item Bullet Character eg: @
- Dynamic Job Checklist from. Select this if you have turned on Dynamic Job Checklist from Notes. This tells Ostendo which Job Notes field the Dynamic Checklist will be defined on the job.
- Job Instructions
- Work Instructions
- Task Instructions
Dynamic Checklist Syntax:
Syntax to be entered into the relevant Instructions field on the Job / Assembly or Delivery (NB: For convenience, these could be predefined in General->Frequently Used Text)
Keywords (case insensitive) for determining Checklist Item Type
- 'PHOTO', ‘IMAGE’, ‘PICTURE’, ‘PHOTOGRAPH’ = PhotoNote
- ‘DATE’ = Date
- ‘TIME’ = Time
- ‘QUANTITY’, ‘QTY’ = Integer
- ‘NUMBER’, ‘VALUE’ = Number
- ‘CHECK’ = CheckBox
- ‘NOTE’, ‘NOTES’ = Memo
- ‘SIGN’, ‘SIGNATURE’ = Signature
- ‘LIST’ = List followed by the list values eg: List (value1,value2,value3…)
- ‘GPS’ = GPS (Refer special syntax rule below)
- If there is no keyword, then the Type is assumed to be Text
- You are also able to set the Check Item to mandatory using the keyword ‘MUST’
- Syntax of ‘List’ keyword values are delimited by commas and enclosed in brackets as follows: (value1,value2,value3…)
- Ensure you define a Template Type of “DynamicChecklist” in the Style Template to be used
Syntax Example:
An example is as follows to be typed into Order Notes / Job or Task Instructions:
{checkList}
@ you must take a picture of the washing machine
@ please record the date of the work
@ enter the time when the work as done
@ take another photo
@ you must enter some notes
{end}
Things to Avoid
 |
The following syntax rules should be adhered to: |
- Avoid having checklist items with multiple keywords in it. eg:
- Please sign and check the date is correct
The above phrase will only look at the first keyword eg: 'sign' keyword, not the ‘check’ or 'date' keywords.
- Ensure you leave a space between the bullet character and the checklist
entry eg:
@ please record date √
@please record date ×
- Ensure that keywords have at least one word appearing before.
@ please record date √
@ date to record ×
- Ensure the GPS keyword has at least one word before & one word after.
@ Log the GPS Coordinates √
@ GPS Coordinates ×
Register Checklist
On occasions you will need to record data to a checklist potentially multiple times within a Datasheet. With a Standard checklist, you can only record one set of data against the same checklist once within a Data Sheet.
Example - Repairs & Maintenance Register
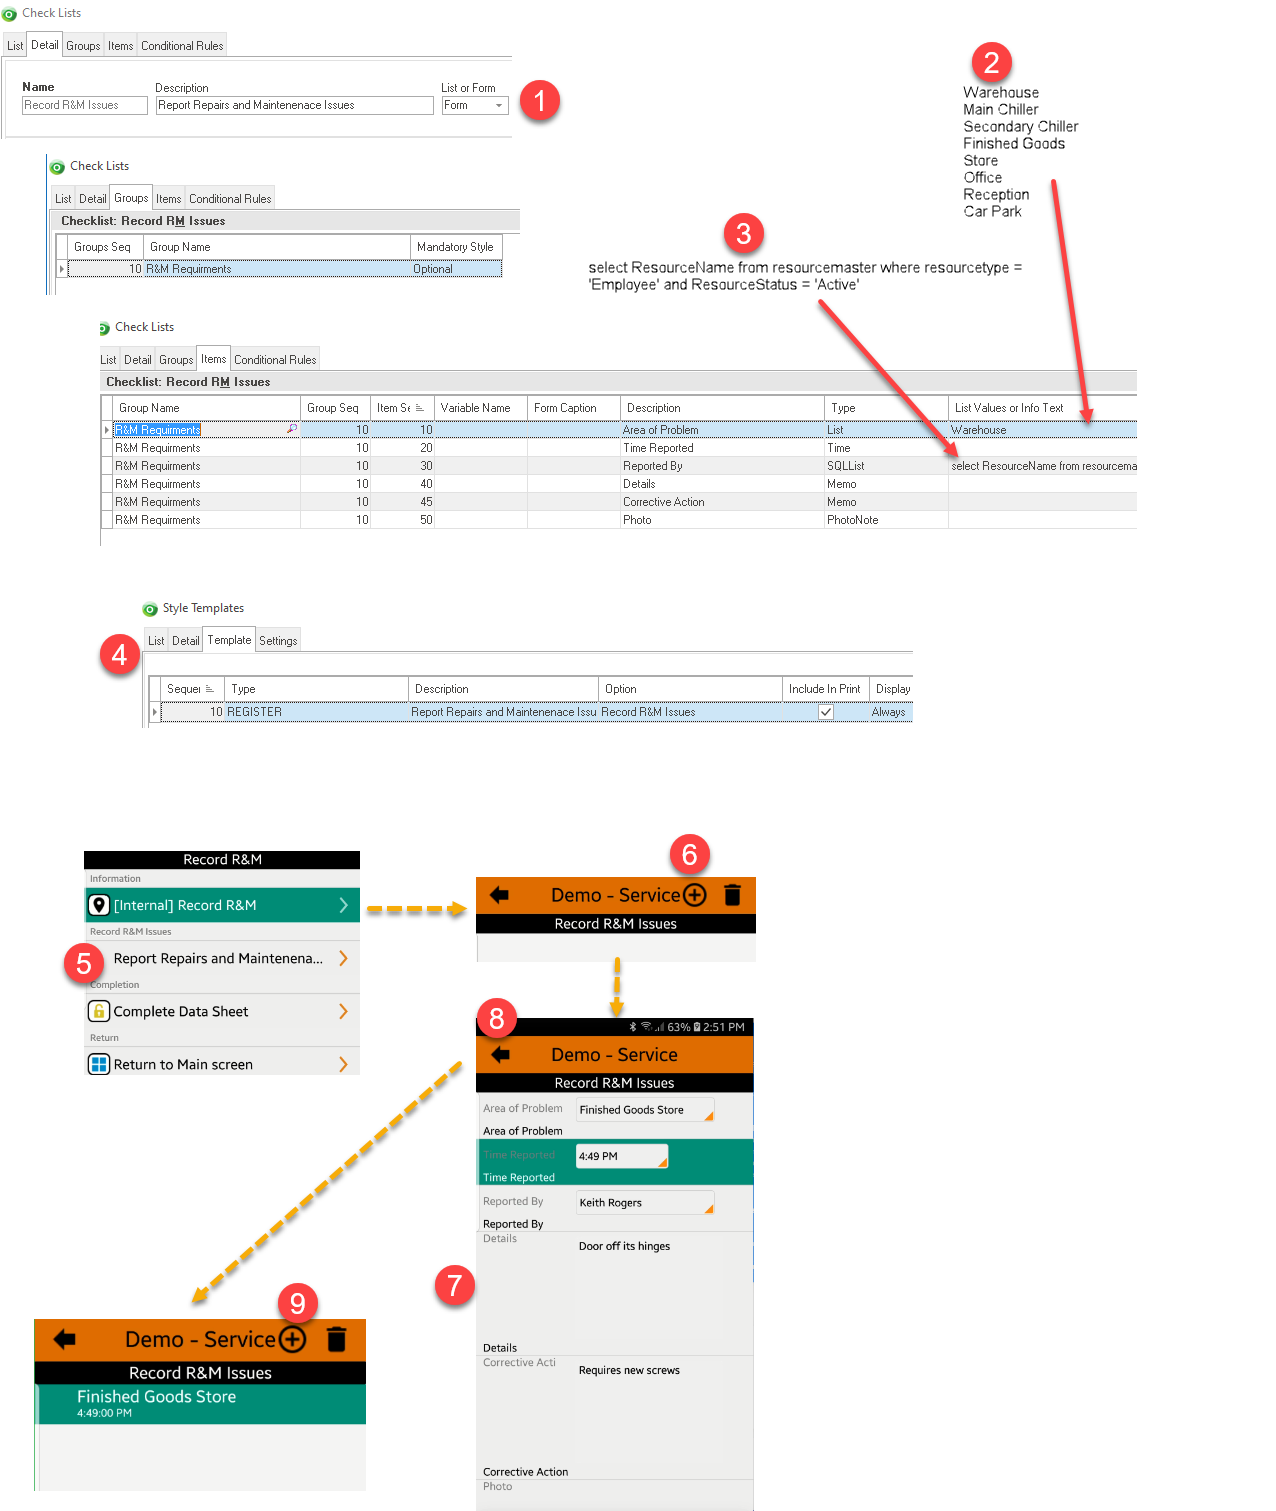
Imagine we wish to have a Freeway Template that allows us to record one or more Repairs and Maintenance issues at the same time. Let's say we want to record two separate R&M issues. Using a conventional Checklist. We can only record each issue within two separate Datasheets. This would be impractical and time consuming. Wouldn't it be better, if we could record one R&M issue against a single checklist entry for 'Issue1', then create another entry for another R&M issue 'Issue2', all from within the same Datasheet. Let's just not limit ourselves to two issues, however about as many as we need at one time, all being recorded on the same Datasheet. This is what a Register allows for.
In essence, a Register is defined as a Standard Checklist
 |
Conditional Checklists cannot be used in a Register |
When we link the Checklist to the Style Template, we simply give it a Template Type of "Register" rather than CheckList"
This example presents the Register (CheckList) as a "Form" rather than List to make it easier for the user to record information.
- Create a Checklist called "Record R&M Issues" and select "Form"
- Add the Checklist Items as required. We have included a "List" type for the user to record the Area the Repair or Maintenance issue exists
- We have also included an SQLList type to present a list generated from SQL of Resource Names (from the ResourceMaster table) showing all Active Employees to the Freeway User to record their name on the Data Sheet.
- Create a Style Template or Add this to an existing Style Template, ensuring you add the Template Type as a "REGISTER" (not CHECKLIST). Then setup a Style Template Matrix record if required.
- From within Freeway select the Template and select the "Record Repairs and Maintenance Issues" option
- At the Top of the screen press the '+' button (This will launch the Register CheckList)
- Complete the information
- Press the 'Go Back' button
- Either Add another Register Entry by pressing the '+' button (Repeat the process from Step 7 for as many entries as you wish to record) or press the 'Go Back' button to return to the main Data Sheet screen.
PreStart Checklist
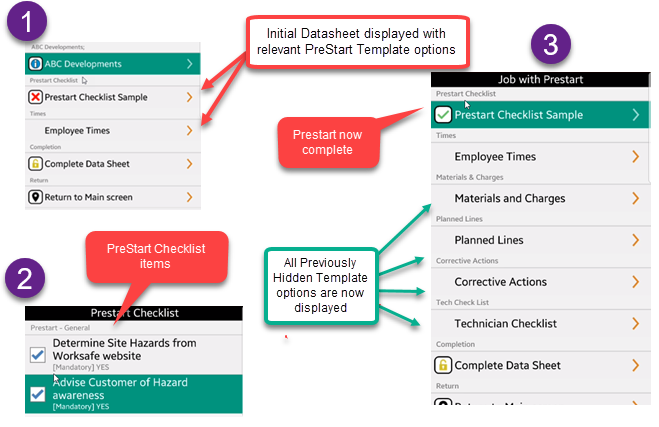
The concept of this is to force the Freeway user to complete various functions within the Datasheet prior to commencing the work. For example, you may have a PreStart checklist to identify hazards prior to starting the work. Once these are completed, only then does the Datasheet reveal all other template options available to the user.
A PreStart checklist is setup the same as any other checklist, however one or more groups in it must be set to ‘Mandatory’.
The Checklist is then defined against the Style Template with a “Display Option” set to ‘PreStart Checklist’. (Only one checklist maybe defined in a Style Template as “PreStart”)
Once a PreStart Checklist “Display Option” is specified for that Template, all other Template lines must be specified either as “Shown at PreStart” or “Hidden at PreStart”. This controls when they are displayed in the Datasheet
Always = Not applicable for use with PreStart Checklists
Optional = Not applicable for use with PreStart Checklists (Refer Below)
Hidden at PreStart = This entry is hidden from the Datasheet until the PreStart Checklist has been completed / or mandatory satisfied.
Shown at PreStart = This entry is displayed in the Datasheet when the PreStart Checklist is presented
PreStart Checklist = This is the checklist that is defined as PreStart. (There can only be one specified for the Template)

Below is an example of how this would be used. Notice, that we are allowing Times to be entered at PreStart, whilst Materials, Planned Line Info and Corrective Action will only be displayed once the Prestart Checklist has been fully completed.

Example of how the Datasheet will be displayed in Freeway:
Optional Checklists:
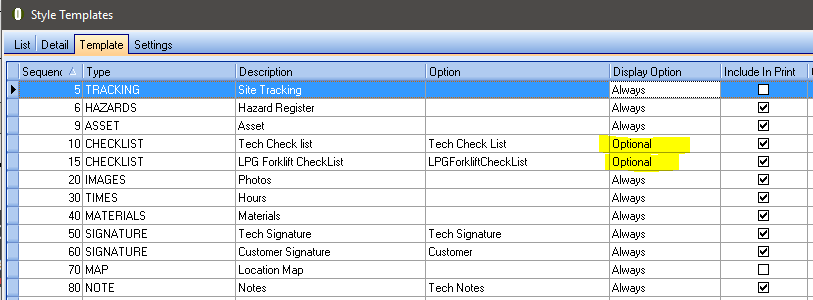
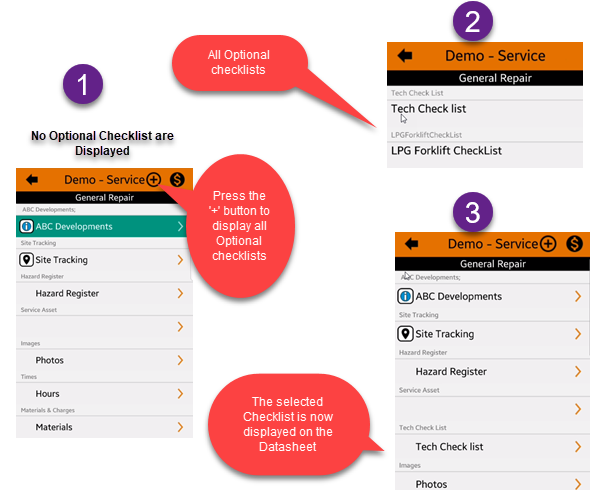
These are defined to allow the Freeway User to optionally select from within the Datasheet. They are defined as normal Checklists but their “Display Option” in the Style Template is set to ‘Optional’. (NB: These cannot be used when a PreStart checklist is defined.)
Examples:
List & Form Checklist Styles
- List: This will display a conventional listing type layout of the checklist items on the Device from Freeway
- Form: This will display the checklist items on page type layout on the Device in Freeway. With this layout you can define a Form Caption alongside each checklist item (NB: Do not use this for conditional Checklists)
Info Type
Group CheckBox
ImageList
Help Text
- Type the appropriate text in the Help Text field in the Checklist in Ostendo
- Within Freeway, press the 'hamburger' button and press the "Info" option
- Info button will appear against all checklist items. Simply press the "Info" button against the item to display the Help Text
