Step 7 - Using Freeway


- Ostendo - Job Setup
- Marking a Job as Urgent
- Marking a Job as Fixed Required Time
- The Freeway Datasheet
- Time Entry
- Materials & Charges:
- Completing the Checklist
- Photos
- Signatures
- Recording Notes
- Job Tracking Code
- Task Status
- Completing The Datasheet
- The Datasheet & Job In Ostendo
- Example of Datasheet in Ostendo
For this part of the Tutorial we need to Create a new job in Ostendo and Assign it to "Jack Jones", so that it becomes available to his device.
This part of this tutorial assumes you already have an understanding of how to create a job within Ostendo, therefore we will only focus on assigning the job to Jack Jones. The method of Job deployment to Freeway for this Tutorial is Mobility Team. Please follow the process as described below
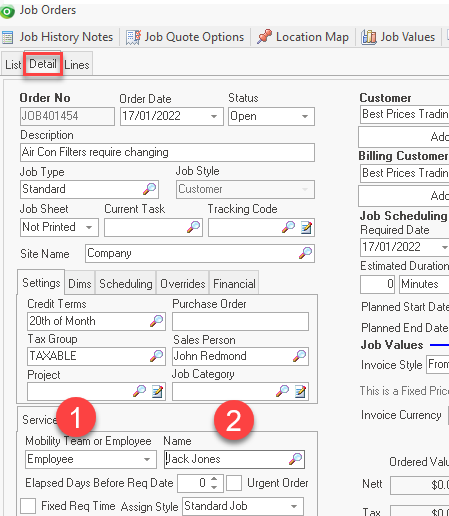
Ostendo - Job Setup
Jobs -> Job Orders
From the Job Details screen
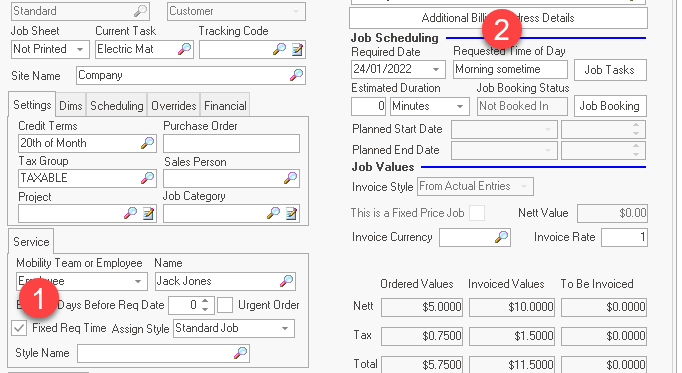
- On the Service tab, ensure "Employee" is selected in the "Mobility Team or Employee" field
- Browse and Select "Jack Jones" from the Employee lookup
Next time you access the Job Lookup from within Freeway, this job will be displayed.
From the Main Freeway screen, press the New button
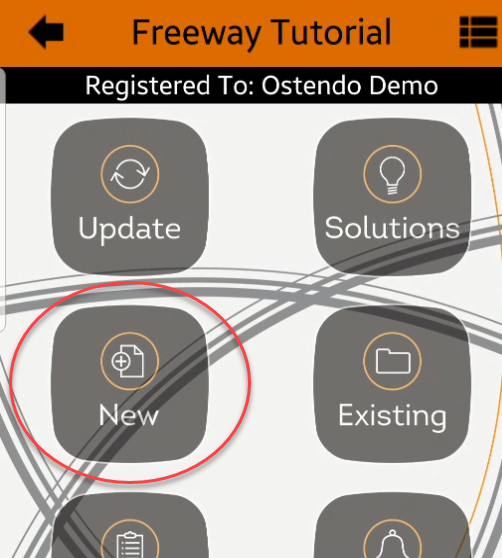
This will then display all the available lookups you have based on your Mobility Settings. (In this case only the Jobs Lookup)
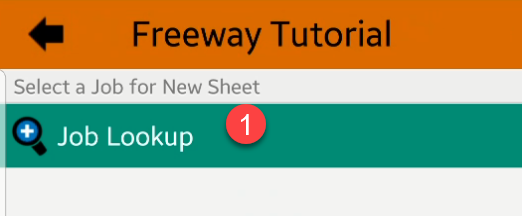
- Press the Job Lookup option
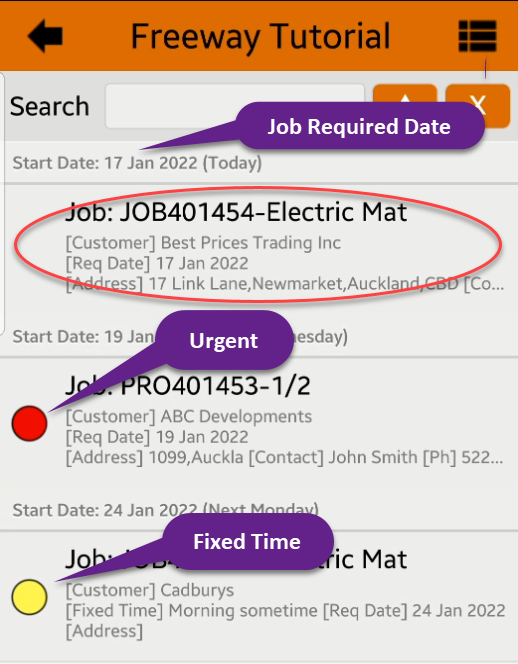
You will now be presented with a list of jobs that are assigned to you
The first job (JOB401454) is the one we just created with a Required Date of 17/1/22
The 2nd job (PRO401453) has been created with a Required Date of 19/1/22, however this job has been marked as Urgent.
The 3rd job (JOB401450) has been created with a Required date of 24/1/22 however this has been marked as Fixed Required Time.
These flags are there to assist the Freeway user to determine which jobs need to be dealt with most urgently on the day / time they are required.
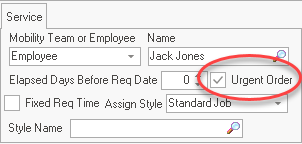
Marking a Job as Urgent
On the Job Detail tab in the Service tab, tick the "Urgent Order" box
Marking a Job as Fixed Required Time
- On the Job Detail tab in the Service tab, tick the "Fixed Req Time" box
- In the Requested Time of Day, type in when you wish the employee to visit eg: Morning, 10:00am Afternoon etc...
- Select JOB401454 to Create a New Datasheet for that Job
The Freeway Datasheet
By selecting the Job, Freeway will automatically generated a Datasheet unless an incomplete Datasheet already exists for that Job on the device. If one does exist you will be prompted to either use that or Create a new Datasheet.
 | It is recommended that you only have one Datasheet per Job open on the device at any point in time. |
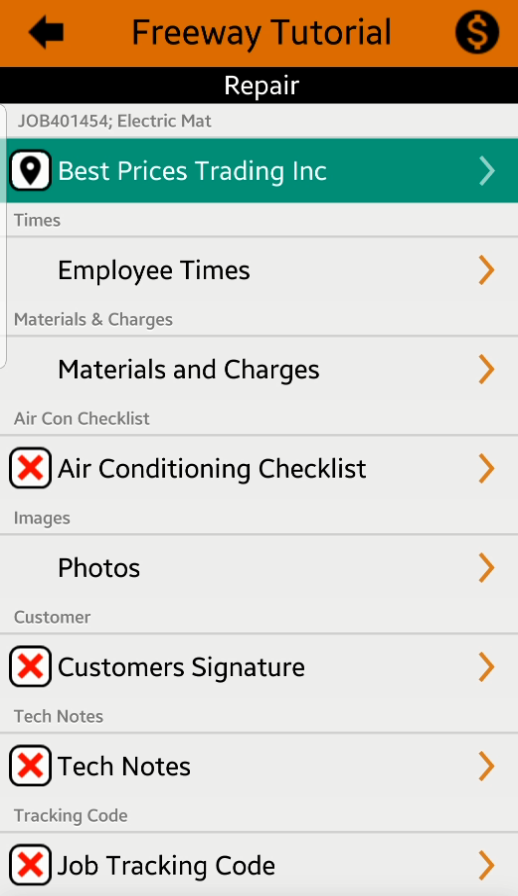
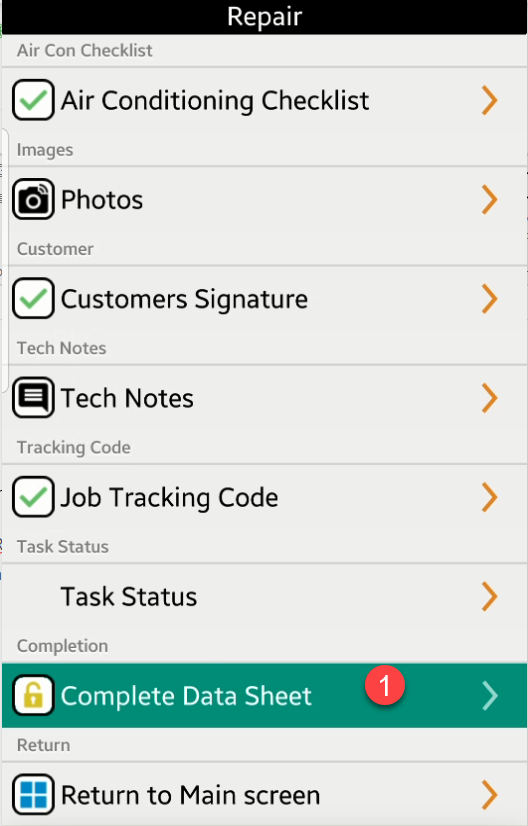
A number of things to note from this Main Datasheet screen
- The contents and the Sequence of the Datasheet come from the Style Template
- The 'X' indicates the option is Mandatory, therefore you will not be able to Complete and Send this Datasheet until those options are completed
- You will see further Datasheet options by scrolling down the Datasheet
- The first option always by default on a Datasheet is the
 icon. By selecting this option you can see more information about this job. eg: notes, PO Number, Phone Numbers (clicking on some of these values will allow you to make a call, send and email etc.)
Recording Information on the Datasheet
Scenario:
Let's imagine Jack has completed the work on the Air Con unit and now wishes to record the following information
- 3.5 hours of time
- 1 x AC-8026FILTER and 1 x 144-020 Switch
- He will also complete all remaining information required on the Datasheet
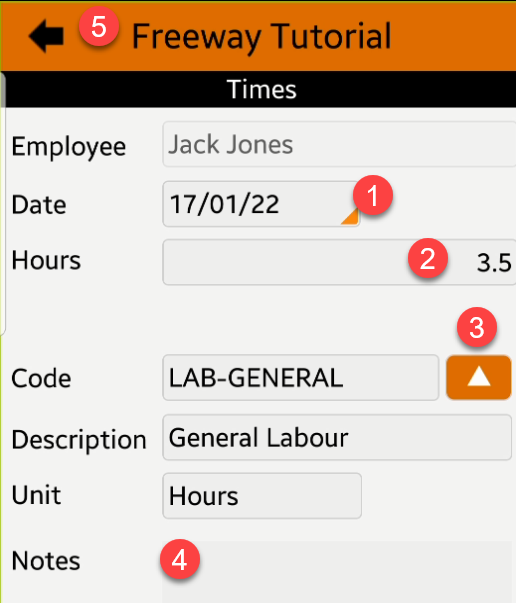
Time Entry
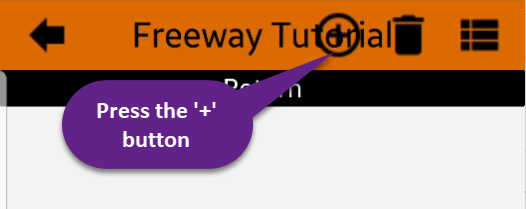
- Firstly select the "Employee Times" option from the Datasheet screen then select the '+' button on the Times screen. This will create a new Timesheet Entry
- Check the date is correct for the entry
- Type in the number of hours eg: 3.5
- Press the Up button to browse and select the applicable Labour Code for this entry
- Optionally enter some notes specific to this time entry otherwise leave blank as we will be entering detailed jobs notes later
- Finally, press the Go Back button twice to return to the Datasheet screen
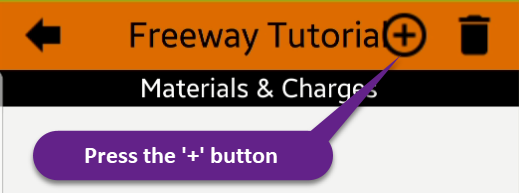
Materials & Charges:
This is where we record Inventory Items or Descriptors used on this job visit. Inventory Items will be issued directly from this Employees defined Warehouse / Location
Select "Materials and Charges" option from the Datasheet screen
- Press the '+' button on the Materials & Charges screen
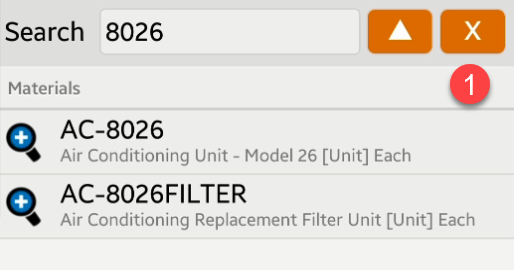
Search or select from this list. (you can type in part of an item or descriptors description or code and press the up button button to search)
In this example we have typed in 8026 to search for all references to that number. (NB: This item will not exist in your database, substitute another item here)
- Type in part of the code or description
- Press the Up button to initiate the search
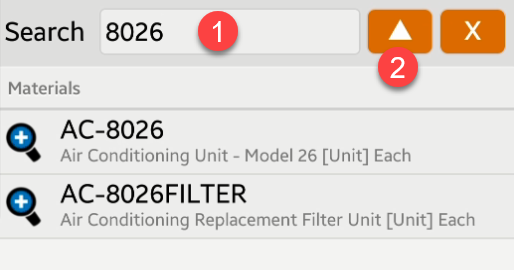
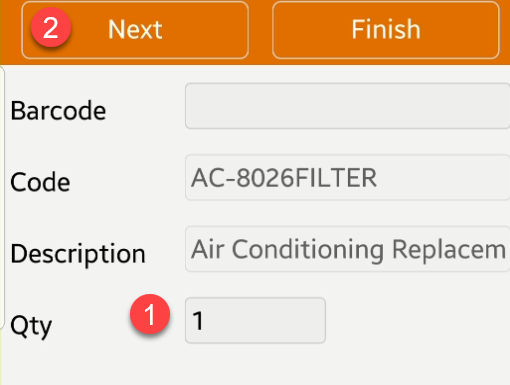
Select the appropriate item to record the Qty to be issued
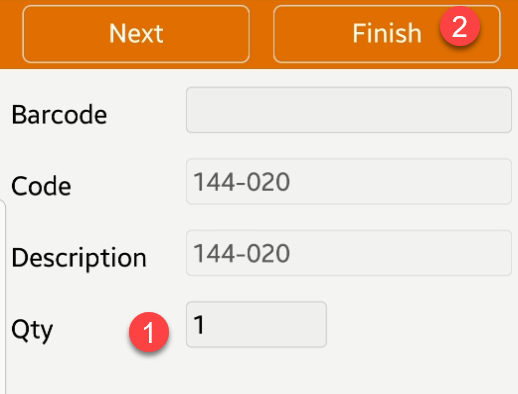
- Type in the Qty to issue of this item
- Press "Next" to continue
Let's now select our next item to issue
Your screen should now look as follows with the results from the previous search.
- Simply press the 'X' button to clear the search and repeat the search process for the next item '144-020'
- Type in all or part of the item you wish to search for
- Press the Up button to initiate the search
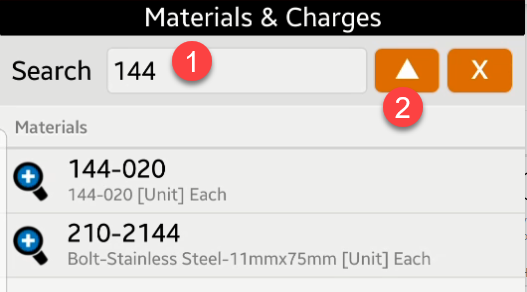
Select the appropriate item to record the Qty to be issued
- Type in the Qty to issue of this item
- Press "Finish" to return to the Issued Materials Screen
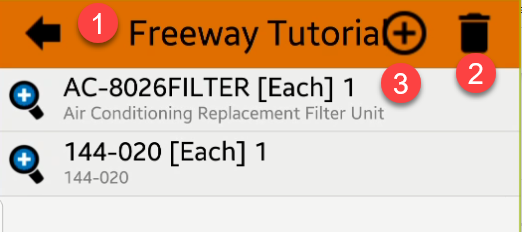
- Press the Go Back button to return to the Main Datasheet screen or
- Press the Delete button to delete Materials you have selected in error or
- Press the '+' button to add further items
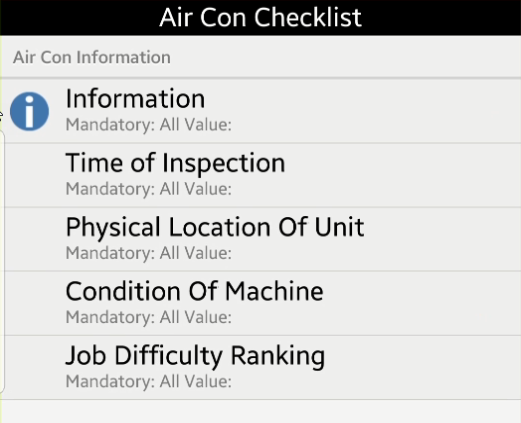
Completing the Checklist
From the Main Datasheet Screen, select the 'Air Conditioning Checklist' option
Simply work through these checklist entries and answer them accordingly. Notice the option at the top of the checklist. This option is for information only. When you have completed entering all the information, press the Go Back button at the Top Left of the screen to return to the Main Datasheet screen
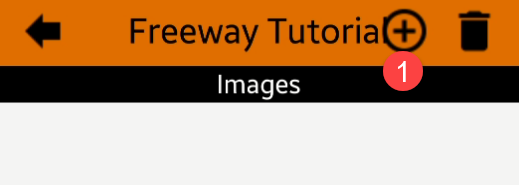
Photos
Select the 'Photos' option from the Datasheet
- Press the '+' button to add an Image
- Optionally type in a Description and Date for this image
- Press "Take Picture" to initiate your Camera or
- Press the Gallery button to allow you to select a photo from your Gallery
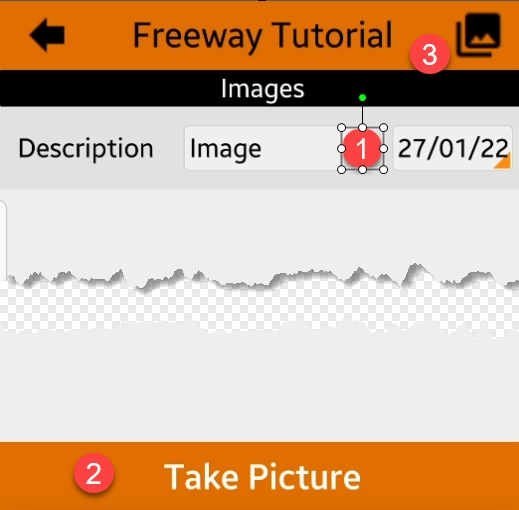
After pressing the Go Back button either continue recording more photos or press the Go Back button again to return to the main Datasheet screen.
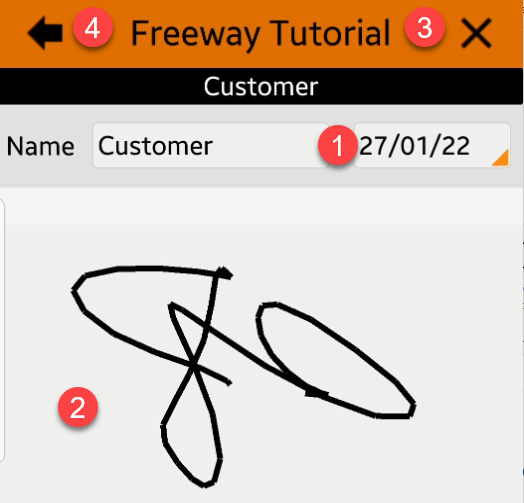
Signatures
Select the Customers Signature option from the Datasheet
- Optionally type in a Name and/or date
- Using either a finger or stylus, to sign on the screen directly
- Press the 'X' button to clear the signature if you wish to re-do the signature
- Press the Go Back button once complete to return to the main Datasheet screen
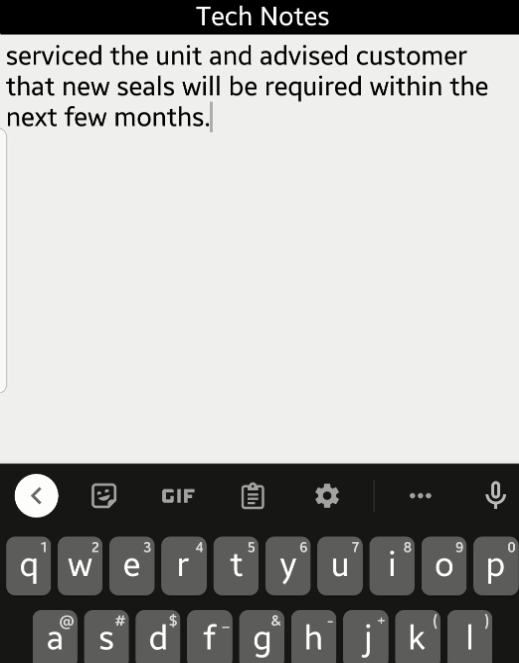
Recording Notes
Select the Tech Notes option from the Datasheet
Type any relevant notes and press the Go Back button to return to the main Datasheet screen
Job Tracking Code
Select the Job Tracking Code option and select the appropriate Tracking Code.
|
|
Assuming you have a live internet connection, this Tracking Code automatically updates the WorkFlow Status of the Job Header and/or Job Task (depending upon your Mobility Rules) back in Ostendo. Irrespective of the rule however, if only one Task exists on the job, then both Task and Job Header Workflow Status will be updated |
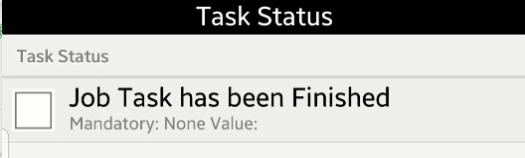
Task Status
Select this option 'Only' if you have finished all work for this Job Task.

|
This option is only relevant when the Mobility user is deployed work from other than the Assignment Board. You would not have this option on the Style Template if work was being deployed via the Assignment Board If only one Task exists on the job, then both Task and Job Header Status will be updated |
This option is used to prevent the Job Task from being made available to Freeway in the future. (In essence, this flag simply amends the Job Task Status to 'Finished' in Ostendo, therefore amending this task in Ostendo in the future will allow you to re-deploy the Task if it has been subsequently flagged as Completed')
Tick this box if you do not wish to make this Task available in future to Freeway
Completing The Datasheet
- Select the option to Complete the Datasheet
Answering 'Yes' will Complete and Send the Datasheet back to Ostendo. The Completed Datasheet can remain on the device (based upon the Employee Mobility Settings) however you will not be able to make subsequent changes to it. The configuration of this employee (Jack Jones) in the Tutorial means that the Datasheet will be sent back to Ostendo once it it is Completed. Answering 'No' will allow you to cancel this process and continue with the Datasheet.
|
|
It should be noted, that if a Datasheet has been Completed and attempted to be sent back, then fails due to a bad internet connection, the Completed Datasheet will remain on the device and will only be sent when the Mobility User performs a Standard or Re-initialize synchronisation. |
The Datasheet & Job In Ostendo
Now the Datasheet has returned to Ostendo, the following has occurred..
- The Completed Datasheet is now available to be viewed in Ostendo from the Job screen Related button (Datasheets) (refer below)
- All Materials will now be issued to the Job and priced based on the Customer / Product pricing rules
- The Job and/or Task Status is updated to 'Finished' if the Task Status was flagged accordingly on the Datasheet
- An 'InProgress' Timesheet Batch has either been created or added to with the Time recorded in the Datasheet from Freeway. Once this batch is posted, that time will be posted to the Job.
Example of Datasheet in Ostendo

This concludes the "Getting Started Tutorial - Jobs"